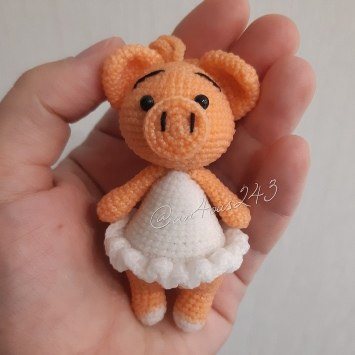
Мастер-класс Анны Сусиной по вязанию поросенка амигуруми в платьице крючком. Для создания милой хрюшки в платьице можно использовать хлопковую или полухлопковую пряжу и крючок подходящего размера.
Instagram: @an4ous243
Мастер-класс свинка амигуруми в платье крючком
Условные обозначения:
КА — кольцо амигуруми
вп — воздушная петля
сбн — столбик без накида
сс — соединительный столбик
пр — 2 сбн в один сбн
уб — 2 сбн провязать вместе
НОГИ (2 детали)
1. 6 сбн в КА
2. пр х 6 раз (12)
3-7. 12 сбн
8. 12 сбн
Нить закрепить и отрезать.
После того, как связали вторую ноги, нить не обрываем, а соединяем ноги: набираем 2 вп, присоединяем с помощью соединительного столбика.
ТЕЛО
9. 2 вп, 11 сбн, 1 пр, 2 пр по воздушным петлям, 1 пр, 10 сбн, 1 пр, 2 пр по воздушным петлям, 1 пр (последняя прибавка в 1 петлю предыдущего ряда) (36)
10. Ставим маркер (5 сбн, пр) х 6 раз (42)
11. 42 сбн
12. Здесь нужно сделать прибавки, как бы по краям попы) и на животе 3 сбн, 2 пр, 6 сбн, пр, (2сбн, пр) х 3 раза, 6 сбн, 2 пр, 13 сбн (50)
13 — 15. 50 сбн
Теперь убавками формируем попу порсенку:
16. 40 сбн (2 уб, сбн) х 2 раза (46)
17. 41 сбн, уб, ХВОСТ (6-8 вп, обратно по цепочке, начиная со 2 петли от крючка, по 3 сбн в каждую вп), уб, 1 сбн (44)
18. Провязываем до хвоста 40 сбн, делаем 2 убавки, 1 убавку до хвостика, 1 убавку — после. При необходимости хвост можно сдвинуть вперёд или назад, чтобы складка у попы не уходила вбок (42)
Вот так формируется складочка попы. И начало ряда сдвинулось прямо над хвостиком.
Меняем цвет пряжи на белый:
19. (5 сбн, уб) х 6 раз (36)
20. 36 сбн за заднюю стенку петли
21. 36 сбн
22. (уб, 4 сбн) х 6 раз (30)
23-24. 30 сбн
25. (3 сбн, уб) х 6 раз (24)
26-28. 24 сбн
29. (уб, 2 сбн) х 6 раз (18)
30. 18 сбн
31. (1 сбн, уб) х 6 раз (12)
РУКИ (2 детали)
1. 6 сбн в КА
2. пр х 6 раз (12)
3-5. 12 сбн
6. 1 уб, 10 сбн (11)
7. 1 уб, 9 сбн (10)
8. 1 уб, 8 сбн (9)
9. 1 уб, 7 сбн (8)
10-14. 8 сбн
ГОЛОВА
1. 6 сбн в КА
2. пр х 6 раз (12)
3. (1 сбн, пр) х 6 раз (18)
4. (пр, 2 сбн) х 6 раз (24)
5. (3 сбн, пр) х 6 раз (30)
6. 30 сбн
7. 2 сбн, пр (4 сбн, пр) х 5 раз, 2 сбн (36)
8. (5 сбн, пр) х 6 раз (42)
9-10. 42 сбн
11. 5 сбн, пр (6 сбн, пр) х 5 раз, 1 сбн (48)
12. 3 сбн, пр, (7 сбн, пр) х 5 раз, 4 сбн (54)
13-15. 54 сбн
16. (7 сбн, уб) х 6 раз (48)
17. (уб, 6 сбн) х 6 раз (42)
18. 3 сбн, уб (5 сбн, уб) х 5 раз, 2 сбн (36)
19. (уб, 4 сбн) х 6 раз (30)
20. (3 сбн, уб) х 6 раз (24)
21. (уб, 2 сбн) х 6 раз (18)
22. (1 сбн, уб) х 6 раз (12)
Нить закрепить, оставить кончик для пришивания.
ПЯТАЧОК
1. 6 сбн в КА
2. пр х 6 раз (12)
3. (1 сбн, пр) х 6 раз (18)
4. (пр, 2 сбн) х 6 раз (24)
5. 24 сбн за заднюю полупетлю
6. (2 сбн, уб) х 6 раз (18)
Нить закрепить и оставить немного для пришивания.
УШКИ (2 детали)
1. 6 сбн в КА
2. (1 сбн, пр) х 3 раза (9)
3. (пр, 2 сбн) х 3 раза (12)
4. (3 сбн, пр) х 3 раза (15)
5. 2 сбн, пр (4 сбн, пр) х 2 раза, 2 сбн (18)
6. (5 сбн, пр) х 3 раза (21)
7. (пр, 6 сбн) х 3 раза (24)
8. 4 сбн, пр (7 сбн, пр) х 2 раза, 3 сбн (27)
9. 1 сбн, 6 уб, 1 сбн, сложить пополам и провязать вместе ~ 10 сбн.
Сложить необходимо так, чтобы убавки в середине ушка, сформировав углубления.
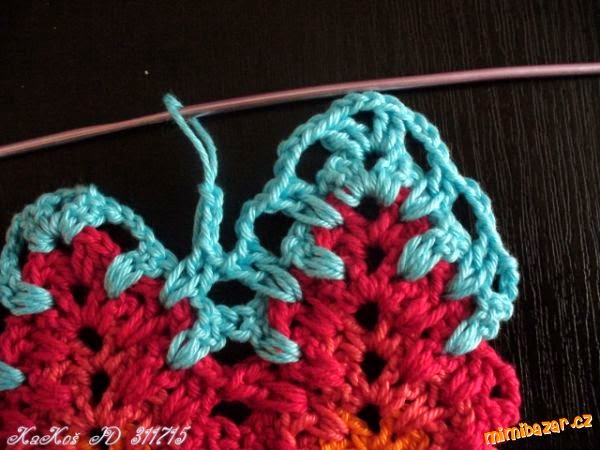
ЮБОЧКА
Возвращаемся к 20-ому ряду тела и вяжем за передние стенки в каждую петля 2 или 3 столбика с накидом. Если будете вязать 3 сбн, юбочка будет, как на фото, если 2 — будет менее пышная.
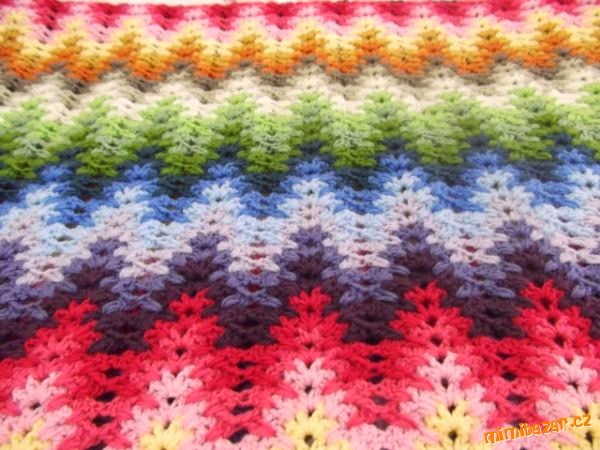
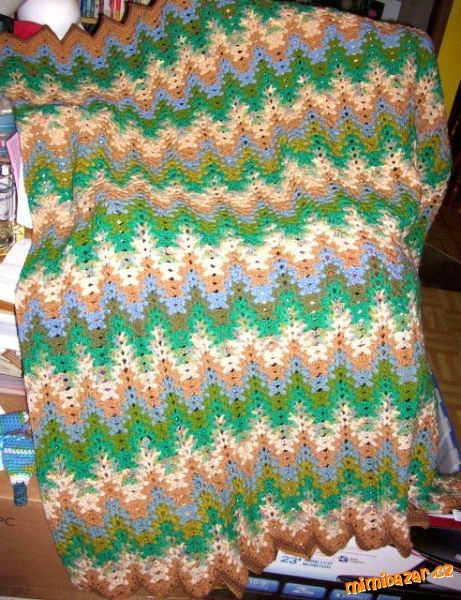
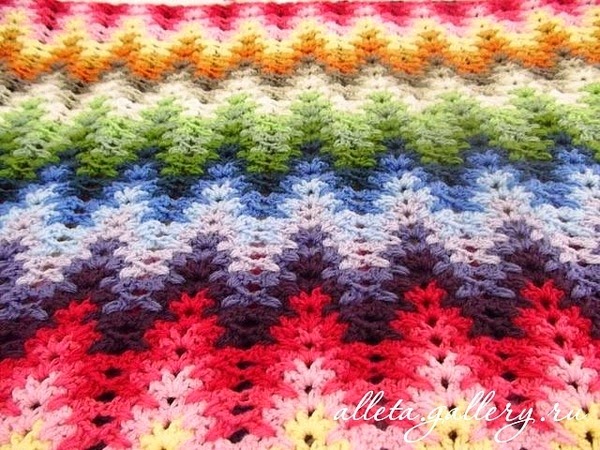
Очень практичное вязание, получаются плотные изделия и уходят все остатки пряжи. Подходит, прежде всего, для вязания пледов, шарфов, но не только.
Фотографии были собраны в разное время, в разных местах. Что-то с Осинки, а остальное уже не вспомню.
А вот это уже с Осинки
Полотно получается плотным, нужно к тонким ниткам крючек брать потолще.
Самое главное забыла отметить, чтоб получался такой эффект, нужно узор провязывать одним цветом ДВА ряда, по другому - совсем другой вид получается.
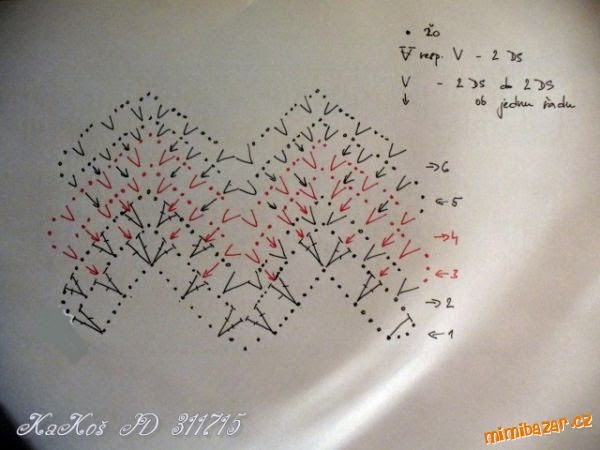
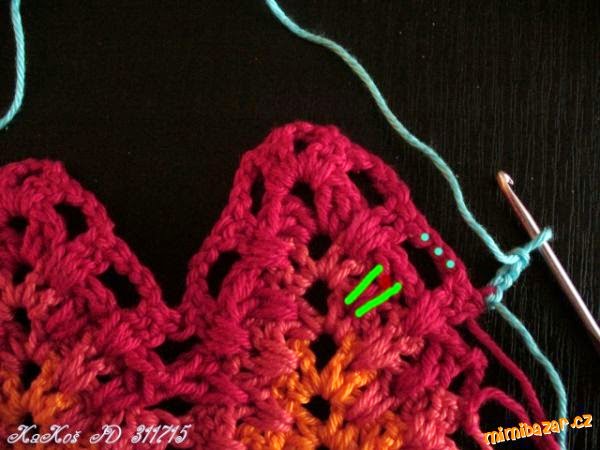
Lyudmila, у меня вопрос.То, что я отдельно вырисовала сверху, это разветвленный столбик или это каждый столбик надо ввязывать на ряд ниже?
Сорри, вопрос снимается. На увеличенном фото узрела, что это каждый столбик отдельно вяжется.
pin380 - Советую брать крючок потоньше,т.к. полотно получается очень толстое из-за введения крючка в предыдущий ряд.
Lyudmila - чтоб получался такой эффект, нужно узор провязывать одним цветом ДВА ряда, по другому - совсем другой вид получается. ... То есть , если вязать не по кругу , 1й лицевой и 2й изнаночный -один цвет, 3й лицевой и 4й изнаночный - другой цвет и т. д
Lyudmila - Полотно получается плотным, нужно к тонким ниткам крючок брать потолще.
AFGHAN ST: Ch for desired length, pick up and pull loop through each st of ch leaving all loops on hook, work back by drawing yarn through first loop, * yarn over hook and draw through 2 loops, repeat from * to end of row.
2nd Row. Same as 1st row picking up the vertical yarn instead of ch, then work back in same manner.
Repeat 2nd row for length desired.
AFGHAN STRIP: With Gray and Size G hook, ch 56 and work 55 afghan sts on ch. Work 215 more rows of afghan sts, then work 1 row of sl sts picking up the vertical yarn same as in afghan st.
With No. 6 hook work a row of s c on each long side.
Work 3 more strips in same manner.
Embroider all 4 strips according to diagram repeating pattern between arrows 3 times, then work remainder of chart. Continue working border pattern for entire length on both sides of strips having patterns 5 rows apart. Sew strips together as illustrated.
Using No. 6 hook, attach Gray yarn in corner st and working across short end, ch 4, skip 1 st, s d c in next st, (s d c: yarn over hook, insert in stitch, pull through, yarn over and pull through all loops at one time), * ch 1, skip 1 st, s d c in next st, repeat from * across row, cut yarn.
FRINGE: With Gray, cut strands 14 inches long. Using 3 strands, double in half and pull through each ch 1 mesh, draw ends through loop, repeat across short end. Complete other short end in same manner.
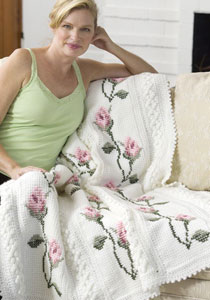
This free crochet pattern for a roses in bloom afghan was originally published around 1940 in Afghans Book 239.
Follow the easy step-by-step instructions of this vintage crochet patternto make this classic crochet afghan. There is absolutely no charge for personal use of this crocheted afghan pattern.
Crochet Afghan Pattern:
Roses in Bloom Afghan
REQUIRED MATERIALS
MATERIALS: CHADWICK'S RHD HEART KNITTING WORSTED
41 Balls (1 oz. Balls) of French Gold:
21 Balls of Leaf Green
4 Balls each of Florida Blue and Deep Rose
3 Balls of Mid Rose
2 Balls each of Wild Rose, Blue Jewel, and Oak Green
Bone Afghan Hook No. 6 (4 1/4 mm. size)
NOTE(s)
Approximately 50 x 70 inches (including fringe).
STEP-BY-STEP INSTRUCTIONS
Wide Strip (Make 5)
Starting at narrow end with Gold, ch 40 to measure 8 1/4 inches. Work inafghan stitch - 40 loops on hook - until piece measures 62 inches.
Narrow Strip (Make 6)
With Leaf Green, ch 9 and work 3 rows of afghan stitch.
4th row: Work in afghan stitch until there are 4 loops on hook; yarn over hook 3 times, insert hook in 2nd vertical bar 3 rows down and draw a loop through, (yarn over and draw through 2 loops) 3 times; yarn over hook 3 times, skip 5 bars 3 rows down and draw a loop through the next vertical bar, (yarn over and draw through 2 loops) 4 times - a herringbone stitch made - skip the st directly behind the herringbone st and draw a loop in each of next 4 vertical bars (9 loops on hook). Complete as for afghan stitch row.
5th row: Work in afghan stitch.
Repeat 4th and 5th rows alternately until strip measures 62 inches. Break off.
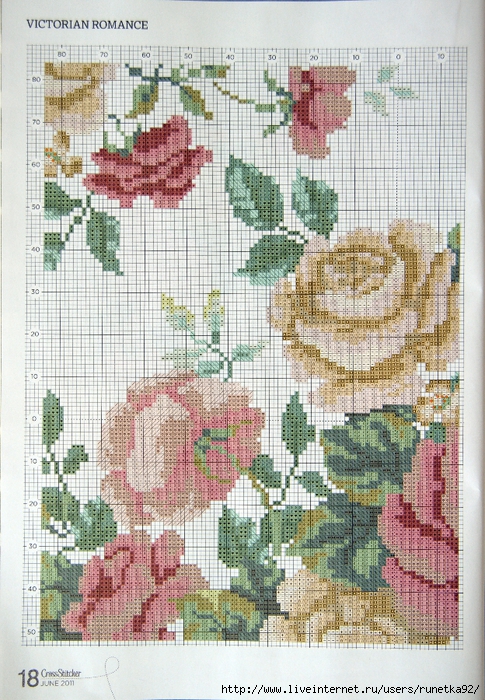
The Embroidery
Examine the diagram for making cross stitches over afghan stitch (see 'notes' section).
Embroider two complete designs according to the chart below, spacing them evenly apart.
Embroider 2 more Wide Strips in the same way.
Sew strips neatly together, alternating Narrow and Wide Strips, having an embroidered strip at each side and in center. Starting at one corner with Leaf Green, make a row of slip stitches around all sides. Join.
Now work along short side as follows: Sc in next 2 sl sts, * ch 2, skip 2 sts, sc in next 2 sts. Repeat from * across narrow end only. Break off.
Work other end to correspond.
Fringe
Cut 6 strands of Leaf Green, each 12 inches long. Double these strands to form a loop, insert hook in ch-2 sp and draw loop through, draw loose ends through loop and pull up tightly. Make a fringe in each ch-2 sp across each short side. Trim evenly.
This free crochet pattern for a roses in bloom afghan was originally published around 1940 in Afghans Book 239.
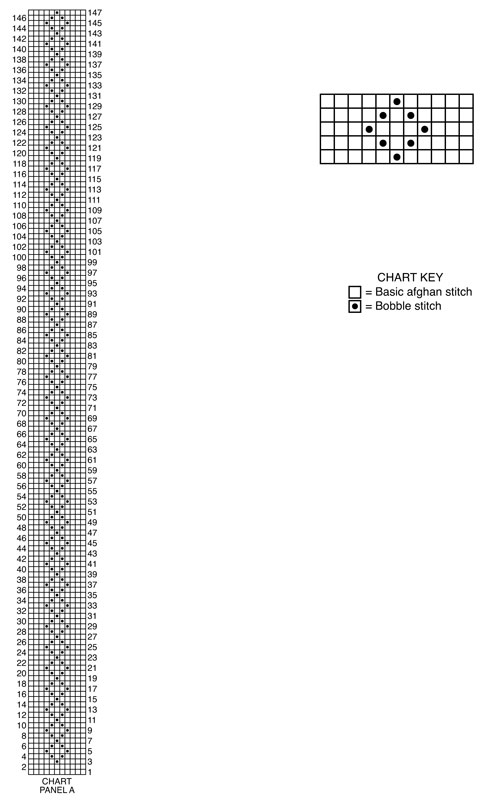
GAUGES: 8 sts = 2"; 7 rows = 2" in afghan stitch on Panel B; 11 sts = 3"; 8 rows = 3" in pattern on Panel A. CHECK YOUR GAUGE. Use any size hook to obtain the gauges.
Bobble Stitch
Insert hook in next vertical st, yo, pull yarn through st, keeping loop on hook, [yo, insert hook in same vertical st just worked, yo, pull yarn through st] 3 times, keeping all loops on hook, yo, pull yarn through all 7 loops on hook = 1 bobble st made.
PANEL A (Make 4)
With afghan crochet hook and Soft White, ch 11.
Row 1: Leaving all loops on hook, draw up a loop in 2nd ch from hook and in each ch across - 11 loops; yo and draw through 1 loop, ** yo and draw through 2 loops; repeat from ** across - 1 loop.
Row 2: Leaving all loops on hook, * insert hook under vertical bar and draw up a loop; repeat from * across - 11 loops; yo and draw through 1 loop, ** yo and draw through 2 loops; repeat from ** across - 1 loop.
Rows 3-147: Work in afghan st and bobbles following Stitch Guide for Panel A.
Row 148: Ch 1, skip first vertical bar, slip st in each vertical bar and bobble st across. Fasten off.
Panel A Border
With crochet hook, join Soft White in upper right corner.
Rnd 1: Ch 3, ** dc in each st across to next corner, ch 2, dc in next row end, * 2 dc in next row end, [dc in next row end] 4 times; repeat from * to last row end; 2 dc in last row end, ch 2; repeat from **; join with a slip st to top of ch-3 - 178 sts across each long edge between corner spaces.
Rnd 2: Ch 1, sc in same st as joining, * ch 1, skip next dc, sc in next dc; repeat from * to last dc before corner; ch 1, skip next dc, (sc, ch 2, 2 sc) all in corner ch-2 space, sc in next dc; repeat from * to next corner; (sc, ch 2, sc) all in corner ch-2 space **, sc in next dc; repeat from * around, end at **; join to first sc - 181 sts across each long edge between corner spaces. Fasten off.
PANEL B (Make 3)
With afghan crochet hook and Soft White, ch 25.
Row 1: Repeat Row 1 of Panel A.
Rows 2-180: Repeat Row 2 of Panel A.
Row 181: Ch 1, skip first vertical bar, slip st in each vertical bar across. Fasten off.
Panel B Border
With crochet hook, join Soft White in upper right corner.
Rnd 1: Ch 3, * dc in each st across to next corner, ch 2, dc in each row end down length to next corner, ch 2; repeat from * around; join to top of ch-3 - 181 sts across each long edge between corner spaces. Fasten off.
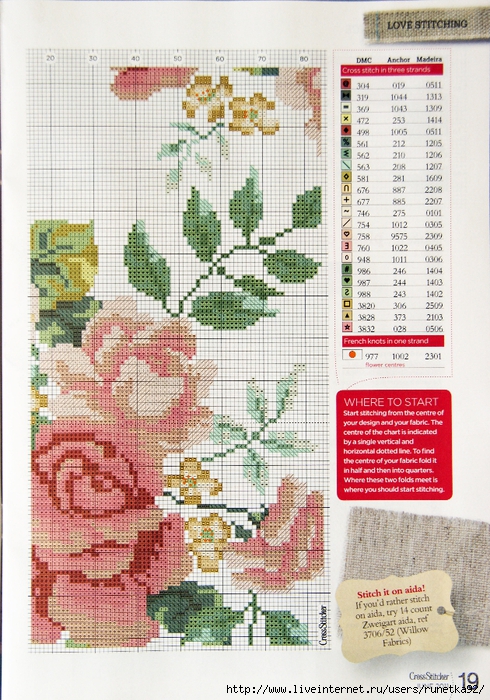
EMBROIDERY
Follow chart to cross stitch design onto each Panel B.
ASSEMBLY
With right sides facing and tops of 2 Panels aligned, with Soft White, slip st Panels together working in back loop of sts across long side, matching sts from corner to corner. Alternate Panel A and Panel B.
THROW BORDER
With right side facing and crochet hook, join Soft White in upper right hand corner sc.
Rnd 1: Ch 1, sc in each sc, dc and each ch-1 space around and work 3 sc in each corner ch-2 space; join to first sc.
Rnd 2: Ch 3, dc in next sc, (ch 3, slip st) in top of dc just made, * dc in next 2 sc, (ch 3, slip st) in top of last dc made; repeat from * to last sc; dc in last sc; join. Fasten off. Weave in ends.
ABBREVIATIONS: ch = chain; dc = double crochet; mm = millimeters; rnd = round; sc = single crochet; st(s) = stitch(es); yo = yarn over; * or ** = repeat whatever follows the * or ** as indicated;


 /hiamigurumi.ru/wp-content/uploads/2018/09/porosenok-amigurumi-150x150.jpg" target="_blank">https://hiamigurumi.ru/wp-content/uploads/2018/09/porosenok-amigurumi-150x150.jpg 150w,