-Поиск по дневнику

Поиск сообщений в yuli4ka8sep

 -Подписка по e-mail


 -Сообщества

 -Статистика

Статистика LiveInternet.ru: показано количество хитов и посетителей
Создан: 24.04.2015
Записей: 12848
Комментариев: 60
Написано: 12919


Без заголовка

Воскресенье, 20 Августа 2017 г. 22:15 + в цитатник

arctic circle snowflake

https://snowflakepatterns.wordpress.com/arctic-circle-snowflake/

Page

IMAG1070IMAG1230

Make magic ring.

Round 1: *1 sc in ring, ch 5, 1 dtr in ring, ch 5, 1 sc in ring*. Repeat from * to * 5 more times. Pull magic ring tight, end with sl st in first sc.

Round 2: *3 sc in ch 5 space, ch 6, 1 dc in 3rd ch from hook. 1 dc in dtr, ch 3, 1 dc in 3rd ch from hook, ch 3. 3 sc in ch 5 space, sl st in sc*. Repeat from * to * around.

Round 3: Sl st into ch 3 space, *3 sc. Ch 6, 2 dc in 3rd ch from hook, 1 tr in dc below. Ch 10, 1 hdc in 7th ch from hook. In next 3 ch: 1 dc, 1 tr, 1 dtr. 1 tr in same dc below, ch 3, 2 dc in 3rd ch from hook. Ch 3, 3 sc in ch 3 space, sl st in sc from round 2. Ch 6, sl st in 3rd ch from hook, ch 3, skip 4 sc, sl st in next sc*. Repeat from * to * around.

Bind off, weave in ends.

Рубрики:  интересные ссылки
вязание крючком
куклы и игрушки

Без заголовка

Воскресенье, 20 Августа 2017 г. 22:13 + в цитатник

Patrón de copo de nieve a ganchillo

27 de diciembre de 2013

http://www.lanukas.com/2013/12/patron-de-copo-de-nieve-ganchillo.html

 
¿Recordáis este copo de nieve que hice a ganchillo para la felicitación navideña del Mini Swap de Wasel Wasel?
 
Pues hoy os traigo el patrón del copo de nieve y os explico cómo hacerlo para dejarlo más tieso que la mojama! Aquí tenéis el patrón en español and here the English pattern.
 
 
Inicialmente utilicé este patrón de Craft Passion, pero se me hacía muy pesado de seguir y decidí crear uno más sencillo y rápido de hacer.


Una vez tejido, debemos darle apresto y que quede bien tieso. Muy fácil: con almidón. Yo utilicé el almidón líquido que venden en Mercadona. Tengo que reconocer que hace una olorcita súper buena a limpio.
 
Puede que tengas dificultades para encontrar almidón, es una cosa que antaño se utilizaba bastante pero ahora está en desuso, por eso hay personas que también utilizan azúcar o maicena (almidón de maíz), aunque en ese sentido no os puedo dar mi opinión porque nunca lo he probado.

 
Sumergimos nuestro copo de nieve en la mezcla unos 5 minutos, y pasado este tiempo lo escurrimos bien.
 
El siguiente paso es colocar el tejido en una plancha de porexpan o corcho, estirar las puntas del copo de nieve y sujetarlas mediante alfileres. Aseguraos bien que las puntas opuestas os quedan rectas y lo dejamos secar.
 
Puedes repetir este proceso un par de veces para darle más rigidez.

 
Y ya tienes listos tus copos de nieve! Los puedes usar como decoración en tu árbol de Navidad, hacer una guirnalda o añadirlo como aplique como hice yo en mi tarjeta navideña.


Si tienes cualquier duda, o detectas cualquier error, puedes escribirme un correo a hola@lanukas.com o dejarme un comentario más abajo.


Here you have the crochet snowflake in English. Happy crocheting!

Рубрики:  интересные ссылки
вязание крючком
куклы и игрушки

Без заголовка

Воскресенье, 20 Августа 2017 г. 22:07 + в цитатник

Colorful Crochet Snowflake Pattern

http://www.thepurpleponcho.com/colorful-crochet-snowflake-pattern/

avatar

purple-and-white-crochet-snowflake-pattern-by-the-purple-poncho


One of my favorite things to make at Christmas are crocheted snowflakes. I’ve made these a little different this year by adding bright, fun colors to them. They make great gifts and are also nice to stuff inside a Christmas card for an extra surprise for the recipient. They are fun to decorate with too. Here we go…

This post contains affliliate links.


Colorful Crochet Snowflake

Supplies:
Aunt Lydia’s Crochet Cotton Thread #10
Color A – Purple (10 yds); Color B – White (5 yds)
Steel Hook – Size 2.10 mm US 3
Stiffening solution
Glitter
Wax Paper

Abbreviations: In US Terms
ch – chain
dc – double crochet
sc – single crochet
sl st – slip stitch 
tr – treble crochet  

Special Stitch:
picot – ch 3, sl stitch in 3rd chain from hook

Notes:
1. Chains at beginning of Row count as a stitch
2. Add new color on the last yo on the last stitch of the indicated Row.

Instructions:
With Color A, make a magic circle OR ch 6, sl st to beginning ch to form a ring.

Round 1: ch 2, counts as 1 sc, 11 sc in loop, ending with adding Color B, sl st into top of beginning ch 2. (12 sc).

Round 2:  ch 3, *skip 1 stitch, sc in next stitch, ch 2*, repeat *-* around, ending with sl st into 2nd ch of beginning ch 3. (6 loops).

Round 3: ch 3, 1 dc, ch 1, 2 dc in same space, picot, *2 dc, ch 1, 2 dc in next space, picot*, repeat *-* around, ending with sl st into top ch of beginning ch 3. (6 picots, 6 shells).

Round 4: sl st into next 2 stitches to reach center of shell space. Ch 3, 1 dc, ch 1, 2 dc in same ch 1 space, ch 3, *2 dc, ch 1, 2 dc, in center of next shell, ch 3*, repeat *-* around, ending with adding Color A, sl st into top ch of beginning ch 3. (6 ch 3 spaces, 6 shells).

Round 5:  sl st into next 2 stitches to reach center of shell. Ch 3, 1 dc, ch 1, 2 dc, in center of shell, ch 3, sc in loop, picot, 1 sc in same loop, ch 3, *2 dc, ch 1, 2 dc in center of next shell, ch 3, 1 sc in loop, picot, 1 sc in same loop, ch 3*, repeat *-* around, ending with sl st into top ch of beginning ch 3. (6 picots, 6 shells).

Round 6: sl st into next 2 stitches to reach center of shell. Ch 4, 1 tr, picot, 2 tr in same space, ch 4, sc in ch 3 loop, ch 4, sc in next ch 3 loop, ch 4, *2 tr, picot, 2 tr, in center of next shell, ch 4, sc in ch 3 loop, ch 4, sc in next ch 3 loop, ch 4*, repeat *-* around, ending with sl st into top ch of beginning ch 4. End off, weave in ends.

Finishing:
Saturate your snow flake in stiffening solution. Lay flat on wax paper and shape as desired. Sprinkle with glitter for added sparkle. Let dry thoroughly. May need to reapply stiffening solution more than one time. End of pattern.


The color possibilities are endless. Here are a few of the ones I made with white thread for Rounds 2-4, along with a pop of bright color for Rounds 1, 5, 6.

Crochet work in progress using white and red thread.

wip-red-snowflake-crochet-pattern-by-the-purple-poncho

Red and white snowflake with lots of glitter added.

red-and-white-snowflake-crochet-pattern-by-the-purple-poncho

Turquoise and white snowflake…

turquoise-and-white-snowflake-crochet-pattern-by-the-purple-poncho

white-and-turquoise-crochet-snowflake-by-the-purple-poncho

Pink and white snowflake…

pink-and-white-snowflake-crochet-pattern-by-the-purple-poncho


white-and-pink-snowflake-crochet-pattern-by-the-purple-poncho

Using off white thread for Rounds 2-4.

Pink and off white work in progress.

wip-pink-snowflake-crochet-pattern-by-the-purple-poncho

Pink and green snowflakes with off white thread…

pink-and-green-snowflake-crochet-pattern-by-the-purple-poncho

colorful-snowflake-crochet-pattern-by-the-purple-poncho

Purple and white snowflake…

Рубрики:  интересные ссылки
вязание крючком
куклы и игрушки

Снежинка

Воскресенье, 20 Августа 2017 г. 22:04 + в цитатник

Crochet Snowflake

http://www.thepurpleponcho.com/crochet-snowflake/

avatar

christmas-crochet-snowflake-pattern-by-the-purple-poncho

For years, I’ve made crocheted snowflakes, I just love them. They make great gifts and are also nice to stuff inside a Christmas card for an extra surprise for the recipient. They are fun to decorate with too, I love them on my tree and dining room table every year.

This post contains affliliate links.


Crochet Snowflake

Supplies:
1 Crochet Cotton Thread #3
Hook – Size 1.7 mm US 5
Stiffening solution
Glitter
Wax Paper

Abbreviations:
sl st – slip stitch; ch – chain; sc – single crochet; dc – double crochet; tr – treble crochet;  picot – ch 3, sl stitch in 3rd chain from hook

Instructions:
Make a magic circle OR ch 6, sl st to beg ch to form a ring.

Round 1: ch 2, counts as 1st sc, 11 sc in loop, sl st to beg ch. (12 sc).

Round 2: *ch 2, sk 1 stitch, sc in next stitch*, repeat *-* 5 times, sl st into 2nd ch space of beginning ch 2. (6 loops).

Round 3: ch 3, 1 dc, ch 1, 2 dc in same space, picot, *2 dc, ch 1, 2 dc in next space, picot*, repeat *-* 5 times. Sl st into 3rd ch of beginning ch 3. (6 picots, 6 shells).

Round 4: sl st into next 2 stitches to reach center of shell. Ch 3, 1 dc, ch 1, 2 dc in same stitch, ch 3, *2 dc, ch 1, 2 dc, in center of next shell, ch 3*, repeat *-* 5 times. Sl st into 3rd ch of beginning ch 3. (6 ch 3 spaces, 6 shells).

Round 5: sl st into next 2 stitches to reach center of shell. Ch 3, 1 dc, ch 1, 2 dc, in center of shell, ch 3, sc in loop, picot, 1 sc in same loop, ch 3, *2 dc, ch 1, 2 dc in center of next shell, ch 3, 1 sc in loop, picot, 1 sc in same loop, ch 3*, repeat *-* 5 times. Sl st into 3rd ch of beginning ch 3. (6 picots, 6 shells).

Round 6: sl st into next 2 stitches to reach center of shell. Ch 4, 1 tr, picot, 2 tr in same space, ch 4, sc in loop, ch 4, sc in next loop, ch 4, *2 tr, picot, 2 tr, in center of next shell, ch 4, sc in loop, ch 4, sc in next loop, ch 4*, repeat *-* 5 times. Sl st into 4th ch of beginning ch 4. End off, weave in ends.

Finishing:
Saturate your snow flake in stiffening solution. Lay flat on wax paper and shape as desired. Sprinkle with glitter for added sparkle. Let dry thoroughly.

Happy Crocheting!

Рубрики:  интересные ссылки
вязание крючком
куклы и игрушки

Шишки на елку крючком

Воскресенье, 20 Августа 2017 г. 21:52 + в цитатник


Рубрики:  интересные ссылки
вязание крючком
куклы и игрушки
видео

Снежинки и колокольчики

Воскресенье, 20 Августа 2017 г. 21:43 + в цитатник


Рубрики:  интересные ссылки
вязание крючком
куклы и игрушки
видео

Снежинки,шарики,колокольчики

Воскресенье, 20 Августа 2017 г. 21:36 + в цитатник


Рубрики:  интересные ссылки
вязание крючком
куклы и игрушки
видео

Как крахмалить снежинку

Воскресенье, 20 Августа 2017 г. 21:31 + в цитатник


Рубрики:  интересные ссылки
вязание крючком
куклы и игрушки
видео

Снежинки

Воскресенье, 20 Августа 2017 г. 21:28 + в цитатник


Рубрики:  интересные ссылки
вязание крючком
куклы и игрушки
видео

Снежинки ,гирлянды и мелочи

Воскресенье, 20 Августа 2017 г. 21:22 + в цитатник


Рубрики:  интересные ссылки
вязание крючком
куклы и игрушки
видео

Снежинки+

Воскресенье, 20 Августа 2017 г. 21:16 + в цитатник


Рубрики:  интересные ссылки
вязание крючком
куклы и игрушки
видео

Снежинки

Воскресенье, 20 Августа 2017 г. 20:36 + в цитатник


Рубрики:  интересные ссылки
вязание крючком
куклы и игрушки
видео

Снежинки

Воскресенье, 20 Августа 2017 г. 20:30 + в цитатник


Рубрики:  интересные ссылки
вязание крючком
куклы и игрушки
видео

Снежинки

Воскресенье, 20 Августа 2017 г. 20:25 + в цитатник


Рубрики:  интересные ссылки
вязание крючком
куклы и игрушки
видео

Снежинки

Воскресенье, 20 Августа 2017 г. 20:18 + в цитатник


Рубрики:  вязание крючком
куклы и игрушки
видео

Без заголовка

Воскресенье, 20 Августа 2017 г. 20:12 + в цитатник
 
Salve a tutti! Oggi vi spiego come realizzare dei fiocchi di neve all’uncinetto!
Se non volete inscriverli nel cerchio, finita la lavorazione del fiocco, vi basterà inamidarli!
 
Hi! I’m going to explain how to crochet snowflakes.
If you don’t want to inscribe them in the circle, just starch them!
 
 
Io ne farò decorazioni per l’albero, orecchini, acchiappasogni , decorazioni per finestre e…  tanto altro! E voi?
 
I’ll use them as Christmas ornaments, earrings, dreamcatcher, windows decorations and… a lot more!
And you?


Qui trovate il video degli orecchini!

Here you can find a videotutorial about snowflake earrings


Per il cerchio ho utilizzato il bordo di un bicchiere di plastica (diametro 7 cm).
 
My circle is the border of a plastic glass (diameter 7 cm) .


Ho usato un filato cablé n° 5 ed un uncinetto da 1,75 cm
 
I used thread cablé n° 5 and a 1,75mm hook 
 
 
SCHEMA ITALIANO
 
Giro 1: nel cerchio magico à5 cat, 1 mb (x6)
Giro 2: in ogni spazio à2 mb 3 cat, 2 mb
Giro 3: in ogni spazio da 3 cat à1 mb, 3 cat, 1 mb, 6 cat, 1mb, 3 cat 1 mb – 3 cat (per raggiungere l’archetto successivo)
 
ENGLISH PATTERN
 
Round 1: in the magic ring à5 ch, 1 sc (x6)
Round 2: in each space à2 sc, 3 ch, 2 sc
 
Round 3: in 3 chains space à1 sc, 3 ch, 1 sc, 6 ch, 1 sc, 3 ch, 1 sc – 3 ch (to reach next space)
 
E questo è il risultato finale! Che ve ne pare?
 
Рубрики:  вязание крючком
куклы и игрушки

Без заголовка

Воскресенье, 20 Августа 2017 г. 20:06 + в цитатник

Lace Crochet Christmas Ornaments … Free Pattern

https://www.petalstopicots.com/2014/12/lace-crochet-christmas-ornaments-free-pattern/

Print Friendly, PDF & Email

Free Crochet Christmas Ornament Patterns | <a href=/www.petalstopicots.com" target="_blank">www.petalstopicots.com | #crochet #lace #Christmas #ornaments" height="600" src="https://www.petalstopicots.com/wp-content/uploads/2014/12/11-30-14-2-2.jpg" title="Free Crochet Christmas Ornament Patterns | www.petalstopicots.com | #crochet #lace #Christmas #ornaments" width="600" />

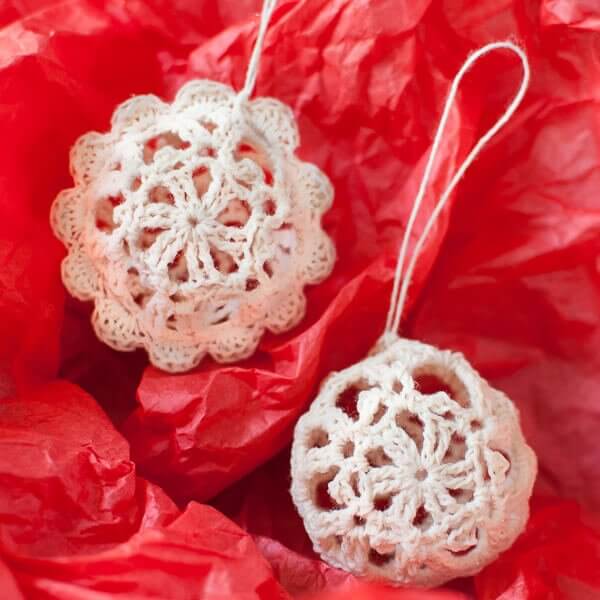
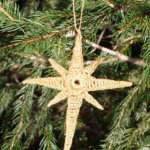
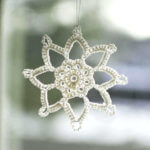
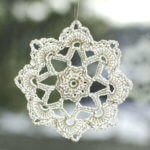
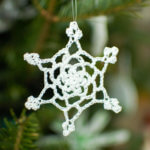
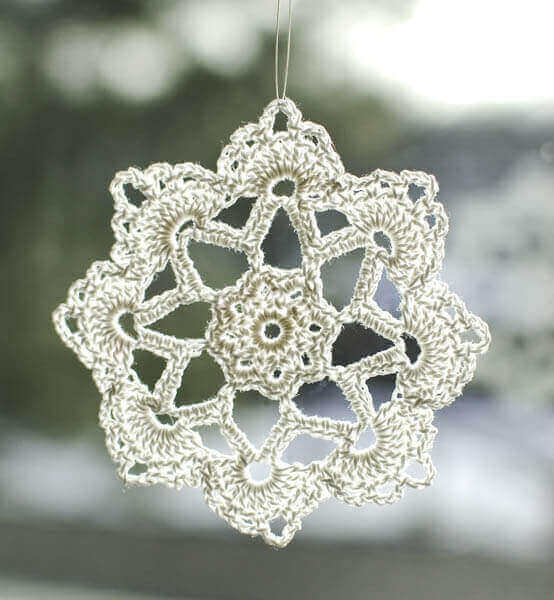
I love the look of lace crochet Christmas ornaments on my tree! I have pretty snowflakes (patterns can be found here, here, and here), glittery Stars of Bethlehem (pattern here), pretty lace crosses (pattern here), and many more lace ornaments that my grandmother made. This year I thought I would try some pretty little lace balls.

Lace Crochet Christmas Ornaments

Here’s what you’ll need:

  • Size 10 crochet thread
  • 2 mm steel hook
  • sewing needle and scissor
  • fabric stiffener
  • paint brush
  • small balloons

Click here to reference Crochet Abbreviations or here to reference Crochet Stitch Symbols.

Add this pattern to your Ravelry library.

Finished ornament measures approx 6 in. in circumference


Ch 5 (counts as ch 1 and 1st tr).

Round 1: Work 1 tr in furthest chain from hook, ch 3, *2 tr in same ch as last stitch was made, ch 3, rep from * 4 more times, join in top of beg ch — 12 tr sts.

Round 2: Sl st in next tr, *[1 sc, ch 4, 1 sc] in next ch-3 sp, ch 4, work 1 sc in 3rd ch from hook, ch 1, rep from * 5 more times, join in 1st sc — 12 ch-4 loops.

Round 3: Sl st in next ch-4 sp, ch 4 (counts as tr), [1 tr, ch 3, 2 tr] in same ch-4 sp, ch 3, *[2 tr, ch 3, 2 tr] in next ch-4 sp, ch 3, rep from * 4 more times, join in beg ch 4 — 12 ch-3 loops.

Round 4: Sl st in next tr, *[1 sc, ch 4, 1 sc] in next ch-3 sp, rep from * around, join — 12 ch-4 loops.

Fasten off and weave in ends.


You now have one half of your ornament …

If you want to make just a simple round ornament, make a second half following Rounds 1 through 3 above and then skip down to the Join As You Go Round 4 pattern below.

If you want to make the ornament with the scalloped edging, make a second half following Rows 1 through 4 about and then skip down to the Scalloped Edging Pattern below.


Join As You Go

Free Crochet Christmas Ornament Patterns | <a href=/www.petalstopicots.com" target="_blank">www.petalstopicots.com | #crochet #lace #Christmas #ornaments" height="300" src="https://www.petalstopicots.com/wp-content/uploads/2014/12/11-30-14-1-300x300.jpg" title="Free Crochet Christmas Ornament Patterns | www.petalstopicots.com | #crochet #lace #Christmas #ornaments" width="300" />

For a simple round ornament with no edging, work one piece as directed in Rounds 1 through 4 above. Make a second working Rounds 1 through 3 and follow this Round 4 for joining, making sure to keep wrong sides facing each other and stitches aligned as you join …

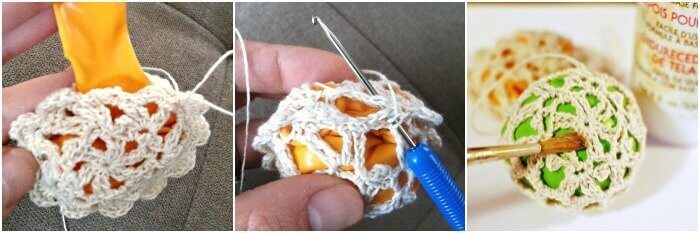
Round 4: Sl st in next tr, *[1 sc, ch 2, drop loop from hook and pick it up through ch 4 loop of first piece, ch 2, 1 sc] in next ch-3 sp, rep from * over next 10 ch-3 loops, insert the balloon in between piece and inflate just enough to form a sphere that fits comfortably inside your ornament, knot balloon, work last pattern repeat in remaining ch-3 loop, join — 12 ch-4 loops.

Free Crochet Christmas Ornament Patterns | <a href=/www.petalstopicots.com" target="_blank">www.petalstopicots.com | #crochet #lace #Christmas #ornaments" height="233" src="https://www.petalstopicots.com/wp-content/uploads/2014/12/PicMonkey-Collage2.jpg" title="Free Crochet Christmas Ornament Patterns | www.petalstopicots.com | #crochet #lace #Christmas #ornaments" width="700" />

Fasten off and weave in ends.


Scalloped Edging Pattern

Free Crochet Christmas Ornament Patterns | <a href=/www.petalstopicots.com" target="_blank">www.petalstopicots.com | #crochet #lace #Christmas #ornaments" height="300" src="https://www.petalstopicots.com/wp-content/uploads/2014/12/11-30-14-2-300x300.jpg" title="Free Crochet Christmas Ornament Patterns | www.petalstopicots.com | #crochet #lace #Christmas #ornaments" width="300" />

For an ornament with a pretty scalloped edging, make two pieces working Rows 1 through 4 above. Holding wrong sides together with stitches lined up, join pieces by working this scalloped border into ch-4 loops of each piece …

Round 5 Edging: Join crochet  thread in any ch-4 spaces, ch 1 (does not count as st), work [1 sc, 4 dc, 1 sc] in same ch-4 loop and each of the next 10 ch-3 loops, insert the balloon in between piece and inflate just enough to form a sphere that fits comfortably inside your ornament, knot balloon, work last pattern repeat in remaining ch-4 loop, join — 72 sts.

Fasten off and weave in ends.


Finishing

Using a length of crochet thread, add a loop to your ornament for hanging. Using a small paintbrush, apply a thin coat of fabric stiffener over the ornament. Hang until dry or as long as directed on the stiffening product. Once dry, pop the balloon and carefully pull it out. If desired, finish off with a coat of spray glitter (outside!).

Interested in making this project? You can also help support my blog by purchasing through the affiliate links below …

8 Responses to Lace Crochet Christmas Ornaments … Free Pattern

  1. Marilyn December 3, 2014 at 9:30 am #

    These ornaments are simply elegant!

  2. Sharlyn December 3, 2014 at 9:54 am #

    Beautiful! Thanks for sharing

  3. Becky Dirlam December 8, 2014 at 12:23 pm #

    These are so wonderful. I love the timeless elegance of them. Now to find a friend who can see to work the thread for me! Reply

  4. Carol Derbis December 13, 2014 at 1:37 pm #

    Thank you for these! they are beautiful! Have made one from another pattern – now will make a couple from this one…I have some plain ornaments that desperately need ‘dressing up’!

  5. Elizabeth Azuaje July 14, 2015 at 10:06 pm #

    Todo estas labores son bellas..amo el tejido admiro todo lo que tenga que ver…Dios bendiga los ojos las manos…de las personas que lo elaboran y el amor con que lo trabajan.muchas bendiciones. .

  6. Regina Potter December 13, 2016 at 2:31 pm #

    Thanks so much!!!

Trackbacks/Pingbacks

  1. Picks of the Week for December 12, 2014 at Hands Occupied - December 12, 2014

    […] & ivy perfect pouf knitting pattern -craft passion knit ball ornament -milk shed lace crochet ornaments -petals to […]

  2. 10 Fun & Festive Crochet Ornaments – The Crochet Cafe - November 17, 2015

    […] Lace Crochet Christmas Ornaments by Kara Gunza […]

Рубрики:  интересные ссылки
вязание крючком
куклы и игрушки

Без заголовка

Воскресенье, 20 Августа 2017 г. 19:57 + в цитатник

Pretty Picot Snowflake Pattern

https://www.petalstopicots.com/2013/01/pretty-picot-snowflake-pattern/

Print Friendly, PDF & Email
Pretty Picot Snowflake Pattern | <a href=/www.petalstopicots.com" target="_blank">www.petalstopicots.com | #crochet " height="542" src="https://www.petalstopicots.com/wp-content/uploads/2013/01/500-1-of-1.jpg" title="Pretty Picot Snowflake Pattern | www.petalstopicots.com | #crochet " width="543" />

Pretty Picot Snowflake Pattern

Here’s what you’ll need:

  • Size 10 crochet thread
  • 2 mm steel hook
  • Sewing needle, fabric stiffener

Click here to reference the Crochet Abbreviations Chart.


Add this pattern to your Ravelry library.

Special Stitches

Picot (p): Chain 3, work 1 single crochet in first chain made.

Triple picot (tr-p): Work 3 picots, slip stitch into base of first picot made.


Finished snowflake measures approx 4 in.


Ch 5 (counts as ch 1 and 1st tr).

Round 1: Work 1 tr in furthest chain from hook, ch 3, *2 tr in same ch as last stitch was made, ch 3, rep from * 4 more times, join in top of beg ch — 12 tr sts.

Round 2: Sl st in next tr, *[1 sc, ch 4, 1 sc] in next ch-3 sp, ch 1, p, ch 1, rep from * 5 more times, join in 1st sc — 12 ch-4 loops.

Round 3: Sl st in next ch-4 sp, ch 4 (counts as tr), [1 tr, ch 3, 2 tr] in same ch-4 sp, ch 3, *[2 tr, ch 3, 2 tr] in next ch-4 sp, ch 3, rep from * 4 more times, join in beg ch 4 — 12 ch-3 loops.

Round 4: Sl st in next tr, *[2 sc, p, 2 sc] in next ch-3 sp, ch 7, skip next ch-3 sp, rep from * 5 more times, join in 1st sc — 6 ch-8 sp.

Round 5: *Ch 3, p, ch 3, [1 sc, 1 hdc, 2 dc, 1 tr, tr-p, 1 tr, 2 dc, 1 hdc, 1 sc] in next ch-7 sp, rep from * 5 more times, Sl st around beg ch 3 — 12 p points.

Fasten off and weave in ends.


Finishing

Wrap a flat piece of Styrofoam or thick cardboard with wax paper and tape to secure. Using straight pins, pin the snowflakes right side down onto the Styrofoam/cardboard, making sure to straighten each point. Using a small paintbrush, apply a thin coat of fabric stiffener over the snowflakes. Let sit until dry or as long as directed on the stiffening product. Once dry, sew a piece of thread through the top of each snowflake and knot the thread to create a loop.

Pretty Picot Snowflake Pattern | <a href=/www.petalstopicots.com" target="_blank">www.petalstopicots.com | #crochet " height="400" src="https://www.petalstopicots.com/wp-content/uploads/2013/01/11-18-14-1.jpg" title="Pretty Picot Snowflake Pattern | www.petalstopicots.com | #crochet " width="400" />

Enjoy!


Click here for more of my free Christmas patterns.

free crochet snowflake patterns

Interested in making this project? You can also help support my blog by purchasing through the affiliate links below …


28 Responses to Pretty Picot Snowflake Pattern

  1. Ana BC (Lanas de Ana) January 1, 2013 at 4:35 pm #

    Really cute snowflake. Thanks for sharing! Hope to see you in my new blog: Lanas de Ana.
    Have a happy new year!
    ♥ Ana BC

    • Brenda Dyson-Pitz December 30, 2016 at 1:12 pm #

      I’m new at crocheting. Can’t wait to make these snowflakes for next Christmas

  2. Hanni January 1, 2013 at 6:46 pm #

    I love these snowflakes! Pinning the pattern for the future Reply

    • Anonymous January 1, 2013 at 8:18 pm #

      Beautiful

  3. linda January 1, 2013 at 3:32 pm #

    It’s beautiful, so pretty Reply

  4. Debi Y. January 1, 2013 at 3:52 pm #

    Beautiful snowflake – thanks for sharing your pattern.

    Happy New Year to you and your family. Thanks so much for visiting my blog throughout the year. Reply

  5. janie January 1, 2013 at 5:22 pm #

    I really neet to learn how to crochet with that teeny-tiny hook and thread…I’m all thumbs!!

  6. Preeti January 1, 2013 at 5:31 pm #

    Really pretty snowflake! Thanks for sharing the pattern:)

  7. Adrianne at Happy Hour Projects January 2, 2013 at 1:50 am #

    Soooo pretty!!

  8. Melanie @ bear rabbit bear January 2, 2013 at 2:31 am #

    How pretty!

  9. Luna January 1, 2013 at 11:16 pm #

    Beautiful …love them,just got a snowflake book from my friend as a Christmas gift and it’s beautiful and it has great patterns .
    Yours are cute …next November I will start making some for Christmas.

    Happy New Year and happy crocheting !

    Luna

  10. Amy January 2, 2013 at 5:11 pm #

    Very pretty!!

  11. Chiwei @ One Dog Woof January 2, 2013 at 6:56 pm #

    Beautiful!

  12. Jill @ Create.Craft.Love. January 3, 2013 at 2:38 am #

    Just beautiful! I love how vintage-y the snowflake looks. And I LOVE how it looks so delicate and lacy. Great job!

  13. Kadie January 3, 2013 at 2:39 am #

    Oh it turned out so pretty!! I love it on the tree it looks like something my grandmother used to have on her tree.:)

  14. Anya @ SAS-does January 3, 2013 at 8:00 am #

    So delicate and beautiful! Thank you for sharing the pattern.

  15. Dawn January 3, 2013 at 3:01 am #

    This is so beautiful…and you included the pattern! Yay! I have been looking for a lovely pattern for a snowflake. Thank you.

  16. Shivangi January 3, 2013 at 9:30 am #

    good one…indiagiftservices.com

  17. Heather Kaluf January 3, 2013 at 8:20 pm #

    So Pretty! Someday I will give this a try Reply

  18. Winnie January 3, 2013 at 10:12 pm #

    Elegant and very beautiful !

  19. naida January 6, 2013 at 4:17 pm #

    That is so pretty!
    crochet mamas blog

  20. Marilyn November 18, 2014 at 10:29 am #

    These snowflakes are gorgeous! Do you think if I crocheted a bunch of these, the real snow would go away and the temps will warm up? Reply

Trackbacks/Pingbacks

  1. 2014/46 – Gorgeous Christmas decoration (I know it’s super early!!) | UK Crochet Patterns - August 2, 2014

    […] know it’s early, but I just couldn’t help myself! I really like this pattern, it makes for a very pretty snowflake decoration, which (yet again) I am tempted to suggest adding […]

  2. Top 10 Free Patterns for Crocheted Snowflakes - April 3, 2015

    […]  Crochet Pattern and photo credit to petalstopicots.com […]

  3. Free Christmas Crochet Patterns - Petals to Picots - November 30, 2015

    […]     […]

  4. Link List 35: 10 Free Crochet Patterns using Picot Stitch - Crochet For You - December 19, 2015

    […] Pretty Picot Snowflake – Petals to Picots […]

  5. Crochet Snowflake Patterns - Gorgeous Tree Decorations - Crochet Now - October 30, 2016

    […] to Picot’s also has a tutorial for this pretty picot snowflake and there are two more beautiful patterns for snowflakes over on this site.  We think you should […]

  6. Granddaughter Snowflakes 2015 « Musings, Mischief, and Mayhem - December 15, 2016

    […] pattern is a Pretty Picot Snowflake Pattern from […]


Рубрики:  вязание крючком
куклы и игрушки

Без заголовка

Воскресенье, 20 Августа 2017 г. 19:53 + в цитатник

Grandma Jennie’s Snowflake Pattern: Part

https://www.petalstopicots.com/2013/01/grandma-jennies-snowflake-pattern-part-2/

Print Friendly, PDF & Email

Grandma Jennie's Snowflake Pattern: Part 2 | <a href=/www.petalstopicots.com" target="_blank">www.petalstopicots.com | #crochet " height="480" src="https://www.petalstopicots.com/wp-content/uploads/2013/01/crochet-snowflake-pattern-2.jpg" title="Grandma Jennie's Snowflake Pattern: Part 2 | www.petalstopicots.com | #crochet " width="443" />

Grandma Jennie’s Snowflake Pattern: Part 2

Here’s what you’ll need:

  • Size 10 crochet thread
  • 2 mm steel hook
  • sewing needle
  • fabric stiffener

Click here to reference the Crochet Abbreviations Chart.


Add this pattern to your Ravelry library.


Finished snowflake measures approx 4 in.


Ch 6, join with Sl st in furthest ch from hook to form a ring.

Round 1: Ch 1 (does not count as st), work 16 scs into ring, join in 1st sc of round — 16 scs.

Round 2:  Ch 1 (does not count as st), beginning in same st as join, *work [1 sc, ch 3, 1 sc], skip next st, rep from * 7 more times, join in 1st sc of round — 8 ch-3 spaces.

Round 3:  Ch 1 (does not count as st), work 5 scs in each ch-3 sp around, join in 1st sc of round — 40 sts.

Round 4:  Sl st in next 2 sts, ch 1 (does not count as st), work 1 sc in same st as last Sl st was made, ch 10,  skip next 4 sts, *work 1 sc in next st, ch 10, skip next 4 sts, rep from * around, join in 1st sc of round — 8 ch-10 spaces.

Round 5:  Ch 1 (does not count as st), work [6 scs, ch 6, 6 scs] in each ch-10 sp around, join in 1st sc of round — 8 ch-6 spaces.

Round 6:  Sl st in next 5 sts and in ch-6 sp, ch 3 (counts as dc), work 12 dcs in same ch-6 sp, work 13 dcs in each of the next ch-6 spaces around, join in top of beg ch 3 — 8 groups of 13 dcs.

Round 7:  Ch 1 (does not count as st), beginning in same st as join, *sc2tog, ch 3, skip next st, 1 sc in next, ch 3, skip next st, 1 sc in next, ch 5, skip next st, 1 sc in next, ch 3, skip next st, 1 sc in next, ch 3, skip next st, sc2tog, rep from * around,  join in 1st sc of round — 40 ch spaces.

Fasten off and weave in ends.


Finishing

Block snowflake as described in the previous post for the Pretty Picot Snowflake Pattern.

free crochet snowflake patterns
Click here for more of my free snowflake patterns.

22 Responses to Grandma Jennie’s Snowflake Pattern: Part 2

  1. Adrianne at Happy Hour Projects January 16, 2013 at 6:12 pm #

    Kara… I just adore these. You make such beautiful things!!

  2. Jen January 16, 2013 at 9:01 pm #

    Wow! Love this, not sure my skills are up to it at the moment. Hope some day soon I’ll be able to make such lovely things

  3. Natas Nest January 16, 2013 at 4:15 pm #

    Wow, Kara, that’s so l♥vely!! Thanks for the pattern Reply

  4. Kadie January 17, 2013 at 2:31 am #

    This is so beautiful, Kara! I LOVE, LOVE the way it turned out!

  5. Winnie January 17, 2013 at 10:48 pm #

    Very very beautiful.

  6. Sara McFall January 23, 2013 at 1:40 am #

    Oh, wow, this one’s even more beautiful than the first! Why is it called Grandma Jennie’s? Thanks for sharing at Hookin On Hump Day!

  7. Grace F. August 16, 2013 at 9:23 am #

    I made one of these yesterday using coral instead of white. I’m really pleased with it!

    • Kara August 17, 2013 at 3:19 pm #

      It came out great!

  8. Cherie Seifert November 10, 2013 at 9:33 am #

    Round 7 needs 14 stitches to complete. I used one twice for the end sc2tog. The pattern would need to be changed to include 14 stitches on Round 6 to be accurate. Otherwise it is a very pretty pattern.

    • Kara November 10, 2013 at 7:23 pm #

      Hi Cherie

      I went over the last two rounds and double checked the calculations. I believe they are correct as is. Each repeat for Round 7 is worked over 13 sts, which is exactly what we have from the double crochet groupings in Round 6.

    • Tyler October 28, 2014 at 9:33 pm #

      I think I know where the confusion came in. The single crochet two together stitches are worked over the last two stitches in the 13 Double crochet group. My guess is that you put the single crochet two together in one stitch only.

  9. mere November 23, 2014 at 9:05 pm #

    In round 6, how do you get from one group of 13 double crochets to the next? It doesn’t look like you slip stitched your way to the next chain 6 space so how did you get there in order to do the next group of 13 double crochets? Sorry, this isn’t self explanatory to me

    • Kara November 27, 2014 at 9:08 pm #

      Just start working the next group of double crochets into the next chain space, no need to slip stitch over Reply

  10. Donna December 6, 2016 at 8:48 pm #

    Gorgeous! I made these in red and green for Christmas gifts and they look like poinsettias!

    • Kara December 7, 2016 at 10:16 am #

      Great idea!

  11. Marianne February 25, 2017 at 2:52 pm #

    How many inches in diameter is this Grandma Jennie’s Snowflake?

    • kara February 27, 2017 at 8:55 am #

      Finished snowflake measures approx 4 in.

  12. Mary March 1, 2017 at 6:19 pm #

    I have made many snowflakes for my tree but none as pretty as this. Really love it and it is so easy to make.

Trackbacks/Pingbacks

  1. Top 10 Free Patterns for Crocheted Snowflakes - Top Inspired - December 8, 2013

    […]  Crochet Pattern and photo credit to petalstopicots.com […]

  2. 21 Free Fabu Frozen Crochet Patterns - Simply Collectible - November 19, 2014

    […] Grandma Jennie’s Snowflake Pattern: Part 2 by Petals to Picots […]

  3. Let it snow | Bymami - September 22, 2015

    […] 2: Grandma Jennie’s Snowflake Pattern from Petals to Picots A small hook and a little patience will give you a beautiful snowflake. This will definitely be on my tree this year! […]

  4. 21Easy DIY Christmas Decoration Ideas - Rustic Style - December 9, 2015

    […] Check out the full DIY tutorial HERE […]


Рубрики:  вязание крючком
куклы и игрушки

Без заголовка

Воскресенье, 20 Августа 2017 г. 19:45 + в цитатник

by

Crystallized Textured Snowflake

http://www.crochetmemories.com/blog/crystallized-textured-snowflake/

www.crochetmemories.com/blog Free pattern for a crystal-like snowflake hotpad, ornament or coaster

Crystallized Textured Snowflake

Our versatile snowflake can be worked with any medium and appropriate hook size to make delicate ornaments to sturdy cotton hot pads and coasters. Or make three-dimensional ornaments by molding – instructions included. Enjoy!


www.crochetmemories.com/blog Free pattern for a crystal-like snowflake hotpad, ornament or coaster

Crystallized Textured Snowflake

sm-ballthreadsm-ballthread sm-ballthread Rated: Intermediate
 

Pattern Information
Medium: Your choice
Hook: Appropriate hook
Finished Size: Not important
Gauge: Not important to overall size
Download Information


Download 1928
File Size 356.48 KB
Create Date October 13, 2014
Last Updated January 30, 2015
   
Please share the page - Download - Enjoy!         Bookmark and Share
Рубрики:  вязание крючком
куклы и игрушки


Поиск сообщений в yuli4ka8sep
Страницы: 43 ... 34 33 [32] 31 30 ..
.. 1 Календарь