creditos http://knitting-and.com/small-looms/
/knitting-and.com/graphics/forcewhite.gif" target="_blank">http://knitting-and.com/graphics/forcewhite.gif); padding: 20px 5px 5px; overflow: hidden; color: rgb(0, 0, 0); font-family: Verdana, Arial, Helvetica, sans-serif; font-size: 16px; line-height: 22px;">
Quick Links
Daisy Winders, Flower Looms and Bloom Looms
Making Your Own Flower Looms
/knitting-and.com/graphics/forcewhite.gif" target="_blank">http://knitting-and.com/graphics/forcewhite.gif); padding: 5px; overflow: hidden; color: rgb(0, 0, 0); font-family: Verdana, Arial, Helvetica, sans-serif; font-size: 16px; line-height: 22px;">

How to Make and Use a Daisy Loom - Vintage Instructions from the 1930's
/knitting-and.com/graphics/forcewhite.gif" target="_blank">http://knitting-and.com/graphics/forcewhite.gif); padding: 5px; overflow: hidden; color: rgb(0, 0, 0); font-family: Verdana, Arial, Helvetica, sans-serif; font-size: 16px; line-height: 22px;">

Ice Cream Lid Flower Looms (Round)
/knitting-and.com/graphics/forcewhite.gif" target="_blank">http://knitting-and.com/graphics/forcewhite.gif); padding: 5px; overflow: hidden; color: rgb(0, 0, 0); font-family: Verdana, Arial, Helvetica, sans-serif; font-size: 16px; line-height: 22px;">

Ice Cream Lid Flower Looms (Triangular)
/knitting-and.com/graphics/forcewhite.gif" target="_blank">http://knitting-and.com/graphics/forcewhite.gif); padding: 5px; overflow: hidden; color: rgb(0, 0, 0); font-family: Verdana, Arial, Helvetica, sans-serif; font-size: 16px; line-height: 22px;">

Plastic Canvas Flower Looms
Offsite
/knitting-and.com/graphics/forcewhite.gif" target="_blank">http://knitting-and.com/graphics/forcewhite.gif); padding: 5px; overflow: hidden; color: rgb(0, 0, 0); font-family: Verdana, Arial, Helvetica, sans-serif; font-size: 16px; line-height: 22px;">

Tutorial: Loom Flowers (without the loom!) from Craftastical
/knitting-and.com/graphics/forcewhite.gif" target="_blank">http://knitting-and.com/graphics/forcewhite.gif); padding: 5px; overflow: hidden; color: rgb(0, 0, 0); font-family: Verdana, Arial, Helvetica, sans-serif; font-size: 16px; line-height: 22px;">
Reviews of both new and vintage flower looms (mostly from my blog)
/knitting-and.com/graphics/forcewhite.gif" target="_blank">http://knitting-and.com/graphics/forcewhite.gif); padding: 5px; overflow: hidden; color: rgb(0, 0, 0); font-family: Verdana, Arial, Helvetica, sans-serif; font-size: 16px; line-height: 22px;">

The Cottrell Adjustable Flower Loom 1962 (includes instruction sheet download)
/knitting-and.com/graphics/forcewhite.gif" target="_blank">http://knitting-and.com/graphics/forcewhite.gif); padding: 5px; overflow: hidden; color: rgb(0, 0, 0); font-family: Verdana, Arial, Helvetica, sans-serif; font-size: 16px; line-height: 22px;">

Hamanaka Flower Motif Cards
/knitting-and.com/graphics/forcewhite.gif" target="_blank">http://knitting-and.com/graphics/forcewhite.gif); padding: 5px; overflow: hidden; color: rgb(0, 0, 0); font-family: Verdana, Arial, Helvetica, sans-serif; font-size: 16px; line-height: 22px;">

Hazel's Adjust-O-Peg Loom
Basic Instructions and Vintage Instruction Sheets
/knitting-and.com/graphics/forcewhite.gif" target="_blank">http://knitting-and.com/graphics/forcewhite.gif); padding: 5px; overflow: hidden; color: rgb(0, 0, 0); font-family: Verdana, Arial, Helvetica, sans-serif; font-size: 16px; line-height: 22px;">


Looms and Yarns - now includes a video on choosing yarn and troubleshooting problem flowers
/knitting-and.com/graphics/forcewhite.gif" target="_blank">http://knitting-and.com/graphics/forcewhite.gif); padding: 5px; overflow: hidden; color: rgb(0, 0, 0); font-family: Verdana, Arial, Helvetica, sans-serif; font-size: 16px; line-height: 22px;">

Winding the Yarn
/knitting-and.com/graphics/forcewhite.gif" target="_blank">http://knitting-and.com/graphics/forcewhite.gif); padding: 5px; overflow: hidden; color: rgb(0, 0, 0); font-family: Verdana, Arial, Helvetica, sans-serif; font-size: 16px; line-height: 22px;">

Grids for Designing Your Own Colour Combinations for shawls, spreads etc.
/knitting-and.com/graphics/forcewhite.gif" target="_blank">http://knitting-and.com/graphics/forcewhite.gif); padding: 5px; overflow: hidden; color: rgb(0, 0, 0); font-family: Verdana, Arial, Helvetica, sans-serif; font-size: 16px; line-height: 22px;">

Size Comparison of Various Looms
/knitting-and.com/graphics/forcewhite.gif" target="_blank">http://knitting-and.com/graphics/forcewhite.gif); padding: 5px; overflow: hidden; color: rgb(0, 0, 0); font-family: Verdana, Arial, Helvetica, sans-serif; font-size: 16px; line-height: 22px;">

Instant Stitchery Kits, Flower Loom Kits and Ideas
Studio Twelve Looms
/knitting-and.com/graphics/forcewhite.gif" target="_blank">http://knitting-and.com/graphics/forcewhite.gif); padding: 5px; overflow: hidden; color: rgb(0, 0, 0); font-family: Verdana, Arial, Helvetica, sans-serif; font-size: 16px; line-height: 22px;">

Winding the Yarn Method 2 (Bucilla Studio 12 Loom Directions 1971)
/knitting-and.com/graphics/forcewhite.gif" target="_blank">http://knitting-and.com/graphics/forcewhite.gif); padding: 5px; overflow: hidden; color: rgb(0, 0, 0); font-family: Verdana, Arial, Helvetica, sans-serif; font-size: 16px; line-height: 22px;">

Mini-Fleur Instructions (including foot thongs, plaque and jewellery projects)
/knitting-and.com/graphics/forcewhite.gif" target="_blank">http://knitting-and.com/graphics/forcewhite.gif); padding: 5px; overflow: hidden; color: rgb(0, 0, 0); font-family: Verdana, Arial, Helvetica, sans-serif; font-size: 16px; line-height: 22px;">

Multi-Fleur Instructions 1970 (including hair spray cover and rain bonnet key chain)
/knitting-and.com/graphics/forcewhite.gif" target="_blank">http://knitting-and.com/graphics/forcewhite.gif); padding: 5px; overflow: hidden; color: rgb(0, 0, 0); font-family: Verdana, Arial, Helvetica, sans-serif; font-size: 16px; line-height: 22px;">

Magni-Fleur Instructions 1970 (including straw flower with calyx and tote bag made from placemats)
/knitting-and.com/graphics/forcewhite.gif" target="_blank">http://knitting-and.com/graphics/forcewhite.gif); padding: 5px; overflow: hidden; color: rgb(0, 0, 0); font-family: Verdana, Arial, Helvetica, sans-serif; font-size: 16px; line-height: 22px;">

Square Loom (including Fiesta Poncho instructions)
Other Looms
/knitting-and.com/graphics/forcewhite.gif" target="_blank">http://knitting-and.com/graphics/forcewhite.gif); padding: 5px; overflow: hidden; color: rgb(0, 0, 0); font-family: Verdana, Arial, Helvetica, sans-serif; font-size: 16px; line-height: 22px;">
The Cottrell Adjustable Flower Loom 1962. Includes instructions for a mohair stole and double flower afghan.
/knitting-and.com/graphics/forcewhite.gif" target="_blank">http://knitting-and.com/graphics/forcewhite.gif); padding: 5px; overflow: hidden; color: rgb(0, 0, 0); font-family: Verdana, Arial, Helvetica, sans-serif; font-size: 16px; line-height: 22px;">

Fiesta Flower Wheel Instructions by Arbee
/knitting-and.com/graphics/forcewhite.gif" target="_blank">http://knitting-and.com/graphics/forcewhite.gif); padding: 5px; overflow: hidden; color: rgb(0, 0, 0); font-family: Verdana, Arial, Helvetica, sans-serif; font-size: 16px; line-height: 22px;">

Fiorella Handicraft Loom Instructions C1970. Includes instructions for many projects.
/knitting-and.com/graphics/forcewhite.gif" target="_blank">http://knitting-and.com/graphics/forcewhite.gif); padding: 5px; overflow: hidden; color: rgb(0, 0, 0); font-family: Verdana, Arial, Helvetica, sans-serif; font-size: 16px; line-height: 22px;">
Fiorella Loom Instructions Book 2. Includes instructions for six projects including three not included in the other instruction book. Directions in French, German, Dutch, Italian, Spanish and English
/knitting-and.com/graphics/forcewhite.gif" target="_blank">http://knitting-and.com/graphics/forcewhite.gif); padding: 5px; overflow: hidden; color: rgb(0, 0, 0); font-family: Verdana, Arial, Helvetica, sans-serif; font-size: 16px; line-height: 22px;">
Instructions for the Hazel Pearson Adjust-O-Peg Loom 1969
/knitting-and.com/graphics/forcewhite.gif" target="_blank">http://knitting-and.com/graphics/forcewhite.gif); padding: 5px; overflow: hidden; color: rgb(0, 0, 0); font-family: Verdana, Arial, Helvetica, sans-serif; font-size: 16px; line-height: 22px;">

Early Knit-Wit Instructions from 1954. Includes patterns for "Elegance Stole" and Carriage Robe
/knitting-and.com/graphics/forcewhite.gif" target="_blank">http://knitting-and.com/graphics/forcewhite.gif); padding: 5px; overflow: hidden; color: rgb(0, 0, 0); font-family: Verdana, Arial, Helvetica, sans-serif; font-size: 16px; line-height: 22px;">

The Inox Flower Loom Instructions in 7 languages. Includes many inspirational pictures of finished projects
/knitting-and.com/graphics/forcewhite.gif" target="_blank">http://knitting-and.com/graphics/forcewhite.gif); padding: 5px; overflow: hidden; color: rgb(0, 0, 0); font-family: Verdana, Arial, Helvetica, sans-serif; font-size: 16px; line-height: 22px;">

Original Instructions for Using the Crazy Daisy Winder C1948
/knitting-and.com/graphics/forcewhite.gif" target="_blank">http://knitting-and.com/graphics/forcewhite.gif); padding: 5px; overflow: hidden; color: rgb(0, 0, 0); font-family: Verdana, Arial, Helvetica, sans-serif; font-size: 16px; line-height: 22px;">

Winding the Yarn on a Triangular Loom (Appliqué Loom Directions)
Languages Other than English
/knitting-and.com/graphics/forcewhite.gif" target="_blank">http://knitting-and.com/graphics/forcewhite.gif); padding: 5px; overflow: hidden; color: rgb(0, 0, 0); font-family: Verdana, Arial, Helvetica, sans-serif; font-size: 16px; line-height: 22px;">

French language video on using the Kit Wit loom
/knitting-and.com/graphics/forcewhite.gif" target="_blank">http://knitting-and.com/graphics/forcewhite.gif); padding: 5px; overflow: hidden; color: rgb(0, 0, 0); font-family: Verdana, Arial, Helvetica, sans-serif; font-size: 16px; line-height: 22px;">

Using a flower loom: Italian language videos by simobre1967
/knitting-and.com/graphics/forcewhite.gif" target="_blank">http://knitting-and.com/graphics/forcewhite.gif); padding: 5px; overflow: hidden; color: rgb(0, 0, 0); font-family: Verdana, Arial, Helvetica, sans-serif; font-size: 16px; line-height: 22px;">

Written Instructions in Portuguese (offsite)
Centres and Decorative Stitching
/knitting-and.com/graphics/forcewhite.gif" target="_blank">http://knitting-and.com/graphics/forcewhite.gif); padding: 5px; overflow: hidden; color: rgb(0, 0, 0); font-family: Verdana, Arial, Helvetica, sans-serif; font-size: 16px; line-height: 22px;">

Backstitch Centre
/knitting-and.com/graphics/forcewhite.gif" target="_blank">http://knitting-and.com/graphics/forcewhite.gif); padding: 5px; overflow: hidden; color: rgb(0, 0, 0); font-family: Verdana, Arial, Helvetica, sans-serif; font-size: 16px; line-height: 22px;">

Beads, Buttons and Sequins
/knitting-and.com/graphics/forcewhite.gif" target="_blank">http://knitting-and.com/graphics/forcewhite.gif); padding: 5px; overflow: hidden; color: rgb(0, 0, 0); font-family: Verdana, Arial, Helvetica, sans-serif; font-size: 16px; line-height: 22px;">

Beaded Stitching
/knitting-and.com/graphics/forcewhite.gif" target="_blank">http://knitting-and.com/graphics/forcewhite.gif); padding: 5px; overflow: hidden; color: rgb(0, 0, 0); font-family: Verdana, Arial, Helvetica, sans-serif; font-size: 16px; line-height: 22px;">

Bullion Stitch Centre - Spanish language video (you don't need to know Spanish to understand the instructions)
/knitting-and.com/graphics/forcewhite.gif" target="_blank">http://knitting-and.com/graphics/forcewhite.gif); padding: 5px; overflow: hidden; color: rgb(0, 0, 0); font-family: Verdana, Arial, Helvetica, sans-serif; font-size: 16px; line-height: 22px;">

Chain Stitch Rounds
/knitting-and.com/graphics/forcewhite.gif" target="_blank">http://knitting-and.com/graphics/forcewhite.gif); padding: 5px; overflow: hidden; color: rgb(0, 0, 0); font-family: Verdana, Arial, Helvetica, sans-serif; font-size: 16px; line-height: 22px;">

Crochet Centres - Cherry Blossom, Shamrock, Heart
/knitting-and.com/graphics/forcewhite.gif" target="_blank">http://knitting-and.com/graphics/forcewhite.gif); padding: 5px; overflow: hidden; color: rgb(0, 0, 0); font-family: Verdana, Arial, Helvetica, sans-serif; font-size: 16px; line-height: 22px;">

Daffodil Centre for Ribbon Straw Flowers
/knitting-and.com/graphics/forcewhite.gif" target="_blank">http://knitting-and.com/graphics/forcewhite.gif); padding: 5px; overflow: hidden; color: rgb(0, 0, 0); font-family: Verdana, Arial, Helvetica, sans-serif; font-size: 16px; line-height: 22px;">

Double Woven Centre
/knitting-and.com/graphics/forcewhite.gif" target="_blank">http://knitting-and.com/graphics/forcewhite.gif); padding: 5px; overflow: hidden; color: rgb(0, 0, 0); font-family: Verdana, Arial, Helvetica, sans-serif; font-size: 16px; line-height: 22px;">

Feather Stitch Rounds
/knitting-and.com/graphics/forcewhite.gif" target="_blank">http://knitting-and.com/graphics/forcewhite.gif); padding: 5px; overflow: hidden; color: rgb(0, 0, 0); font-family: Verdana, Arial, Helvetica, sans-serif; font-size: 16px; line-height: 22px;">

Flower and Grid Combination
/knitting-and.com/graphics/forcewhite.gif" target="_blank">http://knitting-and.com/graphics/forcewhite.gif); padding: 5px; overflow: hidden; color: rgb(0, 0, 0); font-family: Verdana, Arial, Helvetica, sans-serif; font-size: 16px; line-height: 22px;">

French Knot Centre
/knitting-and.com/graphics/forcewhite.gif" target="_blank">http://knitting-and.com/graphics/forcewhite.gif); padding: 5px; overflow: hidden; color: rgb(0, 0, 0); font-family: Verdana, Arial, Helvetica, sans-serif; font-size: 16px; line-height: 22px;">

Grid Motifs on the Square Loom
/knitting-and.com/graphics/forcewhite.gif" target="_blank">http://knitting-and.com/graphics/forcewhite.gif); padding: 5px; overflow: hidden; color: rgb(0, 0, 0); font-family: Verdana, Arial, Helvetica, sans-serif; font-size: 16px; line-height: 22px;">

Knot Stitch Rounds
/knitting-and.com/graphics/forcewhite.gif" target="_blank">http://knitting-and.com/graphics/forcewhite.gif); padding: 5px; overflow: hidden; color: rgb(0, 0, 0); font-family: Verdana, Arial, Helvetica, sans-serif; font-size: 16px; line-height: 22px;">

Large Open Centre for Swistraw and Ribbon Straw Flowers
/knitting-and.com/graphics/forcewhite.gif" target="_blank">http://knitting-and.com/graphics/forcewhite.gif); padding: 5px; overflow: hidden; color: rgb(0, 0, 0); font-family: Verdana, Arial, Helvetica, sans-serif; font-size: 16px; line-height: 22px;">

Loop and Fringe Centre
/knitting-and.com/graphics/forcewhite.gif" target="_blank">http://knitting-and.com/graphics/forcewhite.gif); padding: 5px; overflow: hidden; color: rgb(0, 0, 0); font-family: Verdana, Arial, Helvetica, sans-serif; font-size: 16px; line-height: 22px;">

Loop Stitch Centre
/knitting-and.com/graphics/forcewhite.gif" target="_blank">http://knitting-and.com/graphics/forcewhite.gif); padding: 5px; overflow: hidden; color: rgb(0, 0, 0); font-family: Verdana, Arial, Helvetica, sans-serif; font-size: 16px; line-height: 22px;">

Open Centre
/knitting-and.com/graphics/forcewhite.gif" target="_blank">http://knitting-and.com/graphics/forcewhite.gif); padding: 5px; overflow: hidden; color: rgb(0, 0, 0); font-family: Verdana, Arial, Helvetica, sans-serif; font-size: 16px; line-height: 22px;">

Oversewn Centre
/knitting-and.com/graphics/forcewhite.gif" target="_blank">http://knitting-and.com/graphics/forcewhite.gif); padding: 5px; overflow: hidden; color: rgb(0, 0, 0); font-family: Verdana, Arial, Helvetica, sans-serif; font-size: 16px; line-height: 22px;">

Patterned Stitching
/knitting-and.com/graphics/forcewhite.gif" target="_blank">http://knitting-and.com/graphics/forcewhite.gif); padding: 5px; overflow: hidden; color: rgb(0, 0, 0); font-family: Verdana, Arial, Helvetica, sans-serif; font-size: 16px; line-height: 22px;">

Pom Pom Centre on a Double Loom
/knitting-and.com/graphics/forcewhite.gif" target="_blank">http://knitting-and.com/graphics/forcewhite.gif); padding: 5px; overflow: hidden; color: rgb(0, 0, 0); font-family: Verdana, Arial, Helvetica, sans-serif; font-size: 16px; line-height: 22px;">

Puffy Centre
/knitting-and.com/graphics/forcewhite.gif" target="_blank">http://knitting-and.com/graphics/forcewhite.gif); padding: 5px; overflow: hidden; color: rgb(0, 0, 0); font-family: Verdana, Arial, Helvetica, sans-serif; font-size: 16px; line-height: 22px;">

Rosebud Centre
/knitting-and.com/graphics/forcewhite.gif" target="_blank">http://knitting-and.com/graphics/forcewhite.gif); padding: 5px; overflow: hidden; color: rgb(0, 0, 0); font-family: Verdana, Arial, Helvetica, sans-serif; font-size: 16px; line-height: 22px;">

Satin Stitch Centre
/knitting-and.com/graphics/forcewhite.gif" target="_blank">http://knitting-and.com/graphics/forcewhite.gif); padding: 5px; overflow: hidden; color: rgb(0, 0, 0); font-family: Verdana, Arial, Helvetica, sans-serif; font-size: 16px; line-height: 22px;">

Single Woven Centre
/knitting-and.com/graphics/forcewhite.gif" target="_blank">http://knitting-and.com/graphics/forcewhite.gif); padding: 5px; overflow: hidden; color: rgb(0, 0, 0); font-family: Verdana, Arial, Helvetica, sans-serif; font-size: 16px; line-height: 22px;">

Stamens
/knitting-and.com/graphics/forcewhite.gif" target="_blank">http://knitting-and.com/graphics/forcewhite.gif); padding: 5px; overflow: hidden; color: rgb(0, 0, 0); font-family: Verdana, Arial, Helvetica, sans-serif; font-size: 16px; line-height: 22px;">

Starburst Centre
/knitting-and.com/graphics/forcewhite.gif" target="_blank">http://knitting-and.com/graphics/forcewhite.gif); padding: 5px; overflow: hidden; color: rgb(0, 0, 0); font-family: Verdana, Arial, Helvetica, sans-serif; font-size: 16px; line-height: 22px;">

Stem Stitch Centre
/knitting-and.com/graphics/forcewhite.gif" target="_blank">http://knitting-and.com/graphics/forcewhite.gif); padding: 5px; overflow: hidden; color: rgb(0, 0, 0); font-family: Verdana, Arial, Helvetica, sans-serif; font-size: 16px; line-height: 22px;">

Strawberries and Flower Buds
/knitting-and.com/graphics/forcewhite.gif" target="_blank">http://knitting-and.com/graphics/forcewhite.gif); padding: 5px; overflow: hidden; color: rgb(0, 0, 0); font-family: Verdana, Arial, Helvetica, sans-serif; font-size: 16px; line-height: 22px;">

Thistle Centre
/knitting-and.com/graphics/forcewhite.gif" target="_blank">http://knitting-and.com/graphics/forcewhite.gif); padding: 5px; overflow: hidden; color: rgb(0, 0, 0); font-family: Verdana, Arial, Helvetica, sans-serif; font-size: 16px; line-height: 22px;">

Twirl Centre
/knitting-and.com/graphics/forcewhite.gif" target="_blank">http://knitting-and.com/graphics/forcewhite.gif); padding: 5px; overflow: hidden; color: rgb(0, 0, 0); font-family: Verdana, Arial, Helvetica, sans-serif; font-size: 16px; line-height: 22px;">

Two-Colour Buds
/knitting-and.com/graphics/forcewhite.gif" target="_blank">http://knitting-and.com/graphics/forcewhite.gif); padding: 5px; overflow: hidden; color: rgb(0, 0, 0); font-family: Verdana, Arial, Helvetica, sans-serif; font-size: 16px; line-height: 22px;">

Unusual Pom Pom Centre by Luisa Varela of Telarin.com (Argentinean Youtube video). You don't need to understand Spanish to follow the technique
/knitting-and.com/graphics/forcewhite.gif" target="_blank">http://knitting-and.com/graphics/forcewhite.gif); padding: 5px; overflow: hidden; color: rgb(0, 0, 0); font-family: Verdana, Arial, Helvetica, sans-serif; font-size: 16px; line-height: 22px;">

Using the Pom Pom Bridge
/knitting-and.com/graphics/forcewhite.gif" target="_blank">http://knitting-and.com/graphics/forcewhite.gif); padding: 5px; overflow: hidden; color: rgb(0, 0, 0); font-family: Verdana, Arial, Helvetica, sans-serif; font-size: 16px; line-height: 22px;">

Woven Spokes Centre
Edgings and Joining Motifs
/knitting-and.com/graphics/forcewhite.gif" target="_blank">http://knitting-and.com/graphics/forcewhite.gif); padding: 5px; overflow: hidden; color: rgb(0, 0, 0); font-family: Verdana, Arial, Helvetica, sans-serif; font-size: 16px; line-height: 22px;">

The African Flower Motif with a Flower Loom Centre
/knitting-and.com/graphics/forcewhite.gif" target="_blank">http://knitting-and.com/graphics/forcewhite.gif); padding: 5px; overflow: hidden; color: rgb(0, 0, 0); font-family: Verdana, Arial, Helvetica, sans-serif; font-size: 16px; line-height: 22px;">
Big and Small Flower Tack Join (coming soon)
/knitting-and.com/graphics/forcewhite.gif" target="_blank">http://knitting-and.com/graphics/forcewhite.gif); padding: 5px; overflow: hidden; color: rgb(0, 0, 0); font-family: Verdana, Arial, Helvetica, sans-serif; font-size: 16px; line-height: 22px;">

Cluster Stitch Flowers (for 2½" looms)
/knitting-and.com/graphics/forcewhite.gif" target="_blank">http://knitting-and.com/graphics/forcewhite.gif); padding: 5px; overflow: hidden; color: rgb(0, 0, 0); font-family: Verdana, Arial, Helvetica, sans-serif; font-size: 16px; line-height: 22px;">

Cluster Stitch Flowers V2 (for 3" looms)
/knitting-and.com/graphics/forcewhite.gif" target="_blank">http://knitting-and.com/graphics/forcewhite.gif); padding: 5px; overflow: hidden; color: rgb(0, 0, 0); font-family: Verdana, Arial, Helvetica, sans-serif; font-size: 16px; line-height: 22px;">
Fast Join for Round Flowers (coming soon)
/knitting-and.com/graphics/forcewhite.gif" target="_blank">http://knitting-and.com/graphics/forcewhite.gif); padding: 5px; overflow: hidden; color: rgb(0, 0, 0); font-family: Verdana, Arial, Helvetica, sans-serif; font-size: 16px; line-height: 22px;">
Fast Join for Square Flowers (coming soon)
/knitting-and.com/graphics/forcewhite.gif" target="_blank">http://knitting-and.com/graphics/forcewhite.gif); padding: 5px; overflow: hidden; color: rgb(0, 0, 0); font-family: Verdana, Arial, Helvetica, sans-serif; font-size: 16px; line-height: 22px;">

Floating Petal Joins
/knitting-and.com/graphics/forcewhite.gif" target="_blank">http://knitting-and.com/graphics/forcewhite.gif); padding: 5px; overflow: hidden; color: rgb(0, 0, 0); font-family: Verdana, Arial, Helvetica, sans-serif; font-size: 16px; line-height: 22px;">

Granny Square Edging for Round Motifs
/knitting-and.com/graphics/forcewhite.gif" target="_blank">http://knitting-and.com/graphics/forcewhite.gif); padding: 5px; overflow: hidden; color: rgb(0, 0, 0); font-family: Verdana, Arial, Helvetica, sans-serif; font-size: 16px; line-height: 22px;">

Granny Square Edging for Square Motifs
/knitting-and.com/graphics/forcewhite.gif" target="_blank">http://knitting-and.com/graphics/forcewhite.gif); padding: 5px; overflow: hidden; color: rgb(0, 0, 0); font-family: Verdana, Arial, Helvetica, sans-serif; font-size: 16px; line-height: 22px;">

Joining Flowers as You Go
/knitting-and.com/graphics/forcewhite.gif" target="_blank">http://knitting-and.com/graphics/forcewhite.gif); padding: 5px; overflow: hidden; color: rgb(0, 0, 0); font-family: Verdana, Arial, Helvetica, sans-serif; font-size: 16px; line-height: 22px;">


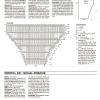
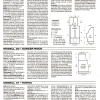
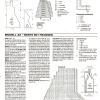
 This is how to knit a basic adult sock on the blue Knifty Knitter loom.
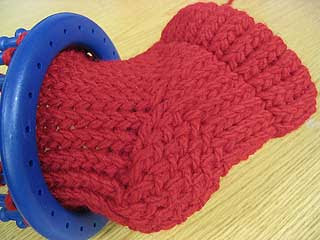


 /static.gallery.ru/i/pleasewait.gif" target="_blank">http://static.gallery.ru/i/pleasewait.gif
 /static.gallery.ru/i/pleasewait.gif" target="_blank">http://static.gallery.ru/i/pleasewait.gif
 /static.gallery.ru/i/pleasewait.gif" target="_blank">http://static.gallery.ru/i/pleasewait.gif
 /static.gallery.ru/i/pleasewait.gif" target="_blank">http://static.gallery.ru/i/pleasewait.gif
 /static.gallery.ru/i/pleasewait.gif" target="_blank">http://static.gallery.ru/i/pleasewait.gif
 /static.gallery.ru/i/pleasewait.gif" target="_blank">http://static.gallery.ru/i/pleasewait.gif
 /static.gallery.ru/i/pleasewait.gif" target="_blank">http://static.gallery.ru/i/pleasewait.gif
 /static.gallery.ru/i/pleasewait.gif" target="_blank">http://static.gallery.ru/i/pleasewait.gif
 /static.gallery.ru/i/pleasewait.gif" target="_blank">http://static.gallery.ru/i/pleasewait.gif
 /static.gallery.ru/i/pleasewait.gif" target="_blank">http://static.gallery.ru/i/pleasewait.gif
 /static.gallery.ru/i/pleasewait.gif" target="_blank">http://static.gallery.ru/i/pleasewait.gif
 /static.gallery.ru/i/pleasewait.gif" target="_blank">http://static.gallery.ru/i/pleasewait.gif
 /static.gallery.ru/i/pleasewait.gif" target="_blank">http://static.gallery.ru/i/pleasewait.gif
 /static.gallery.ru/i/pleasewait.gif" target="_blank">http://static.gallery.ru/i/pleasewait.gif
 /static.gallery.ru/i/pleasewait.gif" target="_blank">http://static.gallery.ru/i/pleasewait.gif
 /static.gallery.ru/i/pleasewait.gif" target="_blank">http://static.gallery.ru/i/pleasewait.gif
 /static.gallery.ru/i/pleasewait.gif" target="_blank">http://static.gallery.ru/i/pleasewait.gif
 /static.gallery.ru/i/pleasewait.gif" target="_blank">http://static.gallery.ru/i/pleasewait.gif
 /static.gallery.ru/i/pleasewait.gif" target="_blank">http://static.gallery.ru/i/pleasewait.gif
 /static.gallery.ru/i/pleasewait.gif" target="_blank">http://static.gallery.ru/i/pleasewait.gif
 /static.gallery.ru/i/pleasewait.gif" target="_blank">http://static.gallery.ru/i/pleasewait.gif
 /static.gallery.ru/i/pleasewait.gif" target="_blank">http://static.gallery.ru/i/pleasewait.gif
 /static.gallery.ru/i/pleasewait.gif" target="_blank">http://static.gallery.ru/i/pleasewait.gif
 /static.gallery.ru/i/pleasewait.gif" target="_blank">http://static.gallery.ru/i/pleasewait.gif
 /static.gallery.ru/i/pleasewait.gif" target="_blank">http://static.gallery.ru/i/pleasewait.gif
 /static.gallery.ru/i/pleasewait.gif" target="_blank">http://static.gallery.ru/i/pleasewait.gif
 /static.gallery.ru/i/pleasewait.gif" target="_blank">http://static.gallery.ru/i/pleasewait.gif
 /static.gallery.ru/i/pleasewait.gif" target="_blank">http://static.gallery.ru/i/pleasewait.gif
 /static.gallery.ru/i/pleasewait.gif" target="_blank">http://static.gallery.ru/i/pleasewait.gif
 /static.gallery.ru/i/pleasewait.gif" target="_blank">http://static.gallery.ru/i/pleasewait.gif
 /static.gallery.ru/i/pleasewait.gif" target="_blank">http://static.gallery.ru/i/pleasewait.gif
 /static.gallery.ru/i/pleasewait.gif" target="_blank">http://static.gallery.ru/i/pleasewait.gif
 /static.gallery.ru/i/pleasewait.gif" target="_blank">http://static.gallery.ru/i/pleasewait.gif
 /static.gallery.ru/i/pleasewait.gif" target="_blank">http://static.gallery.ru/i/pleasewait.gif
 /static.gallery.ru/i/pleasewait.gif" target="_blank">http://static.gallery.ru/i/pleasewait.gif
 /static.gallery.ru/i/pleasewait.gif" target="_blank">http://static.gallery.ru/i/pleasewait.gif
 /static.gallery.ru/i/pleasewait.gif" target="_blank">http://static.gallery.ru/i/pleasewait.gif
 /static.gallery.ru/i/pleasewait.gif" target="_blank">http://static.gallery.ru/i/pleasewait.gif
 /static.gallery.ru/i/pleasewait.gif" target="_blank">http://static.gallery.ru/i/pleasewait.gif
 /static.gallery.ru/i/pleasewait.gif" target="_blank">http://static.gallery.ru/i/pleasewait.gif
 /static.gallery.ru/i/pleasewait.gif" target="_blank">http://static.gallery.ru/i/pleasewait.gif
 /static.gallery.ru/i/pleasewait.gif" target="_blank">http://static.gallery.ru/i/pleasewait.gif
 /static.gallery.ru/i/pleasewait.gif" target="_blank">http://static.gallery.ru/i/pleasewait.gif
 /static.gallery.ru/i/pleasewait.gif" target="_blank">http://static.gallery.ru/i/pleasewait.gif
 /static.gallery.ru/i/pleasewait.gif" target="_blank">http://static.gallery.ru/i/pleasewait.gif
 /static.gallery.ru/i/pleasewait.gif" target="_blank">http://static.gallery.ru/i/pleasewait.gif
 /static.gallery.ru/i/pleasewait.gif" target="_blank">http://static.gallery.ru/i/pleasewait.gif
 /static.gallery.ru/i/pleasewait.gif" target="_blank">http://static.gallery.ru/i/pleasewait.gif
 /static.gallery.ru/i/pleasewait.gif" target="_blank">http://static.gallery.ru/i/pleasewait.gif
 /static.gallery.ru/i/pleasewait.gif" target="_blank">http://static.gallery.ru/i/pleasewait.gif
 /static.gallery.ru/i/pleasewait.gif" target="_blank">http://static.gallery.ru/i/pleasewait.gif
 /static.gallery.ru/i/pleasewait.gif" target="_blank">http://static.gallery.ru/i/pleasewait.gif
 /static.gallery.ru/i/pleasewait.gif" target="_blank">http://static.gallery.ru/i/pleasewait.gif
 /static.gallery.ru/i/pleasewait.gif" target="_blank">http://static.gallery.ru/i/pleasewait.gif
 /static.gallery.ru/i/pleasewait.gif" target="_blank">http://static.gallery.ru/i/pleasewait.gif
 /static.gallery.ru/i/pleasewait.gif" target="_blank">http://static.gallery.ru/i/pleasewait.gif
 /static.gallery.ru/i/pleasewait.gif" target="_blank">http://static.gallery.ru/i/pleasewait.gif
 /static.gallery.ru/i/pleasewait.gif" target="_blank">http://static.gallery.ru/i/pleasewait.gif
 /static.gallery.ru/i/pleasewait.gif" target="_blank">http://static.gallery.ru/i/pleasewait.gif
 /static.gallery.ru/i/pleasewait.gif" target="_blank">http://static.gallery.ru/i/pleasewait.gif
 /static.gallery.ru/i/pleasewait.gif" target="_blank">http://static.gallery.ru/i/pleasewait.gif
 /static.gallery.ru/i/pleasewait.gif" target="_blank">http://static.gallery.ru/i/pleasewait.gif
 /static.gallery.ru/i/pleasewait.gif" target="_blank">http://static.gallery.ru/i/pleasewait.gif
 /static.gallery.ru/i/pleasewait.gif" target="_blank">http://static.gallery.ru/i/pleasewait.gif
 /static.gallery.ru/i/pleasewait.gif" target="_blank">http://static.gallery.ru/i/pleasewait.gif
 /static.gallery.ru/i/pleasewait.gif" target="_blank">http://static.gallery.ru/i/pleasewait.gif
 /static.gallery.ru/i/pleasewait.gif" target="_blank">http://static.gallery.ru/i/pleasewait.gif
 /static.gallery.ru/i/pleasewait.gif" target="_blank">http://static.gallery.ru/i/pleasewait.gif
 /static.gallery.ru/i/pleasewait.gif" target="_blank">http://static.gallery.ru/i/pleasewait.gif
 /static.gallery.ru/i/pleasewait.gif" target="_blank">http://static.gallery.ru/i/pleasewait.gif
 /static.gallery.ru/i/pleasewait.gif" target="_blank">http://static.gallery.ru/i/pleasewait.gif
 /static.gallery.ru/i/pleasewait.gif" target="_blank">http://static.gallery.ru/i/pleasewait.gif
 /static.gallery.ru/i/pleasewait.gif" target="_blank">http://static.gallery.ru/i/pleasewait.gif
 /static.gallery.ru/i/pleasewait.gif" target="_blank">http://static.gallery.ru/i/pleasewait.gif
 /static.gallery.ru/i/pleasewait.gif" target="_blank">http://static.gallery.ru/i/pleasewait.gif
 /static.gallery.ru/i/pleasewait.gif" target="_blank">http://static.gallery.ru/i/pleasewait.gif
 /static.gallery.ru/i/pleasewait.gif" target="_blank">http://static.gallery.ru/i/pleasewait.gif
 /static.gallery.ru/i/pleasewait.gif" target="_blank">http://static.gallery.ru/i/pleasewait.gif
 /static.gallery.ru/i/pleasewait.gif" target="_blank">http://static.gallery.ru/i/pleasewait.gif
 /static.gallery.ru/i/pleasewait.gif" target="_blank">http://static.gallery.ru/i/pleasewait.gif
 /static.gallery.ru/i/pleasewait.gif" target="_blank">http://static.gallery.ru/i/pleasewait.gif
 /static.gallery.ru/i/pleasewait.gif" target="_blank">http://static.gallery.ru/i/pleasewait.gif
 /static.gallery.ru/i/pleasewait.gif" target="_blank">http://static.gallery.ru/i/pleasewait.gif
 /static.gallery.ru/i/pleasewait.gif" target="_blank">http://static.gallery.ru/i/pleasewait.gif
 /static.gallery.ru/i/pleasewait.gif" target="_blank">http://static.gallery.ru/i/pleasewait.gif
 /static.gallery.ru/i/pleasewait.gif" target="_blank">http://static.gallery.ru/i/pleasewait.gif
 /static.gallery.ru/i/pleasewait.gif" target="_blank">http://static.gallery.ru/i/pleasewait.gif