1
Вязание тунисским крючком

С давних пор известен этот интересный способ вязания длинным крючком, иногда его называют
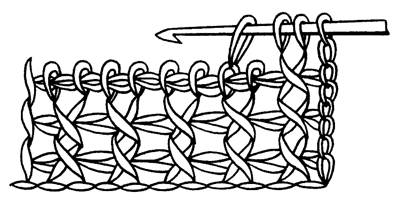
вязанием "в набор". Вязанное полотно имеет четкий узор, почти не растягивается и не деформируется после стирки. Для вязания подходят любые толстые нитки и длинный крючок с головкой на конце, чтобы не спускались петли. Его длина должна быть такой, чтобы можно было набрать петли по всей ширине изделия, в противном случае изделие сшивается из отдельных полос.
Чаще всего крючок при вязании держат в руке как карандаш во время письма, но недаром длинный крючок называют еще крючок-спица: при вязании его нужно держать в руке как спицу. Следует помнить, что в тунисском вязании нельзя туго натягивать нить, иначе в последующих рядах будет трудно производить набор петель.
При этом способе вязания для получения законченного ряда выполняют две операции: первую (справа налево) - набирают петли на крючок, не провязывая, и вторую (слева направо) - провязывают эти петли одну за другой.
Вязание на длинном крючке производится только по одной лицевой стороне и этим отличается от вязки, выполняемой обыкновенным крючком. Основание узора является цепочка из воздушных петель, она вяжется по ширине изделия, затем по ее косичке набирают на крючок сразу все петли ( поэтому
вязание и называется "в набор")
(рис.1а.).

Когда набор закончен, не поворачивая работу, вяжут в обратную сторону: для этого накидывают на крючок рабочую нить и протаскивают ее через крайнюю петлю, лежащую на крючке, затем снова захватывают нить и протаскивают ее через две петли
(рис.1б). Так продолжают вязать до конца ряда, пока на крючке не останется одна петля.
Эффектная вязка получается при использовании ниток двух и более цветов: набор делается ниткой одного цвета, а спуск -другого. Так как тунисская вязка односторонняя, то в этом случае нитку в конце каждого ряда придется обрезать. Для того чтобы не обрезать нитку, в следующем ряду - наоборот: набор - вторым цветом, а спуск первым.
Тунисский крючок с успехом используется для многоцветного вязания с отделкой в виде узоров с геометрическими и растительными орнаментами, в этом случае можно воспользоваться рисунками для вышивания крестом.
Подробнее >>
Крючки для тунисского вязания
Уроки вязания тунисским крючком
/moikompas.ru/img/bg_h3_module.gif" target="_blank">http://moikompas.ru/img/bg_h3_module.gif); background-attachment: initial; background-origin: initial; background-clip: initial; background-color: initial; color: rgb(255, 255, 255); float: left; height: 26px; line-height: 26px; margin-top: 0px; margin-right: 4px; margin-bottom: 0px; margin-left: 0px; min-width: 8px; padding-top: 0px; padding-right: 0px; padding-bottom: 0px; padding-left: 0px; text-align: center; background-position: initial initial; background-repeat: no-repeat no-repeat; ">
/moikompas.ru/img/bg_h3_module.gif" target="_blank">http://moikompas.ru/img/bg_h3_module.gif); background-attachment: initial; background-origin: initial; background-clip: initial; background-color: initial; color: rgb(255, 255, 255); float: left; height: 26px; line-height: 26px; margin-top: 0px; margin-right: 0px; margin-bottom: 0px; margin-left: 0px; min-width: 8px; padding-top: 0px; padding-right: 9px; padding-bottom: 0px; padding-left: 9px; text-align: center; background-position: 100% 100%; background-repeat: no-repeat no-repeat; ">2
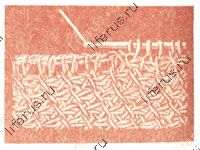
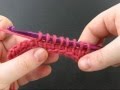
Простое тунисское вязание
2-й ряд. 1-й прием. Набирать петли, вводя крючок под вертикальную стенку каждой петли по всей ширине полотна. 2-й прием. Последовательно провязать все набранные петли (как на предыдущих картинках), последнюю наборную петлю один раз, а затем все петли попарно.

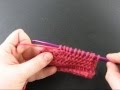
Последний ряд полотна получается очень рыхлый, поэтому после того как связано полотно нужного размера, необходимо сделать завершающий ряд из соединительных столбиков.
С правой стороны полотна получился край – косичка, с левой – из одной нити.
Образцы простой плетенки:

 Фасонные линии на простой плетенке читать далее >>
/moikompas.ru/img/bg_h3_module.gif" target="_blank">http://moikompas.ru/img/bg_h3_module.gif); background-attachment: initial; background-origin: initial; background-clip: initial; background-color: initial; color: rgb(255, 255, 255); float: left; height: 26px; line-height: 26px; margin-top: 0px; margin-right: 4px; margin-bottom: 0px; margin-left: 0px; min-width: 8px; padding-top: 0px; padding-right: 0px; padding-bottom: 0px; padding-left: 0px; text-align: center; background-position: initial initial; background-repeat: no-repeat no-repeat; ">
/moikompas.ru/img/bg_h3_module.gif" target="_blank">http://moikompas.ru/img/bg_h3_module.gif); background-attachment: initial; background-origin: initial; background-clip: initial; background-color: initial; color: rgb(255, 255, 255); float: left; height: 26px; line-height: 26px; margin-top: 0px; margin-right: 0px; margin-bottom: 0px; margin-left: 0px; min-width: 8px; padding-top: 0px; padding-right: 9px; padding-bottom: 0px; padding-left: 9px; text-align: center; background-position: 100% 100%; background-repeat: no-repeat no-repeat; ">3
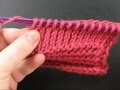
Простая плетенка
/moikompas.ru/img/bg_video.gif" target="_blank">http://moikompas.ru/img/bg_video.gif); background-attachment: initial; background-origin: initial; background-clip: initial; background-color: rgb(242, 242, 242); clear: left; float: left; margin-top: 0px; margin-right: 0px; margin-bottom: 10px; margin-left: 0px; background-position: initial initial; background-repeat: no-repeat repeat; ">
/moikompas.ru/img/bg_video.gif" target="_blank">http://moikompas.ru/img/bg_video.gif); background-attachment: initial; background-origin: initial; background-clip: initial; background-color: initial; float: left; padding-top: 9px; padding-right: 46px; padding-bottom: 9px; padding-left: 46px; background-position: 100% 0%; background-repeat: no-repeat repeat; ">
/moikompas.ru/img/bg_h3_module.gif" target="_blank">http://moikompas.ru/img/bg_h3_module.gif); background-attachment: initial; background-origin: initial; background-clip: initial; background-color: initial; color: rgb(255, 255, 255); float: left; height: 26px; line-height: 26px; margin-top: 0px; margin-right: 4px; margin-bottom: 0px; margin-left: 0px; min-width: 8px; padding-top: 0px; padding-right: 0px; padding-bottom: 0px; padding-left: 0px; text-align: center; background-position: initial initial; background-repeat: no-repeat no-repeat; ">
/moikompas.ru/img/bg_h3_module.gif" target="_blank">http://moikompas.ru/img/bg_h3_module.gif); background-attachment: initial; background-origin: initial; background-clip: initial; background-color: initial; color: rgb(255, 255, 255); float: left; height: 26px; line-height: 26px; margin-top: 0px; margin-right: 0px; margin-bottom: 0px; margin-left: 0px; min-width: 8px; padding-top: 0px; padding-right: 9px; padding-bottom: 0px; padding-left: 9px; text-align: center; background-position: 100% 100%; background-repeat: no-repeat no-repeat; ">4
Скрещенные петли
Если, набирая петли, ввести крючок сначала под 2-ю, затем под 1-ю петлю основания, то получится узор в виде крестиков.
/moikompas.ru/img/bg_h3_module.gif" target="_blank">http://moikompas.ru/img/bg_h3_module.gif); background-attachment: initial; background-origin: initial; background-clip: initial; background-color: initial; color: rgb(255, 255, 255); float: left; height: 26px; line-height: 26px; margin-top: 0px; margin-right: 4px; margin-bottom: 0px; margin-left: 0px; min-width: 8px; padding-top: 0px; padding-right: 0px; padding-bottom: 0px; padding-left: 0px; text-align: center; background-position: initial initial; background-repeat: no-repeat no-repeat; ">
/moikompas.ru/img/bg_h3_module.gif" target="_blank">http://moikompas.ru/img/bg_h3_module.gif); background-attachment: initial; background-origin: initial; background-clip: initial; background-color: initial; color: rgb(255, 255, 255); float: left; height: 26px; line-height: 26px; margin-top: 0px; margin-right: 0px; margin-bottom: 0px; margin-left: 0px; min-width: 8px; padding-top: 0px; padding-right: 9px; padding-bottom: 0px; padding-left: 9px; text-align: center; background-position: 100% 100%; background-repeat: no-repeat no-repeat; ">5
Тунисская изнаночная петля
Тунисское полотно, связанное такими петлями, похоже на изнаночное вязание спицами.
/moikompas.ru/img/bg_video.gif" target="_blank">http://moikompas.ru/img/bg_video.gif); background-attachment: initial; background-origin: initial; background-clip: initial; background-color: rgb(242, 242, 242); clear: left; float: left; margin-top: 0px; margin-right: 0px; margin-bottom: 10px; margin-left: 0px; background-position: initial initial; background-repeat: no-repeat repeat; ">
/moikompas.ru/img/bg_video.gif" target="_blank">http://moikompas.ru/img/bg_video.gif); background-attachment: initial; background-origin: initial; background-clip: initial; background-color: initial; float: left; padding-top: 9px; padding-right: 46px; padding-bottom: 9px; padding-left: 46px; background-position: 100% 0%; background-repeat: no-repeat repeat; ">
/moikompas.ru/img/bg_h3_module.gif" target="_blank">http://moikompas.ru/img/bg_h3_module.gif); background-attachment: initial; background-origin: initial; background-clip: initial; background-color: initial; color: rgb(255, 255, 255); float: left; height: 26px; line-height: 26px; margin-top: 0px; margin-right: 4px; margin-bottom: 0px; margin-left: 0px; min-width: 8px; padding-top: 0px; padding-right: 0px; padding-bottom: 0px; padding-left: 0px; text-align: center; background-position: initial initial; background-repeat: no-repeat no-repeat; ">
/moikompas.ru/img/bg_h3_module.gif" target="_blank">http://moikompas.ru/img/bg_h3_module.gif); background-attachment: initial; background-origin: initial; background-clip: initial; background-color: initial; color: rgb(255, 255, 255); float: left; height: 26px; line-height: 26px; margin-top: 0px; margin-right: 0px; margin-bottom: 0px; margin-left: 0px; min-width: 8px; padding-top: 0px; padding-right: 9px; padding-bottom: 0px; padding-left: 9px; text-align: center; background-position: 100% 100%; background-repeat: no-repeat no-repeat; ">6
Тунисская лицевая петля
Узор, выполненный тунисскими лицевыми петлями, ничем не отличается от вывязанного на спицах лицевого полотна.
/moikompas.ru/img/bg_video.gif" target="_blank">http://moikompas.ru/img/bg_video.gif); background-attachment: initial; background-origin: initial; background-clip: initial; background-color: rgb(242, 242, 242); clear: left; float: left; margin-top: 0px; margin-right: 0px; margin-bottom: 10px; margin-left: 0px; background-position: initial initial; background-repeat: no-repeat repeat; ">
/moikompas.ru/img/bg_video.gif" target="_blank">http://moikompas.ru/img/bg_video.gif); background-attachment: initial; background-origin: initial; background-clip: initial; background-color: initial; float: left; padding-top: 9px; padding-right: 46px; padding-bottom: 9px; padding-left: 46px; background-position: 100% 0%; background-repeat: no-repeat repeat; ">
/moikompas.ru/img/bg_h3_module.gif" target="_blank">http://moikompas.ru/img/bg_h3_module.gif); background-attachment: initial; background-origin: initial; background-clip: initial; background-color: initial; color: rgb(255, 255, 255); float: left; height: 26px; line-height: 26px; margin-top: 0px; margin-right: 4px; margin-bottom: 0px; margin-left: 0px; min-width: 8px; padding-top: 0px; padding-right: 0px; padding-bottom: 0px; padding-left: 0px; text-align: center; background-position: initial initial; background-repeat: no-repeat no-repeat; ">
/moikompas.ru/img/bg_h3_module.gif" target="_blank">http://moikompas.ru/img/bg_h3_module.gif); background-attachment: initial; background-origin: initial; background-clip: initial; background-color: initial; color: rgb(255, 255, 255); float: left; height: 26px; line-height: 26px; margin-top: 0px; margin-right: 0px; margin-bottom: 0px; margin-left: 0px; min-width: 8px; padding-top: 0px; padding-right: 9px; padding-bottom: 0px; padding-left: 9px; text-align: center; background-position: 100% 100%; background-repeat: no-repeat no-repeat; ">7
Основные петли и приемы вязания
/moikompas.ru/img/bg_h3_module.gif" target="_blank">http://moikompas.ru/img/bg_h3_module.gif); background-attachment: initial; background-origin: initial; background-clip: initial; background-color: initial; color: rgb(255, 255, 255); float: left; height: 26px; line-height: 26px; margin-top: 0px; margin-right: 4px; margin-bottom: 0px; margin-left: 0px; min-width: 8px; padding-top: 0px; padding-right: 0px; padding-bottom: 0px; padding-left: 0px; text-align: center; background-position: initial initial; background-repeat: no-repeat no-repeat; ">
/moikompas.ru/img/bg_h3_module.gif" target="_blank">http://moikompas.ru/img/bg_h3_module.gif); background-attachment: initial; background-origin: initial; background-clip: initial; background-color: initial; color: rgb(255, 255, 255); float: left; height: 26px; line-height: 26px; margin-top: 0px; margin-right: 0px; margin-bottom: 0px; margin-left: 0px; min-width: 8px; padding-top: 0px; padding-right: 9px; padding-bottom: 0px; padding-left: 9px; text-align: center; background-position: 100% 100%; background-repeat: no-repeat no-repeat; ">8
Ажурное тунисское вязание
Тунисское ажурное
вязание крючком чрезвычайно легко. Первый ряд петелек делается по способу простого тунисского вязания. На возвратном ряду последовательно связывают вместе 2 и 3 или 3 и 4 петельки
предшествующего ряда и заменяют их таким же количеством воздушных петель. В следующих рядах, чтобы сделать ряд петелек, крючок продевают в воздушные петли.
/moikompas.ru/img/bg_h3_module.gif" target="_blank">http://moikompas.ru/img/bg_h3_module.gif); background-attachment: initial; background-origin: initial; background-clip: initial; background-color: initial; color: rgb(255, 255, 255); float: left; height: 26px; line-height: 26px; margin-top: 0px; margin-right: 4px; margin-bottom: 0px; margin-left: 0px; min-width: 8px; padding-top: 0px; padding-right: 0px; padding-bottom: 0px; padding-left: 0px; text-align: center; background-position: initial initial; background-repeat: no-repeat no-repeat; ">
/moikompas.ru/img/bg_h3_module.gif" target="_blank">http://moikompas.ru/img/bg_h3_module.gif); background-attachment: initial; background-origin: initial; background-clip: initial; background-color: initial; color: rgb(255, 255, 255); float: left; height: 26px; line-height: 26px; margin-top: 0px; margin-right: 0px; margin-bottom: 0px; margin-left: 0px; min-width: 8px; padding-top: 0px; padding-right: 9px; padding-bottom: 0px; padding-left: 9px; text-align: center; background-position: 100% 100%; background-repeat: no-repeat no-repeat; ">9
Уроки и схемы тунисского вязания на английском языке
/moikompas.ru/img/bg_h3_module.gif" target="_blank">http://moikompas.ru/img/bg_h3_module.gif); background-attachment: initial; background-origin: initial; background-clip: initial; background-color: initial; color: rgb(255, 255, 255); float: left; height: 26px; line-height: 26px; margin-top: 0px; margin-right: 4px; margin-bottom: 0px; margin-left: 0px; min-width: 8px; padding-top: 0px; padding-right: 0px; padding-bottom: 0px; padding-left: 0px; text-align: center; background-position: initial initial; background-repeat: no-repeat no-repeat; ">
/moikompas.ru/img/bg_h3_module.gif" target="_blank">http://moikompas.ru/img/bg_h3_module.gif); background-attachment: initial; background-origin: initial; background-clip: initial; background-color: initial; color: rgb(255, 255, 255); float: left; height: 26px; line-height: 26px; margin-top: 0px; margin-right: 0px; margin-bottom: 0px; margin-left: 0px; min-width: 8px; padding-top: 0px; padding-right: 9px; padding-bottom: 0px; padding-left: 9px; text-align: center; background-position: 100% 100%; background-repeat: no-repeat no-repeat; ">10
Узоры
/moikompas.ru/img/bg_h3_module.gif" target="_blank">http://moikompas.ru/img/bg_h3_module.gif); background-attachment: initial; background-origin: initial; background-clip: initial; background-color: initial; color: rgb(255, 255, 255); float: left; height: 26px; line-height: 26px; margin-top: 0px; margin-right: 4px; margin-bottom: 0px; margin-left: 0px; min-width: 8px; padding-top: 0px; padding-right: 0px; padding-bottom: 0px; padding-left: 0px; text-align: center; background-position: initial initial; background-repeat: no-repeat no-repeat; ">
/moikompas.ru/img/bg_h3_module.gif" target="_blank">http://moikompas.ru/img/bg_h3_module.gif); background-attachment: initial; background-origin: initial; background-clip: initial; background-color: initial; color: rgb(255, 255, 255); float: left; height: 26px; line-height: 26px; margin-top: 0px; margin-right: 0px; margin-bottom: 0px; margin-left: 0px; min-width: 8px; padding-top: 0px; padding-right: 9px; padding-bottom: 0px; padding-left: 9px; text-align: center; background-position: 100% 100%; background-repeat: no-repeat no-repeat; ">11
Орнамент

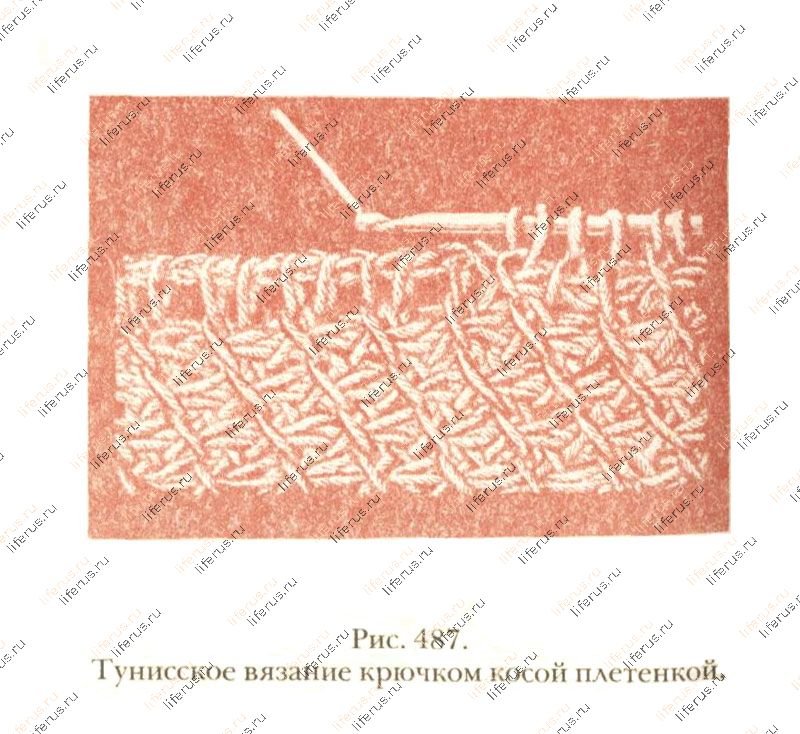
В тунисском вязании орнамент обычно выполняется на вязках
«простая плетёнка» или
«лицевая». Рисунок орнамента наносится на бумагу в клетку так же, как для вышивки крестом. Каждой клетке соответствует одна вытянутая петля, каждый ряд вязания (1-й и 2-й этапы) соответствует ряду рисунка.
При выполнении 1-го этапа ряда набрать петли, чередуя нитки 2—3 цветов, при выполнении 2-го этапа (провязыва-ния горизонтальной цепочкой) вязать соответственно ниткой то одного, то другого цвета, повторяя рисунок 1-го этапа.
При выполнении орнамента свободную нитку, которая не участвует в работе, надо протягивать по изнаночной стороне вязания. При переходе от одного цвета к другому нитки скрещивать. Если же цветную нитку вводить с края, т. е. с первой петли ряда, то в предшествующем ряду последнюю петлю горизонтальной косички 2-го этапа надо провязать ниткой нового цвета. Чтобы протягиваемые с изнаночной стороны свободные от работы нитки не стягивали орнамент, полотно при вязании надо слегка растягивать, но в то же время протяжки ниток не должны провисать. При вязании длинным крючком не рекомендуется использовать узор с крупным рисунком орнамента, чтобы по изнаночной стороне не проходили слишком длинные протяжки. Не рекомендуются многоцветные рисунки, т. к. свободные нитки, проходящие по изнаночной стороне вязания, создадут большое утолщение вязаного полотна.
Источник
Жаккардовое вязание крючком -
Тема на форуме Осинки
Схемы орнаментов для вязания и вышивки
/moikompas.ru/img/bg_h3_module.gif" target="_blank">http://moikompas.ru/img/bg_h3_module.gif); background-attachment: initial; background-origin: initial; background-clip: initial; background-color: initial; color: rgb(255, 255, 255); float: left; height: 26px; line-height: 26px; margin-top: 0px; margin-right: 4px; margin-bottom: 0px; margin-left: 0px; min-width: 8px; padding-top: 0px; padding-right: 0px; padding-bottom: 0px; padding-left: 0px; text-align: center; background-position: initial initial; background-repeat: no-repeat no-repeat; ">
/moikompas.ru/img/bg_h3_module.gif" target="_blank">http://moikompas.ru/img/bg_h3_module.gif); background-attachment: initial; background-origin: initial; background-clip: initial; background-color: initial; color: rgb(255, 255, 255); float: left; height: 26px; line-height: 26px; margin-top: 0px; margin-right: 0px; margin-bottom: 0px; margin-left: 0px; min-width: 8px; padding-top: 0px; padding-right: 9px; padding-bottom: 0px; padding-left: 9px; text-align: center; background-position: 100% 100%; background-repeat: no-repeat no-repeat; ">12
Как менять цвет нити в середине ряда
/moikompas.ru/img/bg_video.gif" target="_blank">http://moikompas.ru/img/bg_video.gif); background-attachment: initial; background-origin: initial; background-clip: initial; background-color: rgb(242, 242, 242); clear: left; float: left; margin-top: 0px; margin-right: 0px; margin-bottom: 10px; margin-left: 0px; background-position: initial initial; background-repeat: no-repeat repeat; ">
/moikompas.ru/img/bg_video.gif" target="_blank">http://moikompas.ru/img/bg_video.gif); background-attachment: initial; background-origin: initial; background-clip: initial; background-color: initial; float: left; padding-top: 9px; padding-right: 46px; padding-bottom: 9px; padding-left: 46px; background-position: 100% 0%; background-repeat: no-repeat repeat; ">
/moikompas.ru/img/bg_h3_module.gif" target="_blank">http://moikompas.ru/img/bg_h3_module.gif); background-attachment: initial; background-origin: initial; background-clip: initial; background-color: initial; color: rgb(255, 255, 255); float: left; height: 26px; line-height: 26px; margin-top: 0px; margin-right: 4px; margin-bottom: 0px; margin-left: 0px; min-width: 8px; padding-top: 0px; padding-right: 0px; padding-bottom: 0px; padding-left: 0px; text-align: center; background-position: initial initial; background-repeat: no-repeat no-repeat; ">
/moikompas.ru/img/bg_h3_module.gif" target="_blank">http://moikompas.ru/img/bg_h3_module.gif); background-attachment: initial; background-origin: initial; background-clip: initial; background-color: initial; color: rgb(255, 255, 255); float: left; height: 26px; line-height: 26px; margin-top: 0px; margin-right: 0px; margin-bottom: 0px; margin-left: 0px; min-width: 8px; padding-top: 0px; padding-right: 9px; padding-bottom: 0px; padding-left: 9px; text-align: center; background-position: 100% 100%; background-repeat: no-repeat no-repeat; ">13
Тунисское вязание с бисером
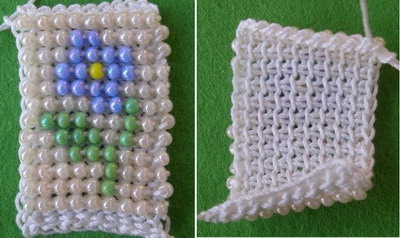
Подробный мастер-класс с пошаговыми фото >>
C помощью этой техники можно создавать разнообразные красивые вещи: сумки, косметички, чехлы для мобильного телефона и т. д.
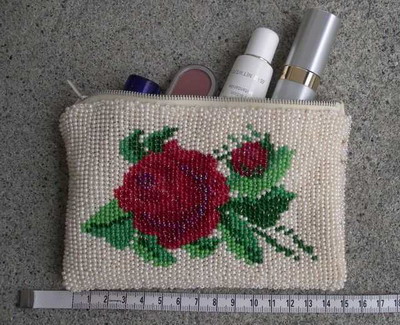 Для схемы вязания с бисером подойдет любая схема для вышивки.
/moikompas.ru/img/bg_h3_module.gif" target="_blank">http://moikompas.ru/img/bg_h3_module.gif); background-attachment: initial; background-origin: initial; background-clip: initial; background-color: initial; color: rgb(255, 255, 255); float: left; height: 26px; line-height: 26px; margin-top: 0px; margin-right: 4px; margin-bottom: 0px; margin-left: 0px; min-width: 8px; padding-top: 0px; padding-right: 0px; padding-bottom: 0px; padding-left: 0px; text-align: center; background-position: initial initial; background-repeat: no-repeat no-repeat; ">
/moikompas.ru/img/bg_h3_module.gif" target="_blank">http://moikompas.ru/img/bg_h3_module.gif); background-attachment: initial; background-origin: initial; background-clip: initial; background-color: initial; color: rgb(255, 255, 255); float: left; height: 26px; line-height: 26px; margin-top: 0px; margin-right: 0px; margin-bottom: 0px; margin-left: 0px; min-width: 8px; padding-top: 0px; padding-right: 9px; padding-bottom: 0px; padding-left: 9px; text-align: center; background-position: 100% 100%; background-repeat: no-repeat no-repeat; ">14
Модели тунисского вязания
/moikompas.ru/img/bg_h3_module.gif" target="_blank">http://moikompas.ru/img/bg_h3_module.gif); background-attachment: initial; background-origin: initial; background-clip: initial; background-color: initial; color: rgb(255, 255, 255); float: left; height: 26px; line-height: 26px; margin-top: 0px; margin-right: 4px; margin-bottom: 0px; margin-left: 0px; min-width: 8px; padding-top: 0px; padding-right: 0px; padding-bottom: 0px; padding-left: 0px; text-align: center; background-position: initial initial; background-repeat: no-repeat no-repeat; ">
/moikompas.ru/img/bg_h3_module.gif" target="_blank">http://moikompas.ru/img/bg_h3_module.gif); background-attachment: initial; background-origin: initial; background-clip: initial; background-color: initial; color: rgb(255, 255, 255); float: left; height: 26px; line-height: 26px; margin-top: 0px; margin-right: 0px; margin-bottom: 0px; margin-left: 0px; min-width: 8px; padding-top: 0px; padding-right: 9px; padding-bottom: 0px; padding-left: 9px; text-align: center; background-position: 100% 100%; background-repeat: no-repeat no-repeat; ">15
Жакет
/moikompas.ru/img/bg_h3_module.gif" target="_blank">http://moikompas.ru/img/bg_h3_module.gif); background-attachment: initial; background-origin: initial; background-clip: initial; background-color: initial; color: rgb(255, 255, 255); float: left; height: 26px; line-height: 26px; margin-top: 0px; margin-right: 4px; margin-bottom: 0px; margin-left: 0px; min-width: 8px; padding-top: 0px; padding-right: 0px; padding-bottom: 0px; padding-left: 0px; text-align: center; background-position: initial initial; background-repeat: no-repeat no-repeat; ">
/moikompas.ru/img/bg_h3_module.gif" target="_blank">http://moikompas.ru/img/bg_h3_module.gif); background-attachment: initial; background-origin: initial; background-clip: initial; background-color: initial; color: rgb(255, 255, 255); float: left; height: 26px; line-height: 26px; margin-top: 0px; margin-right: 0px; margin-bottom: 0px; margin-left: 0px; min-width: 8px; padding-top: 0px; padding-right: 9px; padding-bottom: 0px; padding-left: 9px; text-align: center; background-position: 100%

 Условные обозначения


