-Метки
english Браслет Коврик авторская игрушка ангелы африка благотворительность блог брошь верхняя одежда выкройки вязаные интересности вязаные цветы вязаный креатив грызуны декор деревья дети для мужчин для рукоделия для самых маленьких дополнительный доход елка журналы зайцы здоровье земноводные игрушки из носков игры индия интересное коврики конкурсы конфетка кофта кошачьи кукла купальник лесные жители лето люди мальчикам мелочи мех мишка мишки мужчинам мультяшки на на голову на ноги на руки на шею напопник насекомые обувь открытка пальто пернатые пирожки платье плед плетение подводный мир подушка подушки полезное полезности помпоны программы птицы пуговицы радуга рисунки на стенах салфетка сердце серьги сказки скотный двор слоны смешаная техника собаки спасибо сумка сумки схемы тильда топ топики торт узоры украшения фетр цветы шапочка шарф шитые интересности шорты юбка японасхемы
-Рубрики
- вязание (1723)
- игрушки (560)
- взрослым (382)
- детям (377)
- идеи (104)
- сумки (60)
- уроки (57)
- пледы (50)
- украшения (37)
- мои творения (30)
- журналы (14)
- шитье (751)
- игрушки (337)
- детям (100)
- идеи (78)
- взрослым (70)
- ремонт одежды (переделки) (50)
- уроки (26)
- сумки (18)
- печворк (17)
- мои творения (8)
- АВТОРА (2)
- творчество (415)
- рисунок (59)
- упаковка (40)
- необычное искусство (30)
- вторая жизнь (29)
- декупаж (19)
- кракелюр (4)
- мои творения (1)
- Все для детей (320)
- развитие (116)
- творим с детьми (80)
- english (19)
- творят дети (6)
- Общество (317)
- психология (83)
- братья наши меншие (78)
- города и страны (37)
- мода (27)
- самые-самые-самые (19)
- знаменитые (6)
- все для дома (239)
- для комнат (108)
- для кухни (64)
- интерьер (45)
- бисер (232)
- украшения (120)
- игрушки (23)
- уроки (20)
- мои творения (1)
- праздники (212)
- Новый год (128)
- Свадьба (26)
- День святого Валентина (19)
- Пасха (14)
- Halloween (8)
- 23 февраля (3)
- еда (161)
- сладкое (90)
- поделки из бумаги (157)
- объемное оригами (17)
- плетение из газет (16)
- квиллинг (14)
- папье-маше (9)
- идеи (1)
- красота и здоровье (141)
- все для игрушек (122)
- аксессуары (55)
- мебель (18)
- лепка (117)
- уроки (54)
- соленое тесто (28)
- скульптура (12)
- фотография (76)
- фотографы (18)
- уроки (10)
- вышивка (63)
- схемы (42)
- идеи (4)
- мои творения (2)
- Из моей жизни (59)
- дочка (13)
- мама (8)
- МАСТЕРА своего дела (47)
- ленты (47)
- вышивка (9)
- идеи (4)
- Юмор (40)
- валяние (38)
- уроки (17)
- валяные игрушки (9)
- АВТОРА (4)
- идеи (3)
- Спорт (34)
- художественная гимнастика (19)
- литература (27)
- поэзия (23)
- мое творчество (6)
- проза (1)
- photoshop (19)
- уроки (10)
- мои работы (2)
- рамки (1)
- Натуральные камни (0)
-Музыка
- OT VINTA - Jingle bells (Новорічний дзинь)
- Слушали: 3217 Комментарии: 5
-Фотоальбом

- мамулькины работы
- 01:55 10.07.2015
- Фотографий: 90

- вязаные игрушки
- 15:35 26.12.2012
- Фотографий: 89

- разное вязаное
- 22:57 21.12.2012
- Фотографий: 46
-Поиск по дневнику
-Подписка по e-mail
-Статистика
Аббалденная вязаная елка. Мужской взгляд. |
Девочки, ходила по просторам интернета и набрела на зарубежный сайт мужских блогов, чего там только нет. Был там и один блог мужчины, который вяжет. Вот какую замечательную идею я из него почерпнула. Уже не на этот, но на следуйщий НГ будет просто супер!
Думаю и без перевода все понятно)))
Merry Christmas Tree!
I was having trouble posting this over the last few days, but I was finally able to get it posted.
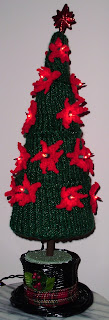
My final Christmas project for this year was a Christmas tree I designed myself! This adorable tree decorated with poinsettias and lights stands 27.5 inches tall and was a delight to make!
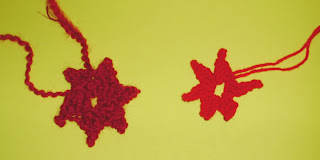
First I started by deciding on how I wanted the poinsettias to look. I created them all in one piece, using the flower loom and Homespun candy apple red yarn. But they came out looking more like a star (the one on the left), and they weren't the right color. I tried again, increasing the number of leaves and using red heart red yarn. Now it looked more like a poinsettia to me (the one on the right):
В результате долгих мучений подошел больше цветок что справа
I knit 20 poinsettias and set them aside.
To knit the tree, I used Homespun Evergreen Christmas yarn and every round loom I had. I knit each section of the tree from small to large, and then sewed them together with yarn. I knit the bottom section of the tree a little longer than the cone so I could pull the tree taut against the cone and cinch it underneath.
Нужно связать 20 цветояков.
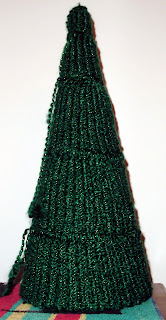
After I completed it I thought of a different way of creating the tree in one piece; maybe next year I'll try it out and see if it works.
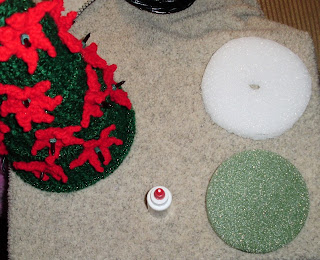
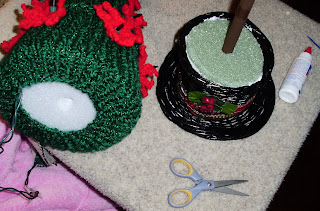
To assemble the tree, I purchased a clear plastic cone from an online craft store to use as the inside of the tree, because I knew styrofoam wouldn't work well with the lights. Plus I didn't want the color of the styrofoam to show through the knitting. I bought a wood dowel and painted the bottom part of it brown, to use as the tree trunk. I bought a strand of 20 red Christmas lights. Then I bought some styrofoam discs that I would cut to insert and glue inside the bottom of the tree and into the base of the pot, to hold the tree steady and upright.
Before I put the lights in, I sewed the poinsettias onto the tree. This could have been a big mistake, since I didn't take into account the distance between each light bulb -vs- the distance I had sewn on each poinsettia. But fortunately all of the lights were able to reach the centers of eack poinsettia as I had planned.
Another problem with sewing the poinsettias on the tree first happened when I had to space and match each light with the center of each poinsettia I had sewn on. I had to use an exacto knife to mark the center of each poinsettia on the plastic cone. Then I enlarged the hole in the plastic cone and pushed each light through. Then I secured the lights using black electrical tape, which I knew would be covered up by the poinsettia.
Next I carefully turned the tree inside out, and pushed the lights through the center of each poinsettia, starting at the top. This was difficult, but not impossible. I poked a pencil through the center of each poinsettia to guide my finger and to make the hole big enough for the light to push through. The ones at the top were the hardest, but after the first few I was able to position the lights both inside and outside the cone through the yarn.
At first I had planned to knit the star on top of the tree. I was going to make a large poinsettia for the top, but I just wasn't getting a good design together for how I wanted it to look. So I found a star at the craft store to use instead.
The last part I bought was the pot itself: a cute wicker basket that I found at the craft store, in the shape of a snowman's hat. It was just the right finishing touch!
Here is what the tree looks like with the lights on,
and an artistic rendering of it:
| Рубрики: | вязание/игрушки праздники/Новый год |
Процитировано 9 раз
Понравилось: 1 пользователю
| Комментировать | « Пред. запись — К дневнику — След. запись » | Страницы: [1] [Новые] |


