Поиск схем и описаний моделей по картинке Допустим нам понравилась модель, но нет...
готовим дома - (1)Зачем при варке риса добавлять уксус Если добавить в рис одну-две чайные ложки уксуса, каша п...
тапочки - (0)Вяжем следки спицами Для вязания следков использована пряжа двух контрастных цветов, чтобы сле...
Без заголовка - (0)Шьем себе сами бюстгальтер - выкройка Ах, сколько девушек мучаются с выбором нижнего белья! То цв...
Без заголовка - (0)Узоры спицами Узоры спицами (46 узоров со схемами) 2. 3. 4. ...
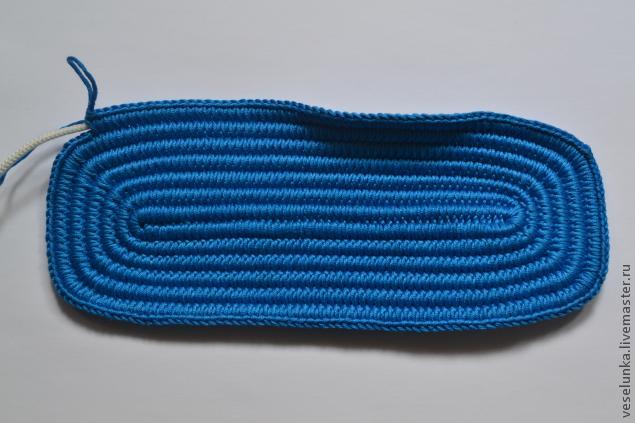
Вяжем дно для сумки. |
Сегодня я поделюсь тем, как связать плотное и удобное дно для сумки, прилагая минимум усилий!
|
Метки: дно для сумки |
Учимся вязать бабушкин квадрат. |


Foundation Ring:
begin by making 5 chains (ch), join with a slip stitch (ss) to the 5th ch from hook to form a ring,
![]()

Round 1:
1) make 3 ch ((beginning ch) count this 3 ch as your first tr (US dc) of this round & throughout the entire pattern) & for this round you will be working into the ring
![]()

2) into ring work (2 tr (US dc), 3 ch) once,


3) then, continue working into ring, make (3 tr (US dc), 3 ch) three times,


4) join with ss into top of beginning ch (3rd ch of beginnging ch) – this join completes the first shell of round.
you should have - 4 shells = 12 tr (US dc) & 4 x 3-ch spaces (sps)


~~~~~~~~~~~~
Round 2:
1) make 4 ch ((beginning ch) count this 4 ch as your first tr (US dc) plus 1 ch of this round & throughout the entire pattern)


2) then * in the next 3-ch sp work (3 tr (US dc), 3 ch, 3 tr(US dc), 1 ch), repeat from * around to last 3-ch sp,


3) in last 3-ch sp work (3tr (US dc), 3 ch, 2 tr (US dc))


4) join with ss to 3rd ch of beginning ch – this join completes the last shell of round
you should have – 8 shells = 24 tr (US dc) – 4 x 3-ch sps – 4 x 1-ch sps


~~~~~~~~~~~~
Round 3:
1) make 3 ch, then into same sp work (2 tr (US dc), 1 ch), you have made the first shell of this round


2) in next corner sp work * (3 tr, 3 ch, 3 tr, 1 ch),


3) in next 1-ch sp work (3 tr, 1 ch),


4) now, repeat from * around to beginning ch, join with ss to top of beginning ch (3rd ch of beginnging ch) – this join completes the first shell of round
you should have 12 shells = 36 tr (US dc) – 4 x 3-ch sps -8 x 1-ch sps


~~~~~~~~~~~~
Round 4:
1) make 4 ch


2) in the next 1-ch sp work (3 tr (US dc), 1 ch),


3) * in the next 3-ch sp work (3 tr (US dc), 3 ch, 3 tr (US dc), 1 ch),


4) then in each next 1-ch sp work (3 tr (US dc), 1 ch), repeat from * around to last 1-ch sp,


5) in last 1-ch sp work (2 tr (US dc))


6) join with ss to 3rd ch of beginning ch – this join completes the last shell of round
you should have – 16 shells = 48 tr(US dc) – 4 x 3-ch sps – 12 x 1-ch sps


Rounds 3 & 4 are the repeat rounds, but you can finish off on any round or just keep going to any desired size
~~~~~~~~~~~~~~~~~~~~~~~~~~~~~~~~~~~~~

The following drawings shows colour changes on every round… however, how many rounds per colour you work is entirely up to you – experiment with these colour changes & amaze yourself with the creativity you may never have thought you had….
Basically you follow the above instructions except that you finish off each colour round before starting a new colour round

~~~~~~~~~~~~
1) Bring in your new colour in any 3-ch sp with a slip stitch & make 3 ch ((beginning ch) count this 3 ch as your first tr (US dc) of this round & throughout the pattern), in the same space work (2tr (US dc), 3 ch, 3 tr (US dc)),
Tip: leave generous tail ends & wherever possible work over tail ends as you work

2) then, depending on the round, work as for one colour Gr/square instructions

~~~~~~~~~~~~~~~~~~~~~~~~~~~~~~~~~~~~~
There are many variations, but the following the 2 methods are the ones I use most often for edging Granny Squares:
Example No 1. Round 1:
1a) after finishing your last round with a slip stitch do not finish off but continue with this last colour in use (working colour) & make 1 ch, & dc (US sc) in same stitch,


1b) now * work dc (US sc) in each 1-ch space & in each stitch across to next 3-ch space, work 3 dc (US sc) in 3-ch space, then repeat from * around & join with a slip stitch to the first dc (US sc) but do not finish off
Tip: I like to place a marker in the middle stitch of the 3 corner stitches for easy identification on the next round & I leave these markers in so that when it comes to joining my squares later I only have to match them corner marker to corner marker


~~~~~~~~~~
Example No 1. Round 2:
1c) make 1 ch, & dc (US sc) in same stitch,


1d) now * work dc (US sc) in each stitch across to next middle corner stitch, work 3 dc (US sc) in middle corner stitch, then repeat from * around & join with a slip stitch to the first dc (US sc) & finish off


~~~~~~~~~~~~~~~~~~~~~~~~~~~~~~~~~~~~~
Example No 2. Round 1:
2a) finish off your last colour of square & bring in your new colour with a dc (US sc) in any corner 3-ch space, work 2 dc in same space (this makes your first 3-corner stitches)
Tip: joining with a dc (US sc) – start with the slip knot on hook, insert hook into space indicated by pattern & draw up a loop (2 loops on hook), YO & draw through both loops on hook (this counts as the first dc (US sc)) then continue as pattern instruction


2b) now * work dc (US sc) in each stitch & in each 1-ch space across to next 3-ch space, work 3 dc (US sc) in 3-ch space, then repeat from * around & join with a slip stitch to the first dc (US sc) but do not finish off
Tip: I like to place a marker in the middle stitch of the 3 corner stitches for easy identification on the next round & I leave these markers in so that when it comes to joining my squares later I only have to match them corner marker to corner marker


~~~~~~~~~~
Example No 2. Round 2:
2c) make 1 ch, & dc (US sc) in same stitch,


2d) now * work dc (US sc) in each stitch across to next middle corner stitch, work 3 dc (US sc) in middle corner stitch, then repeat from * around & join with a slip stitch to the first dc (US sc) & finish off


~~~~~~~~~~~~~~~~~~~~~~~~~~~~~~~~~~~~~
Метки: Квадратные мотивы |
Носочки Pomatomus! |
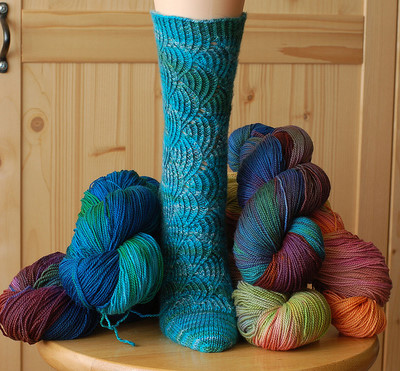

Метки: Носочки Pomatomus! |
Красивые варежки к предстоящим холодам |
Метки: Красивые варежки |
Красивые тапочки на жесткой подошве: вязание крючком |
Метки: Красивые тапочки |
Тапочки-пэчворк МК |


Метки: Тапочки-пэчворк МК |
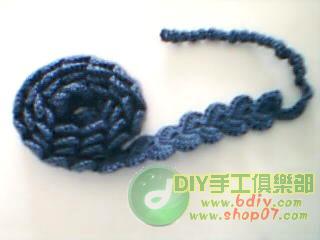
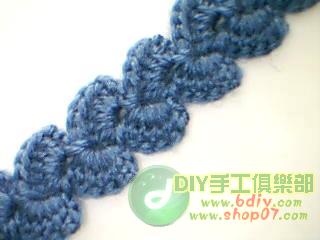
Поясочек |
Метки: Поясочек |
Тапочки красивые |

|
Метки: тапочки |
Тапочки. Вяжутся быстро и легко. |

Цитирую автора
Когда я увидела эти бесплатные тапочки на Рав - Non-felted Slippers by Yuko Nakamura, просто не смогла устоять и тут же взялась за дело. Толстой пряжи у меня не нашлось, поэтому взяла вместе мою пряжу ручного прядения и коммерческую. Вязала на спицах №5 , а не 5,5 как написано в описании, потому как я вяжу слабо.
Я очень, очень и очень довольна тапиками!
Метки: Тапочки. Вяжутся быстро и легко |
ВЯЗАНАЯ БРОШЬ-БУЛАВКА BLUEBIRD |


|