������������������ ���������
 ������ ��� ������������� ��� ^_^
��������� �������� � ������� ������ � ������������ Html-�����. ����� ���������� ��� ������, �������� � ������
������ ��� ������������� ��� ^_^
��������� �������� � ������� ������ � ������������ Html-�����. ����� ���������� ��� ������, �������� � ������ � - �������������� ��� ���������� ���������� � �������� ������������. ����������� ��������� ����������: Internet Explorer 6, Fire Fox 1.5, Opera 9.5, Safari 3.1.1 �� ���������� JavaScript. �������� ��� ����� ����
 ������� ������������������ ����, ������� �����, ��� ��������, 24 ����. �������� ������ � ����� �����!
 ������-���� "Empire"�������� ���� ��������� ����� � �������������� �������� � ����� ���������� ����������� ����������� � ���� Goodgame Empire.
����� ���� ����������� �������, �������� �� � ������� �� ������ �������. �
������-���� "Empire"�������� ���� ��������� ����� � �������������� �������� � ����� ���������� ����������� ����������� � ���� Goodgame Empire.
����� ���� ����������� �������, �������� �� � ������� �� ������ �������. �
DIY � Aufbügelbild selber machen |
|
Nachhaltigkeit im Kinderzimmer � Spielzeug-Orca DIY |
|
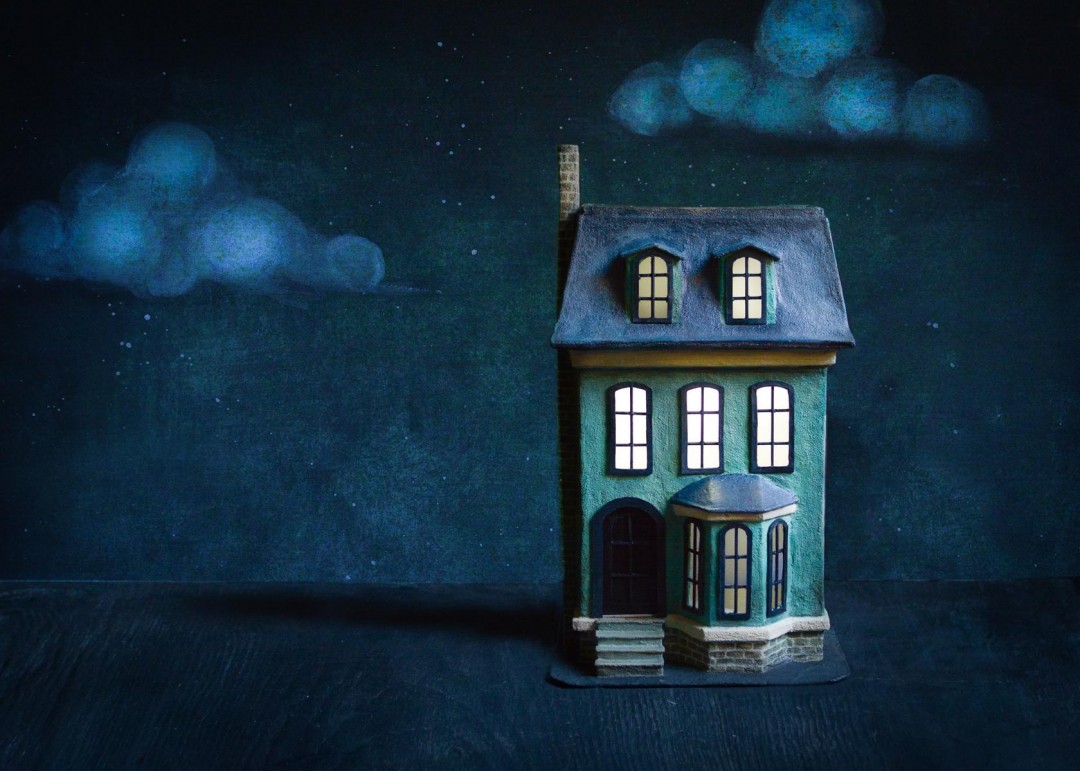
Nachhaltigkeit im Kinderzimmer � Puppenhaus DIY |
|
Die (vor)letzte Rettung � Neuer Anstrich für alte Polster |
|
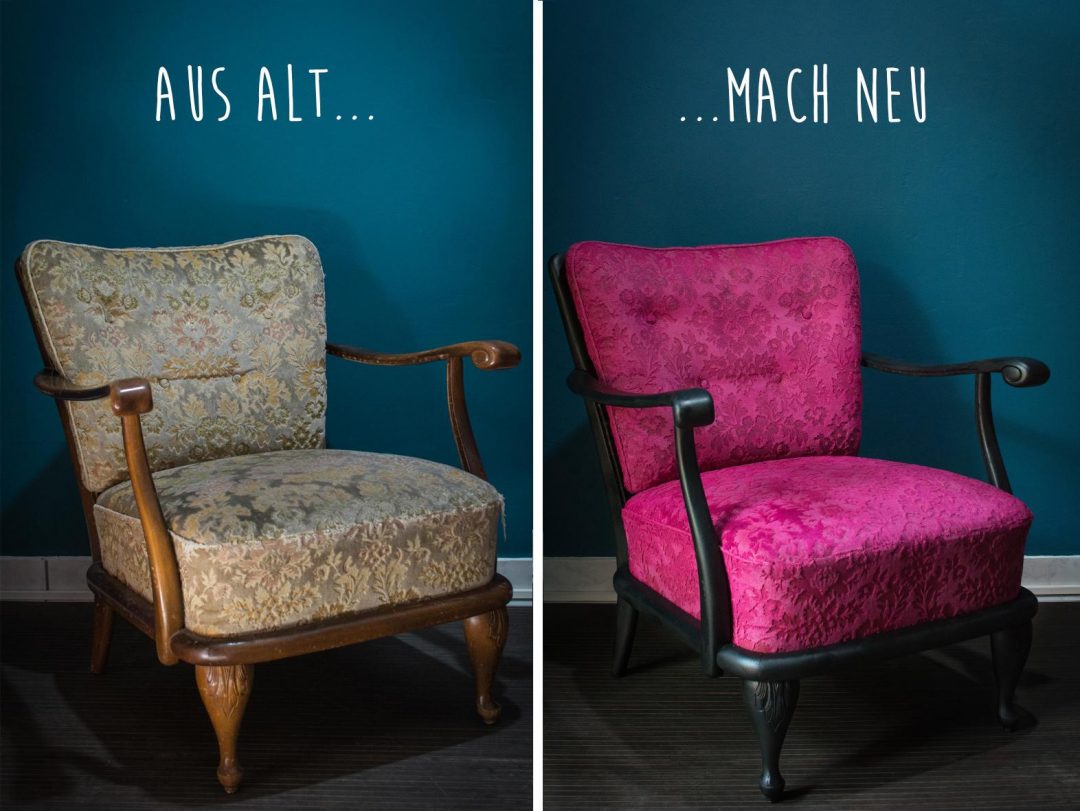
Die (vor)letzte Rettung � Neuer Anstrich für alte Polster |
28. Juni 2016
Dieser Artikel enthält Affiliate Links
Vor einigen Jahren verliebten wir uns bei Ebay-Kleinanzeigen in zwei Chippendale-Sessel aus den 1960ern. Sie waren günstig abzugeben – im Zuge einer Bordellauflösung.
In Ermangelung eines eigenen Autos transportierten wir die beiden stark parfümierten Schmuckstücke damals mit der S-Bahn nach Hause und schlossen sie sofort ins Herz. Die erste Zeit standen die Sessel gemeinsam mit einem kleinen Tisch im Wohnzimmer. Doch irgendwann trennten wir sie und einer kam in die Küche.
Leider muss so ein Sessel in der Küche aber auch viel ertragen. Umgekippten Kakao zum Beispiel. Oder kletternde Kleinkinder, die ihre Chance wittern, auf dem Weg über die Armlehne auf die Arbeitsplatte und an die Kekse zu gelangen.
So kam es, dass zunächst das Flechtwerk an den Armlehnen riss, bis wir es komplett entfernen mussten. Dadurch ging viel Stabilität verloren und immer mal wieder flog die ein oder andere Armlehne ab. Außerdem waren Sitz-und Rückenpolster völlig abgelebt. Ein Knopf war weg, der Stoff wurde immer dünner und begann an einigen Stellen schon zu reißen.
Natürlich hätte man den Sessel einem Polsterer anvertrauen können, der ihn mit viel Zeit und Liebe zum Detail wieder in einen passablen Zustand hätte bringen können. Die letzte Rettung sozusagen…
Aber das hätte unser Budget dann doch mehr als gesprengt und so entschieden wir uns für eine andere Möglichkeit: die vorletzte Rettung.
Als Malerin und Illustratorin habe ich schon so einige Dinge bemalt: Papier, Leinwand, Glas, Holz, Wände – und immer mal wieder aus Versehen: Textilien. Ich arbeite seit vielen Jahren mit Acrylfarben und kann eins aus Erfahrung sagen:
Man muss diese Farbe auch nicht bügeln, um sie zu fixieren. Sie haftet wie Kaugummi und denkt gar nicht daran, sich jemals wieder von irgendetwas zu lösen (Deshalb übrigens auch der hübsche Kittel…).
Ich empfehle allerdings trotzdem, die Acrylfarbe für so ein Projekt mit einem Textilmedium zu mischen. Sie lässt sich dann einfacher auftragen und ist nach dem Trocknen etwas geschmeidiger.
Überlegt euch also gut, welchem Möbelstück ihr so eine Behandlung zukommen lasst. Die Entscheidung lässt sich nicht umkehren!

Nehmt euch für so ein Projekt zwei bis drei Tage Zeit. Das Bemalen des Polsterstoffs selbst dauert nicht lang. Aber euer Möbelstück muss selbstverständlich von allen Seiten gut durchtrocknen.
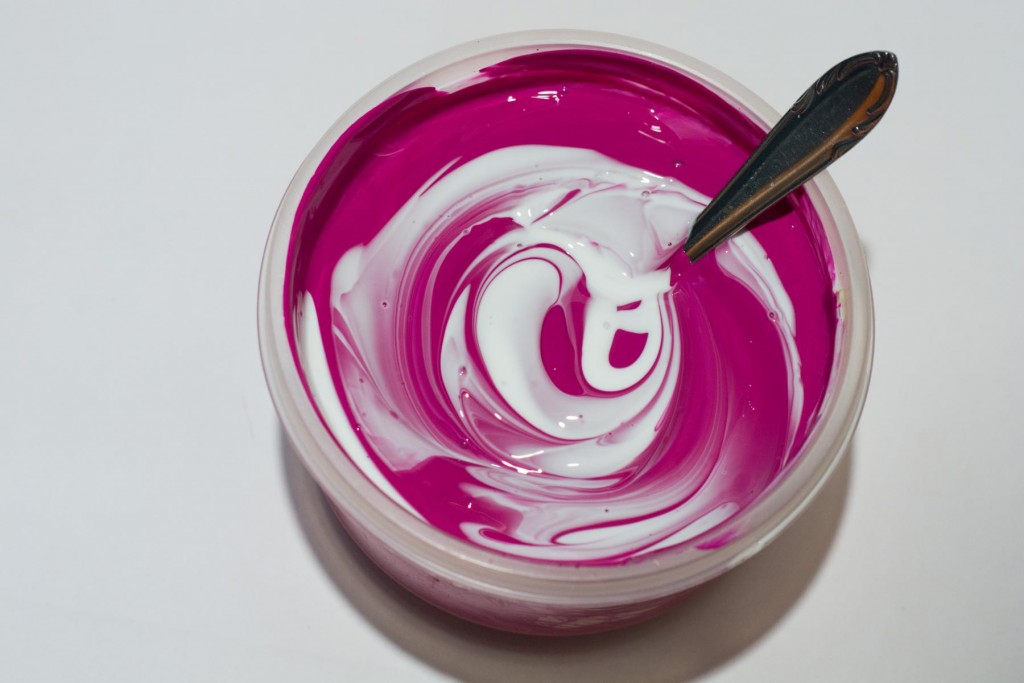
Acrylfarbe (für unseren Sessel waren das ca. 500ml) z.B. Liquitex Basics Acrylfarbe, 400 ml, Quinacridone Magenta
*
Textilmedium (hier ebenfalls 500ml) z.B. Liquitex 126804 Professional Acryl-Textilmedium, 118 ml
*
eine Sprühflasche mit Wasser
ein breiter Pinsel

Mischt die Farbe im Verhältnis 1:1 mit dem Textilmedium. (Am Ende sollten keine weißen Streifen mehr zu sehen sein!)
 Besprüht den Stoff erst mit Wasser und streicht dann mit der Farbe darüber. Wann immer ihr das Gefühl habt, dass die Acylfarbe nicht richtig ins Gewebe reinläuft, könnt ihr noch etwas Wasser nachsprühen.
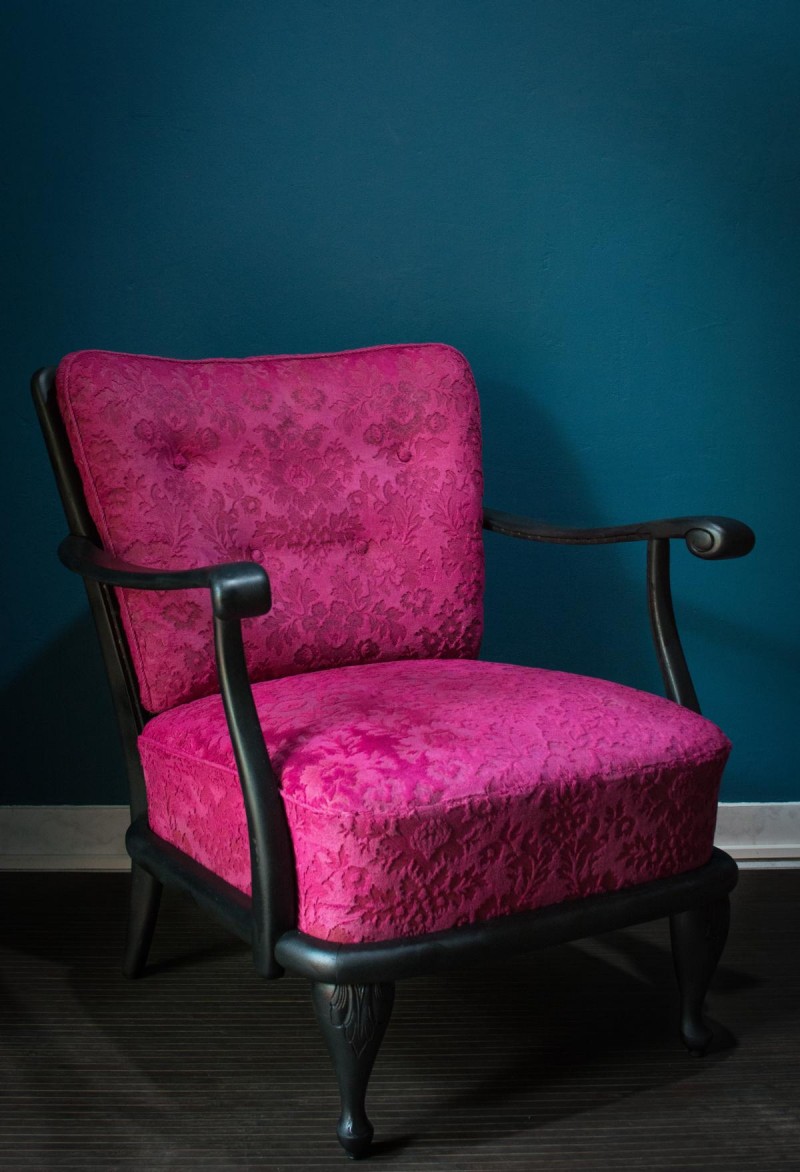
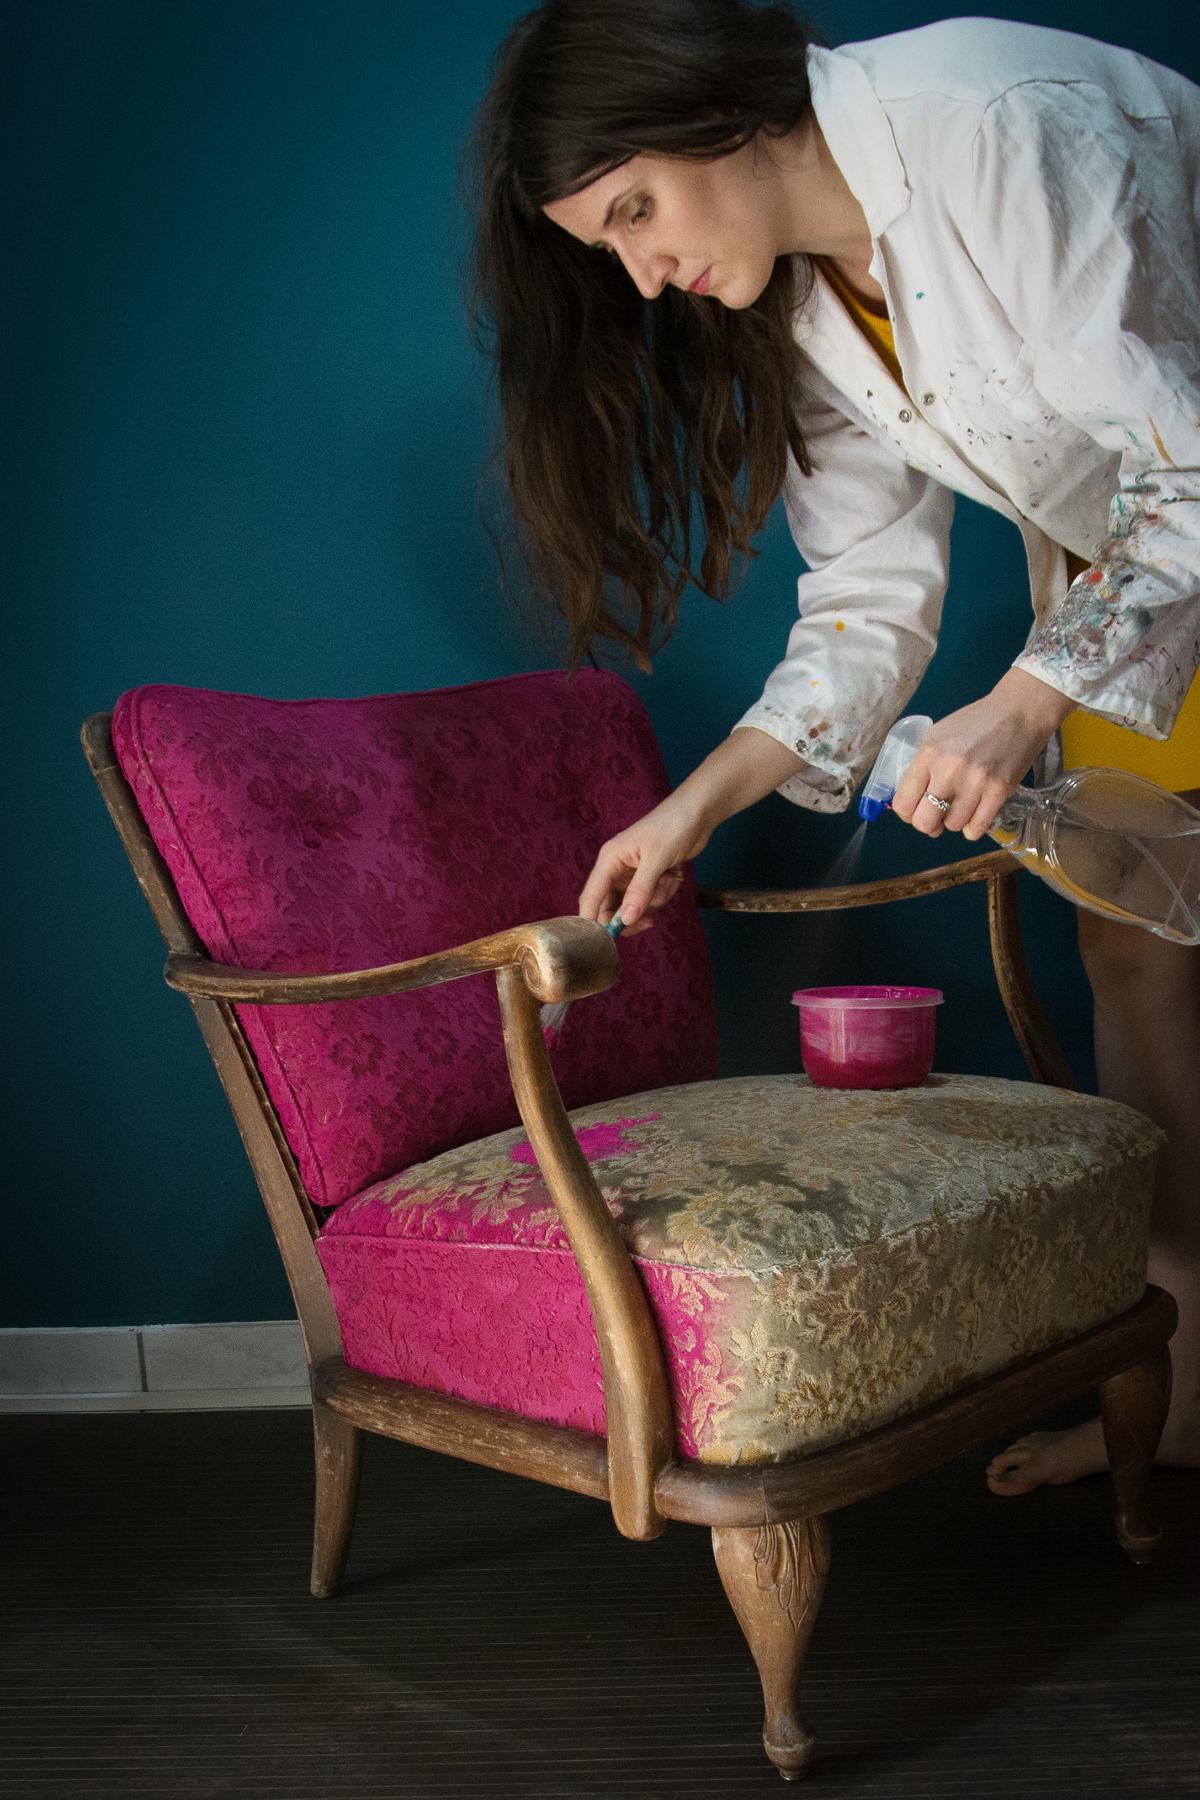 Unser Sessel bekam nicht nur an den gepolsterten Teilen einen neuen Anstrich. Auch die Holzteile sollten am Ende in neuem Glanz erstrahlen. Dafür habe ich das Holz etwas angeschliffen und anschließend mit schwarzer Sprühfarbe bearbeitet.

|
DIY Kerzenhalter RING |
�����: ������ ����� ���������� ������ ������ ��������� |
Fantastik Plastik |
Eigentlich ist Plastik ja gar nicht immer so fantastik. Im Pazifik treibt ein (Plastik-)Müllteppich in der Größe von Texas, das ist etwa 900x die Fläche von Hamburg in Müll!! Da wird selbst Oskar übel.
Nachdem wir nun ja schon alle unsere Plastiktüten bügeln und die ganze Familie mit kleinen Basteleien aus den Ergebnissen beglücken, wenden wir uns heute mal anderen Plastikverpackungen zu.
|
DIY PROJECT:GLASS-JAR MOROCCAN LANTERNS |
|
Schöne Vase aus Beton einfach selber gießen |
|
������-�����: �������� �� �������� ������ |
������� |
�������� �� �������� ������ - �������� �� ��� ����� ������� ������������� ��������. ������������� ���������, ��� ����� ������������, �� ������� ��������, ��� ������ ��������� ���� ��������� �� ��� ���-���� �������� � �������� ������������. ������������� ���������� �������� ��� ��������� ������������� ����� �� ���� ������. ��������, ��������� �� ���-���������� ����� ������ ��������� � ������ �������� ����� ��������. ��� ��� ���������� ����� � ������������� ��������� �����. ��� � ������, � �������, � ��� � �������� � �� �������� ���������. ������������ ���: �����, �����, �����, ����, �����. �������� ��, ������� ��������� ���� �� ������ ���, ��� ������ ����� ����. �� ���. � ������ ������ ������ ���� � ���������� ������� ������ � �������� ������������ ��������� ������. � ��������� ����������� �� ����� ��� ������������� ���������...

�����: ������-����� �������� �������� �������� ������ |
��������� ������. �.�. ������� ������ � ������������ ������, ����������� ������������� � ����� ������ � ����������� |

|
�������� �����. ��������� ��� ��� |
�� ���� ����� ��������, �?
|
����� ��������� ������� (� �� ������ ���������) |

|
�.�. ���� � ������� ������� �����. �������� ������� � ������� ������������� ������� |
����� ����� ���������
�����: � ���� ������-������ �� ����������� ����� ������ ���� � ������� �� ����� ����� «������ �����», ��������� ��������� ������ ������: ������� ���������, «����������� �������», �������� �������, ��������� ����������, ������ � ��������� ������.
������-����� ������� � ����� ���������.
� ���������� ��������� ��������� ������������ ��������� ��������� � ������ ����������� ����������.


|
�������� �������� �� ���� ��� ����� �����. ������-����� |
|
������-�����: ������ ������� ����� ������ ������ |
���� �� ��� ���������� «chalkboards» - ������� (����������) ����� - � ����� �������. ������ � ���������� �������� �������� ������� ���������� ������ � ������ �� � ���� - ������������� «�� ����»!;-)

�����: ������-����� ������� ����� |
������-�����: ������� ������������ ������ � ������� ���������! |
������� ����� � ���������� ������ ����� @Alexandra Yare (����������� ���������) �� ������������ � ����� ���������� ���������� ��� ����������, ������� ���������� ��������� (�� ����. paper clay) ��� �������� �����.
"��� ���������� ���������� ������������ (� � ����� ������, ��������� ) �����, ������� ����� ������������ ��� �������� ��������� �������������� ��������.
�������� �� �������, ����� ��������� ���������� ������, ������� � ����� �������… �� ��� ��������? ����� ���� ��� �������! :-)

�����: ������-����� ������������ ������ �����-���� ������ |
DIY Mad Hatter Tea Table � Fun! - ������ ����� |
This Mad Hatter Tea Table project is whimsical and a wee bit zany!

The creative team at Heirloom Traditions Paint has sponsored this post, because yep, they’re awesome!

If you’d like to follow me down this rabbit hole, you’re gonna need some stuff!
Supplies:
How-to:
When she came to me, this charming little tea table had good lines, functional pull-out trays and lovely scallop medallions – but the tabletop had been badly abused.
(Too many mad tea parties, one supposes…)

The veneer had bubbled and was quite marred. Goodness knows what she’s been through!
I felt an instant affinity for her. Something about her feminine lines, coupled with signs of active use seemed, well, familiar.
Those of us of a certain age can perhaps relate…

After a quick but strenuous session with a hot iron, some parchment paper and an electric sander, the damage had been brought under control.
If only I could work this same magic on MY veneer…

That’s better…a creamy foundation makes our makeover so much smoother!

2. Once the primer has dried (about an hour) a single coat of Heirloom Traditions Rainy Day Chalk Type Paint creates an excellent basis for our whimsical finish.
Such a pretty gray!


Note: for best results, allow the paint to cure overnight prior to applying waxes and distressing.
3. The first layer of Clear Soft Wax is applied to the entire surface with a Best Chalk Brush.


4. Use clean lint-free rags to wipe back the Clear Soft Wax.
Note: If you use Spray Wax, no wiping back is required!
5. Next, a layer of Jet Black Soft Wax is applied to all the nooks and crannies.


6. Wipe back with a clean rag to bring out the lovely qualities of this beautiful wax:

7. Now it’s time to embellish! Cut a piece of patterned paper large enough to cover your tabletop.

8. Apply a generous coat of 1Gel to the surface of the wood, and carefully adhere the paper.
A brayer really helps to get any wrinkles and/or bubbles out.
Note: A spicy vocabulary can facilitate the process, as well.

The 1Gel dries very quickly – I was able to begin distressing the surface of the paper within the hour.
9. A few swipes with sandpaper, and the surface of the slick paper now begins to show signs of wear:

10. To add depth to the finish, Heirloom Traditions Chalk Type Paint in Black Bean, thinned just a bit with water is haphazardly applied with a chip brush…

11. Then wiped back with damp absorbent toweling, leaving a soft layer of shadowing ‘round the edges of the top.

12. Decoupage pretty scrapbook paper to the surface of the pull-out trays, using 1Gel.
13. Sand the paper lightly when dry, to age.
14. Add Jet Black Soft Wax to soften the transition at the edges.
15. When dry, coat with 1Gel to seal and protect.

16. Add detail areas of the bold patterned paper on the trays and on vertical surfaces, to create cohesion in your design:

17. Distress the ‘wear points’ with 400 grit sandpaper, if desired, to expose layers of primer:

She had no knobs when she came to me, but Hobby Lobby had just the right thing.
These little clear glass floral knobs subtly echo the scallop shape of the medallions, unifying the design further:

18. Add a casual ombre effect to the legs by simply painting the feet with thinned Black Bean Chalk Type Paint, and feathering your application upward.

19. Apply Black Bean full strength to just the feet when this layer had dried, leaving a gradually lightening effect from the base to mid-leg.

20. Stipple Black Bean anywhere you wish to create the impression of shadow.
21. Keep a moist rag handy, and alternate between painting pigment on, and wiping it back to get a feathered effect.
22. For this admittedly over-the-top look, keep working the areas of shadow and light until an almost cartoon effect takes shape.
23. Messy stippling with a ratty chip brush gives a slightly deranged over-emphasis to the shadowing, and accentuates the playful mood:

24. Retouch the areas you want to emphasize with a lighter shade.

Here, Heirloom Traditions Nickel Chalk Type Paint has been used to gently highlight areas of interest.
25. Add highlights, then soften with a fingertip:

26. Once the paint has thoroughly cured, apply Jet Black Wax over the darkened areas and buff to a sheen.
27. Finally, apply a coat of 1Gel over the entire piece to seal and protect.
It dries so quickly, you’ll be sipping your well-earned cuppa within the hour!

The perfect place to sit with a good book and cup of tea…
This piece has just enough silliness to make me smile every time I catch a glimpse…
I love the combination of pretty florals with bold black and white:

For more information on Heirloom Traditions Products, please visit www.heirloomtraditionspaint.com
* Full Disclosure: Heirloom Traditions supplied their products to be used in this project, and they sponsored this post – however, I supplied the elbow grease, rescued furniture, design concept, and silliness! All of which reflect my own point of view, regardless of affiliation…
Thank you for visiting The Graphics Fairy today!
Hope you’ve enjoyed this little excursion into zaniness. It was such a fun process creating this Mad Hatter Tea Table…I can’t wait to add humor and whimsy to another furniture project!
Break out your own favorite papers and experiment with playfully embellishing your next reclaimed piece of furniture: it’s sure to make you smile.
If you appreciate a bit of nonsense from time-to-time, stop by Thicketworks to see what all the mayhem is about!
Heather
�����: ������ ����� |
������� �������� - ����� "������". |
������ ����! 
� ��������� �� ���������� ������� �, ������� ��, �� � ������� ������. ����������� ���� ����� ������. �� ���� ��� �������������� ���������� ������ �������� �������.

���������� ������ ��������� �� ����������� ����� �����-���� ��������� ��������. ����������� ������������� ������ (�� ���������) ������, ���������� �� ����� ������� ����������, �������� ������ � ������ ������, �� ������ ��� ������ � ������������, ���� � ����� ���������. ����� ��� ������ �� ���� ���, �� ��� ���-�� ���� �� ��������. �� ���, �������, ������ ������� �� ����. ������� ��, ���������� � ����, ����������, ��� ��� ���� �������� �������� ��������������. ����������� ����, ��� �� ��� �������� �������� � �����. � ��������� �� ����.
����� ����� � ����������� ������. ��������
|
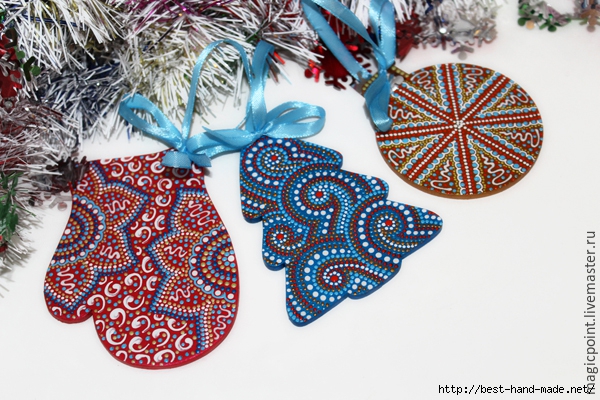
�������� ������� ���������� ��������. ������-����� �� ������� �������� |
����������� ���!
����, ������������ ����������, ��������� � ����� �������� ��������� �� ��������� �� ����� ����������, �������� �� ����� ������������ ���������� - �� �� ���������� ����� ��������� � ������������ ����� ��� ����, � ��������� ������� ��� ����� ������ � �������. � ��� ������ ����� ��������� ������� ���������, ��� ���������� ���������� ����������� �� ����, ������ ��������� ��������� ��� ������������� ������� � ���������.
�������� ������� - ������������� ��� ���������, ����������� ������ �������� �������� ����� ������, �� ����� ���������� �� ������ � ��������������� ����������, �� � ��� ����������� ������� � ��������, ������������ � �.�. ����� ����, ��� ������� �������� ������ �� ����� ������������� �������� � ����������:)
����������� ��������� ������� ������� ����������� ��� ��� � ���� �������������� ������-����� �� ������� � ������� point-to-point ���������� ��������. � �������, ��� �� ������� ���, ��� ��� �� ������ � ���� ��������, ������� �� ����� � ������. ��������� ��������� � �������� ����������� ����������!
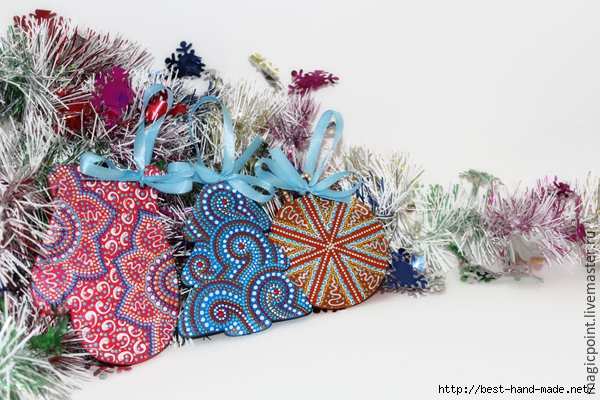
��� ����� ���� �������� � ������ ���� �������, ������� ������ ������ ������? ���� � ���� ������� ����, ������ ����� � ����� ��������! � �������� ���������� �������, ��������� ������ ������, �������� �������, ��� ��� ����� ��� — �������� ������ � ���������! ����� �� ����� �������� �������� ����� ����� ����� ���������� ��������, ����������� � ������� �������� �������.
������� ��� ���������� ������� ������ ������, ��� ����� ������ �� ����������� �������� ������������ ��������������� ��������, ������� — ��� �������� � �����������, �� �, ������� ��, ���� �������!
|