Welcome back, and start posting! The first couple of post will be moderated, while I start messing with the tags and such. So if you post don't worry I'm on almost everyday! ~Peace
Welcome back, and start posting! The first couple of post will be moderated, while I start messing with the tags and such. So if you post don't worry I'm on almost everyday! ~Peace
Dear friends, as the maintainer of the community, I have to inform you that, due to the recent legal problems, I had to stop using LJ as a platform for my community. From now on, all new icons-related materials should be posted to the new community I've recently created, as for old entries, you will be able to find them there.
Using Photoshop create the following bright and crisp coloring: from this: Uses Curves, Selective Coloring and Brightness/Contrast. Not translatable, sorry.
Other examples of this coloring:
Post includes the PSD file for the one created in the tutorial as well as 4 others with similar effects.
Going from this to this: . For Photoshop CS2 - not sure how translatable this is (if you get it to work in another program, let me know! :) Basic to Intermediate difficulty - but I hope I've explained things clearly enough that even a fairly new Photoshop user can figure it out :)
Sometimes I want to put the main focus of my icon way off-centre, either to leave room for text, brushwork, or textures, or just because I think it looks nicer that way. However, when you're working with screencaps, it can often be hard to find a shot with enough space left around the subject to crop it so dramatically. But! You can get around this problem by extending your background...
It's a tutorial made of several tutorials actually: A/ BASICS B/ CUTTING OUT AN IMAGE WITH THE PEN TOOL C/ DRAWING LINES / CURVES / STROKES WITH THE PEN TOOL D/ DRAWING SHAPES WITH THE PEN TOOL
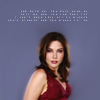
 to
to 


 to
to 


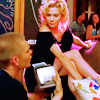
 from this:


 . For Photoshop CS2 - not sure how translatable this is (if you get it to work in another program, let me know! :) Basic to Intermediate difficulty - but I hope I've explained things clearly enough that even a fairly new Photoshop user can figure it out :)
 to
to  or
or  in PSP X.


 to
to 
 to
to 