Looking for More Online Deals? Click here for more THRIFTY DEALS. Please note that Amazon prices tend to change often so prices may be higher or lower without notice.
Понедельник, 18 Февраля 2019 г. 10:51
+ в цитатник
Forse non è stata la miglior Mostra di Venezia per qualità media (pochi i film davvero inaccettabili, molti quelli buoni, rarissimi i capolavori indiscutibili) di certo è stata un’edizione “potente”. Al Lido c’erano i film che tutti i festival volevano. Esclusi quello di Xavier Dolan e Steve McQueen (contentino di Toronto), c’era tutto ciò che ci poteva e doveva essere, inclusi anche titoli che sarebbero stati di Cannes non fosse per la scelta suicida di chiudere a Netflix. Che poi non tutti siano stati all’altezza dell’aspettativa è, una volta tanto, secondario perché di fatto erano i più difficili da avere e i più desiderati.
I tre western in concorso, uno dei dettagli e delle peculiarità più evidenti dell’edizione, sono tutti andati a premi in un risvolto imprevedibile che conferma l’approdo alla Fase 2 della trasformazione dei festival (processo che coinvolge tutto il mondo ma nel quale Venezia ha fatto uno scatto negli ultimi anni fino ad arrivare a condurlo). Se è ormai assodato che “Il cinema di genere è il nuovo cinema d’autore”, come ha detto lo stesso Barbera nella conferenza stampa d’apertura, ratificando quel che molti avevano notato proprio dalle sue selezioni dei passati anni, adesso quei film vincono anche.
Prima stupivano e meravigliavano tutti, finendo regolarmente nelle liste dei migliori visti al festival ma a bocca asciutta, ora i film di genere vincono, grazie anche al grande calcio d’inizio dell’anno scorso con il Leone d’Oro a La Forma Dell’Acqua. Aumentandone la quantità ne aumentano anche le possibilità di vittoria ovviamente ma la sensazione è che di fatto si sia un po’ scavallata una piccola collina. Per un motivo o per l’altro le giurie di Venezia erano state negli anni passati molto più tradizionali della selezione. In concorsi fenomenali per innovazione e audacia vincevano film austeri e molto tradizionali, scelte sicure “a forma di festival” (per quanto paradossale premiare un film filippino di 4 ore è una scelta sicura in un festival). Ora forse qualcosa sta cambiando.
Non sono solo i tre western a dircelo ma anche il fatto (senza nessun precedente davvero) che tutto l’elenco dei vincitori (indiscutibile da qualsiasi sostenitore del #metoo) è composto da film che, belli o brutti, sono buonissimi per il grande pubblico. Non blockbuster ovviamente ma nemmeno opere di nicchia, sono tutti film che possono fare un buon risultato al botteghino (almeno quelli che usciranno in sala) e ottenere passaggi importanti negli sfruttamenti successivi. Sono tutti soprattutto d’orbita anglosassone.
Con nessun italiano a premi per la seconda volta nell’ultimo decennio continuiamo a svincolarci da una tradizione provinciale che voleva un obbligatorio contenito al cinema italiano, acquisendo il coraggio e la serietà delle manifestazioni internazionali più serie. Certo quest’anno è paradossale visto che non sarebbe stato una vergogna dare un premio, magari anche grande, ad uno dei 3 italiani.
Hanno invece vinto film diretti da un messicano, un greco, un francese, un’australiana e tre americani (di cui due sono fratelli), eppure cinque dei sei lungometraggi premiati sono parlati in inglese. Ancora più clamoroso tutti tranne uno hanno nei credits almeno un nome passato per Hollywood. È una vittoria del cinema mainstream di fatto. Questo significa che poca attenzione andrà a film che invece ne avrebbero avuto bisogno (nessuno dei premiati di quest’anno necessita di un grande premio per farsi notare) ma anche che, una volta tanto, il bollino che indica la vittoria di un premio a Venezia non sarà sinonimo di sale vuote e magari si potrà iniziare a ricucire il rapporto con il pubblico più vasto. Sempre che non sia troppo tardi.
E per l’appunto le sale saranno la questione delle prossime settimane (speriamo non dei prossimi mesi) perché due di questi film, tra cui il Leone d’Oro, potrebbero non passare al cinema o farlo in maniera fugace e solo su schermi “selezionati”, visto che appartengono a Netflix.
Fermo restando che in linea di massima i vincitori degli altri anni hanno fatto passaggi rapidissimi in sala lo stesso, sempre se li hanno fatti (e non è che siano stati una miniera per gli sfruttamenti successivi), è vero che per la prima volta non tutti potranno vedere il vincitore del Leone d’Oro. Nemmeno in home video. Sarà visibile solo a chi è abbonato a Netflix.
Pedro Almodovar, presidente di giuria di Cannes due anni fa, aveva detto che non avrebbe mai voluto dare la palma ad un film che non sarebbe passato per le sale. Guillermo Del Toro invece ha rotto un argine che tutti sapevamo prima o poi sarebbe caduto (il prossimo, più grosso, sono gli Oscar, non sarà quest’anno forse ma accadrà).Tuttavia non è nulla di clamoroso né di nuovo. Già gli Emmy e i Golden Globes da decenni premiano prodotti televisivi non necessariamente per tutti ma di proprietà di canali a pagamento, ora anche le manifestazioni d’arte possono farlo.
Vedere il cinema migliore in assoluto prima voleva dire pagare un biglietto, ora vuol dire pagare un abbonamento, come la grande tv, chi non vuole farlo non lo vede. Non è una decisione che qualcuno possa fermare, è un dato di fatto a cui parte dell’industria aderisce. Proprio un colosso del cinema come Cronenberg infatti, ritirando il Leone alla carriera, ha detto di preferire di gran lunga Netflix sul suo televisore 50 pollici alla sala. Sempre di più identificare il cinema con le sale è un concetto che diventa sbagliato. È duro per la generazione di cinefili che è in quei luoghi si è formata ma lo è molto meno per chi i film migliori della propria vita, i grandi capolavori che ti cambiano l’esistenza, li ha scoperti in casa grazie alla tv o al computer, non per questo amandoli di meno, e che a quell’oggetto (ieri associato ad una qualità bassissima, oggi non più e figuriamoci domani) è legatissimo e deve tutto.
Rimane solo un cruccio in questa incredibile cavalcata che è il secondo ciclo di Alberto Barbera: la scoperta.
Nulla di quel che il festival ha scoperto come autori, attori o stili si è imposto all’attenzione internazionale. Venezia è diventata la porta agli Oscar, ha moltiplicato pubblico e accreditati (non servono i numeri, si vede di anno in anno con le file più lunghe e i posti che non si trovano) e quindi anche sponsor e prestigio (anche qui, è così tangibile e visibile il cambiamento che non c’è bisogno di dati), eppure nonostante non pochi esordienti siano stati lanciati, anche nel concorso, quasi nessuno è diventato un’autorità o un autore amato. Forse solo Brady Corbet, prima in Orizzonti con L’Infanzia di un Capo e ora promosso in concorso con Vox Lux, è un nome scoperto e valorizzato dalla Mostra. Non è che la Mostra si sia concentrata più sui grandi nomi dimenticando il nuovo, il lavoro c’è stato e l’ambizione e l’audacia anche, ma le scelte non sono state premiate.
Quest’anno prima del festival Barbera si era speso dicendo di essere riuscito a convincere Pablo Trapero ad andare fuori concorso (il film era La Quietud ed è piaciuto molto) per mettere invece nella competizione un film di uno sconosciuto come Acusada. Mossa senza dubbio audace per un film che nessuno avrebbe detto che poteva stare in concorso. Tuttavia, ancora una volta, non ha funzionato e Acusada non ne è uscito benissimo. Ecco se ancora Venezia può avere dei margini di espansione è lì, nel diventare la piattaforma migliore per le opere prime, quello che ad oggi è un fortino di Cannes (anche grazie alla sezione autonoma, la Quinzaine des Realisateurs) per nulla facile da espugnare.
After years of research and development contributed by over 100 Virginia Tech students and faculty, the FutureHAUS Dubai team has officially built the world’s best solar home.
The lone American team earned a first-place victory over 14 other selected teams and more than 60 total entrants of the 2018 Solar Decathlon Middle East, a competition launched by the United States Department of Energy and the United Arab Emirates’ Dubai Electricity & Water Authority. The global competition aimed to accelerate research on building sustainable, grid-connected, solar homes.
The win follows nearly two decades of research and two years of accelerated development, overcoming a fire that burned down a previous iteration of the house, and more than a month spent in a desert in the outskirts of Dubai, where two dozen students and faculty erected the entire house.
The concept ofFutureHAUS Dubai was brought to life through a university-wide effort, combining talents and research from Virginia Tech’s College of Architecture and Urban Studies, College of Engineering, Myers-Lawson School of Construction, Pamplin College of Business, College of Liberal Arts and Human Sciences, College of Science, and various centers and labs within.
“We have the most interdisciplinary team that we’ve ever had around any research project, and that’s what it takes. That’s the secret,” said Joe Wheeler, architecture professor and lead faculty of FutureHAUS Dubai. “That’s the formula to making something this amazing.”
The Solar Decathlon Middle East juries agreed. In addition to winning first place overall, the team earned top three in nearly all sub-contests: first place in architecture, first place in creative solutions, second place in energy efficiency, second place in interior design, third place in sustainability, and third place in engineering and construction.
According to team members, this success was largely due to a reliance on interdisciplinary knowledge. Each member contributed their unique set of skills, expertise, and life experience, filling in smaller parts of a bigger picture.
Понедельник, 11 Февраля 2019 г. 23:36
+ в цитатник
I have this leak coming down the power cable from my boiler. The cupboard the boiler sits in stays dry but the kitchen surface underneath has about a half a litre of brown smelly water.
I put some tissues around and its definitely coming down the power supply and onto the counter. The leak is sporadic and happens about twice a week overnight when the boiler is off. Ive had two plumbers out to take a look and neither have an idea as there is nothing to be seen.
Photo shows layout. The towels remain dry but the tissue underneath is wet.
A few weeks ago, we shared our tip for adding charm to your home by painting faux wainscoting on your walls. Today, we’re back with another tip in the same vein—this time to replicate the stately, nineteenth century look of floor-to-ceiling moldings. Switching apartments isn’t always easy—painting on the charm is!
You’ll Need
paint painter’s tape a level 1-inch brushes a foam roller
For paint, we used these Sherwin-Williams colors: Grizzle Grey for the walls, Passive for the moldings and baseboard, and Cityscape for the floor. The walls were painted in matte and the floors in semigloss.
1. Paint the walls and floor. Use a large foam roller to paint the wall and floor colors.
2. Tape off your baseboard. Tape off your baseboard by running painter’s tape along the floor and about 6 inches off the floor.
3. Trace your moldings. Create the outlines of your moldings by using a pencil and a level to draw them on the wall.
4. Paint! Paint in the moldings by tracing over their pencil outlines with a 1-inch brush. Paint in the baseboard and, once dry, remove your painter’s tape. That’s it!
The 7 key factors to consider before buying composite decking
Overview: Many options for composite lumber decking
Composite lumber decking, like Trex decking, is a great low-maintenance alternative to wood. The composite decking industry had some growing pains in the past decade, but the composite decking materials continue to improve and the number of quality products on the market increases each year. Ten years ago, there were only 10 choices, and now there are more than 50 different composite decking products available (one common brand is Trex decking). Click here to see a Trex decking project.
You’ll also find cellular PVC and plastic lumber (HDPE—high-density polyethylene) decking, both of which install similarly to composite deck boards. We’ll focus on composite deck boards in this article, but much of this information applies to PVC and plastic as well. The biggest frustration you’ll encounter is choosing the best composite lumber decking among all the styles, colors and brands. This article of composite decking reviews will help you narrow down your options and simplify your shopping for the best composite decking prices.
In a Nutshell
Choose composite lumber decking based on your budget; style and color preferences; fastener choice; and site and code requirements.
Quality composite decking prices, like Trex decking, are two to three times more than pressure-treated wood but lasts two to three times longer.
The fact that your local home center carries a product doesn’t mean it’s been approved for use where you live or for every application. Check with local building officials before you buy.
Each system has different fastening and installation requirements. If you don’t follow the manufacturer’s installation instructions, the warranty will be void.
Factor 1: Are you on a tight budget?
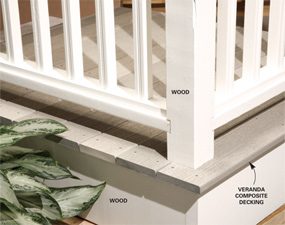
Composite decking, wood railing
Installing a wood rather than composite railing reduces deck costs.
Composite decking, such as Trex decking, costs $3 to $7 per sq. ft. ($1.50 to $5 per lin. ft.). Most lumberyards and home centers stock at least one or two brands and can special order others. Most brands of the basic composites are similar and will perform just fine. The differences come down to variations in design, colors, mix of plastic and wood, installation systems and texture. If you’re OK with a limited palette of colors; a simple, repetitive grain pattern; and a smooth or combed finish, you’ll find a variety of low maintenance, lower-cost products that meet your needs.
Composite lumber decking usually comes in 12-, 16- and 20-ft. planks, and railing components in 12- and 16-ft. increments. Planning your deck design around these measurements can save you money and cut waste. You can also keep your costs down by using a system that installs with face screws (rather than hidden fasteners) and building rails from wood.
Factor 2: Is your deck used in the hot sun?
Composite deck boards heat up
Dark, solid composites absorb more heat than lighter types.
Dark-colored and very dense composite decking boards can really heat up in the sun. If you’re sitting in a deck chair on top of all that plastic, the heat reflected up to you can make you sizzle like the burger on your grill. Get composite samples in different colors and set them outside on your deck site. If they’re hot enough to fry an egg after a day in the hot sun, consider a lighter color or a different composite material.
Factor 3: Is a “wood look” critical?
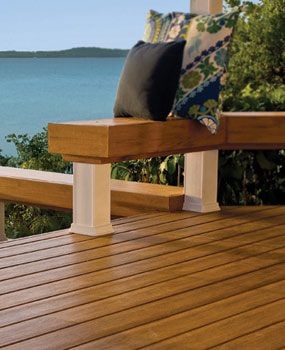
Fine decking details
More expensive composites brands have finer details, more colors and more features.
Higher-end composites have a superior grain and the most “woodlike” appearance and feel. Some of the priciest brands have subtle shadings and individual “grain” variations so that no one board is an exact replica of another. Some manufacturers buff each board at the factory to remove any “plastic” sheen. High-end composites, like Trex decking, also have a wider range of colors and matching add-ons such as railings, balusters, posts, post caps, skirts and decorative trim. These add-ons give your deck a beautiful look, but they don’t come cheap. They can easily be triple the cost of the decking boards.
Factor 4: How wet will it get?
Damp deck
Composite decks subject to frequent wetting can get slippery if they don’t have a texture.
Smooth-textured composites can get slippery. If your deck is going to be used near a pool, or if you live in a climate where ice is an issue and the deck is going to be used as a main entry to the house, search for a style with a pronounced texture.
Video: How to Install Hidden Deck Fasteners
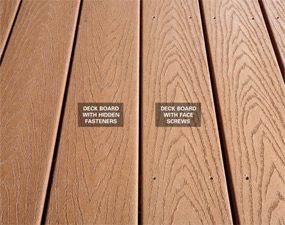
Factor 5: Are hidden fasteners important?
Hidden vs. exposed fasteners
Hidden fasteners are more expensive but result in a cleaner appearance.
Many people couldn’t care less if they see the fasteners when they look at their deck. But if it bothers you, choose a system that works with hidden fasteners. For example, tongue-and-groove systems eliminate gaps and allow you to hide the screws and drive fewer of them. Clip systems work with grooved decking that’s lightweight and has a thinner profile than face-screw styles. However, these systems can have open ends that collect leaves and dirt if you don’t install end caps or a special trim piece or use an installation design that covers them. Hidden fastener systems are pricier than systems that install with face screws. The hidden fasteners themselves can bump up the price by 30 percent.
Factor 6: Are you sure materials meet building codes?
Call your local building officials to make sure the material you’re considering is approved in your city. Some composite systems have limitations on the materials for use as stairs or require specific framing in certain applications. Also, be sure you know what kind of fastener spacing is required so you don’t encounter any surprises during inspection.
Factor 7: Are you including all the extras in your budget?
Deck details
Composite deck details like trim boards, railings and hidden fasteners increase the cost.
You won’t need to pop for specialized tools because composite planks install using the same basic tools as any wood deck. But the decking itself is only a piece of your overall budget. Each system requires either hidden fasteners or deck screws (for best results, use screws specifically for composite material).
In addition, depending on the system, you may need end caps, reinforcement pieces, special trim or skirt pieces, and add-ons like railings, posts and post caps. Research the installation and the add-ons so you have a complete picture of the costs before you buy the decking.
Learn More About Deck Materials Online
Synthetic decking materials are required to have a valid Evaluation Service Report (ESR) to be considered approved for use by many local building departments. ESR reports are issued by a nonprofit code-compliance testing agency. They show the results of tests for moisture absorption, abrasion resistance, fastener spacing, allowable spans and stresses and more. Visit decks.com or icc-es.org, or type the ESR number for each product (ask the manufacturer or check the product literature) into your Web browser.
Several conservation groups and South Carolina coastal communities sued the Trump Administration earlier this month for allowing companies to conduct seismic blasting surveys in the Atlantic Ocean as a precursor to offshore drilling for oil and gas. And now, a coalition of nine states has joined the lawsuit and added their clout to the claim.
Last week, a coalition of attorneys general from Maryland, Virginia, North Carolina, South Carolina, Massachusetts, Delaware, Connecticut, New Jersey and New York filed a motion to intervene in the lawsuit because the seismic surveys will expose marine life to repeated sound blasters louder than 160 decibels, and that could lead to dangerous consequences.
Maryland Attorney General Brian Frosh, the leader of the coalition, says that the Trump Administration continues to make the interests of the fossil fuel industry a top priority over our natural resources. Therefore, attorneys general along the Atlantic Coast will continue to fight the efforts of Atlantic shore drilling.
Diane Hoskins, the campaign director for Oceana— one of the nine groups suing the Trump Administration— applauded the AG coalition for standing up for their states.
“Putting our oceans, marine life and coastal economies at risk for dirty and dangerous offshore drilling is wrong, and we are not backing down. Seismic airgun blasting in the Atlantic defies law, science and common sense. They acted unlawfully, and we’re going to stop it. Oceana is pleased so many states are joining this critical fight,” said Hoskins.
This lawsuit comes less than a month after the National Marine Fisheries Service issued five Incidental Harassment Authorizations that permit companies to use airgun blasting off the Atlantic coast.
During the seismic blasting process, ships fire blasts of air to the bottom of the ocean every ten seconds for weeks or months at a time. They do this to map the contours of the ocean floor with the goal of finding oil and gas deposits.
However, the loud, continuous noise can damage the hearing of marine life, or possibly disorient and kill the animals. It can also negatively impact commercial and recreational fishing by decreasing catch rates.
And, because burning fossil fuels is causing rapid climate change, these conservation groups, along with these nine states, are trying to stop the federal government’s “flat-out wrong” decision to allow offshore drilling on the Atlantic coast.
True confession time: While I’m not deathly afraid of heights, I’m not crazy about working high off the ground. If there’s a lofty job to be done that I can’t sucker someone else into doing, and it will require working way up high (say, over three feet) for more than a short while, it’s time to set up some scaffolding. Fortunately, I rarely take on projects where I’ll need a scaffold. The rest of the time, the scaffolding sits around, taking up space, and in the case of my full-size scaffolding, sitting outside slowly rusting. A big truck recently dropped off a Metaltech ScaffoldBench for us to play with, and it’s a whole ‘nother animal. Finally, my scaffolding can WORK for a living between gigs!
The Metaltech ScaffoldBench is billed as a four-in-one workhorse. Job One for the Metaltech ScaffoldBench is working as a Baker-style scaffold, with a 12’ reach and an 1,100-lb. capacity. It’s compatible with other major brands of Baker type scaffolding, and can be stacked to get you way up high – higher than I’M going to go.
For the 99% of the time I’m NOT working from a scaffold, it steps up and serves as a utility cart to move tools and materials from my truck to the job site, or into the shop. It has rugged locking casters that can go four-wheeling across parking lots and hard-packed job site dirt.
Even more useful from my point of view is its ability to serve as a workbench on wheels. Workbench space is something I never seem to have enough of, and in between scaffolding gigs, I now have another work surface.
And that brings us to the next genius use: The Metaltech ScaffoldBench can quickly transform into a mobile miter saw bench, with rails that will hold a miter saw, planer or table saw. Still want more? The unit also comes with sturdy wire-rack shelving that can be installed above or below the platform.
We’ll take a look at the features and build quality of the Metaltech ScaffoldBench, along with the assembly process. Here’s a list of the specs and features, followed by an elevating video from Metaltech:
• Assembled dimensions (WxDxH): 74.75 x 29.75 x 75 in. (189.9 x 75.6 x 190.5 cm) • Package dimensions (WxDxH): 75.75 x 30 x 7 in. (192.4 x 76.2 x 17.8 cm) • Weight: 174 lbs. (79 kg.) • Load capacity: Scaffolding: 1,100 lbs. (500 kg). Combined weight of user + materials Storage rack: 200 lbs. (90.7 kg.) distributed weight • Working heights: From 27 to 73 in. (69 to 185 cm). 2 in. (5 cm) increment adjustable heights • Reach: 12 ft (3.7 m). Stackable up to 3 units high for 24 ft (7.4 m) reach • Casters: 5 in. (13 cm) Double locking heavy duty • No-tool assembly • Multiple units can be stacked for working at higher levels (use optional guardrails and outriggers for safety) • Compatible with most other brands on the market such as: Werner, Biljax, Buffalo, UST and Metaltech • Standards: OSHA (29 cfr pt. 1926), ANSI (A10.8), CSA (S269.2) • Warranty: 1 year
Some Assembly Required – But Leave The Tools Behind
If you have the Metaltech ScaffoldBench delivered, don’t waste time looking for the brown UPS truck. The box with the scaffold weighs 162 lbs., and it comes strapped to a pallet, meaning you’ve got a roughly 200-pound temporary speed bump in your driveway. In the interest of being able to walk upright again, I opened up the box, loaded lots of yellow parts into my truck, and gave them a ride to my shop. Everything was very well packaged and secured inside the packaging.
All the components of the Metaltech ScaffoldBench are very robust. The instructions are written in the universal language: Pictures. Diagrams, actually. They’re actually pretty well done, and not too hard to figure out, even for an old fart with diminished mental capacity such as myself.
Assembly starts by inserting the casters into the bottom of the end sections. Next, the side supports clip into place. They’re very beefy, with 45-degree bracing for strength and support. They can be located anywhere along the height of the scaffold uprights, in increments of 2”.
At this point, it’s ready for the platform. Everything fit perfectly, with no tools needed, and all removable parts get secured with a spring-loaded locking pin. Total assembly time was only a few minutes, and will be even faster in the future, since I won’t need to refer to the pictures…
The wire storage rack can go wherever you want, either below the scaffold plank or way up high. After installing the shelving side supports, the wire shelving sections hook in on one edge, and then drop down and slide into holes on the other side. I installed mine at the bottom of the unit, as a spot to store tools and supplies.
The plank drops in and sits on an angle bracket along both long edges, and there’s a rotating clamp to lock each edge down. The platform is very solid and stable – a fact you’ll appreciate when you’re standing on it, several feet off the floor. It’s also very heavy; I got it into position and removed it several times by myself, but it’s a bit awkward, and would be much easier to maneuver with a helper. Once I had it in place the first time, I was ready to get up in the air!
Once it was all assembled, I rolled the Metaltech ScaffoldBench over to the wall. The casters are big, heavy-duty units, and the scaffold rolls smoothly and easily when the brakes are released. The casters have a foot brake that’s easy to lock and unlock with your toe, and which holds the wheels very solidly in place.
In the spirit of “Trust, but verify,” I started out with the platform on the lower level. To make it easier to climb up, I left one of the upper end pieces off. The upper end sections are very easy to install and remove. Just press in the locking button, and they slide on or off in just a couple of seconds.
Once on board at the stratospheric height of around 30”, I gave the platform on the Metaltech ScaffoldBench a little torture test. I jumped around on it, shimmied and stomped my feet, and generally banged around in a way that probably would have gotten me committed, if anyone had been watching. The platform didn’t budge, and felt totally unfazed by my 200+ pounds bouncing around on it. This makes sense, since the unit is constructed of metal-reinforced plywood, and rated at being able to support 1,100 pounds. Next time, I can even bring a passel of tools – and four friends.
According to the manufacturer, the Metaltech ScaffoldBench can be stacked up to three levels high, for a 24-foot high reach. Sadly, I only had two sections, so I made the best of it. I attached the other upper end piece, and wrestled the platform into position a couple of notches down from the top. It could have gone higher, but my shop has a 12’ ceiling, and I didn’t want to bang my head on the ceiling joists.
I clambered up, and spent some time moving around on the upper platform. Again, it felt very stable and secure. If I was going to be spending a lot of time at that height, or even higher, I would want to add some stability, though. This can be done a couple of ways; Metaltech offers optional outriggers, which lend stability to the bottom of the scaffold. For the upper end, the Metaltech ScaffoldBench comes with a pair of anti-tip clips. They can be screwed to wall framing, and have clips that fit into the holes in the scaffold’s uprights. An optional guardrail is also available, which would be an excellent idea for working way up yonder.
Back Down To Earth: The Metaltech ScaffoldBench Gets Benched
With the climbing portion of the festivities safely out of the way, I removed the upper ends and relocated the platform onto the lower section. The platform on the Metaltech ScaffoldBench is nice and smooth, with the exception of where a few rounded bolt heads protrude slightly. It makes a nice-sized mobile work table for doing parts assembly or other small projects. It’s also a nice space for going over blueprints or other documents. Pictorial assembly instructions, for instance.
The Metaltech ScaffoldBench has way more potential than that, though. It comes with everything you need to set it up as a sturdy rolling miter saw stand. To start the process, undo the retaining clips at the edges of the platform, and flip it over, so the surface with the rails is on top. The Metaltech ScaffoldBench comes with four brackets. Two of them get attached to the bottom of your miter saw; the long slots in the brackets make them compatible with almost any saw. They even provide the mounting bolts, with wing nuts – again, no tools!
Once the saw is mounted on the brackets, they hook over the rear rail and drop down onto the front rail. (Since my saw weighs over 70 lbs., I actually set the brackets onto the rails first, then set the saw on them and bolted it together). The saw can be slid along the rails from one end to the other, and locked into position anywhere along the way with a tensioning knob and locking lever.
The Metaltech ScaffoldBench also comes with two adjustable supports. They can be attached to the other two brackets, and installed on each side of your miter saw. They can be positioned up or down to support your material. The designers also showed some nice attention to detail by putting a ledge on one side of each support. This allows you to raise the support up and use the ledge side as a stop for making repeated cuts of the same length.
We also received two of the optional support rollers, which can be attached to either or both ends of the Metaltech ScaffoldBench. They also require no tools to assemble, and go together quickly, with the help of the pictographs. They’re very fast to install onto the Metaltech ScaffoldBench when you need extended support for longer pieces.
Although the rail side of the platform is billed as a miter saw stand, there’s no reason you couldn’t attach any portable tool that has bolt-down capability. It would be a very handy place to put a compact jobsite table saw, for example, especially with the optional rollers attached. I plan to use it for my “portable” planer; weighing in at a sturdy 92 lbs., it’s a bit of a chore for me to lug around, but easy peasy for the Metaltech ScaffoldBench.
The Metaltech ScaffoldBench Schleps The Big Stuff
Occasionally, I’ll come to a jobsite – or home – with a pickup load of heavy stuff. Like a box full of scaffolding, for example. If the Metaltech ScaffoldBench isn’t otherwise occupied, it serves as a very capable utility cart. With its ability to haul over a half-ton of weight, it could easily be used to move a stack of drywall, lumber, paving stones, or whatever else you need to get from point A to point B. Or even point C.
To make it easy to maneuver, just leave the platform at the lower level, and the upright end attached to one end. That makes it easy to steer, and the big wheels will have your “stuff” relocated much more quickly and painlessly than schlepping it in one piece at a time.
Stow It With the Metaltech ScaffoldBench
Finally, we reach the most mundane use of the Metaltech ScaffoldBench: Heavy-duty storage. Just because it’s mundane, though, doesn’t make it less useful. Storage space is another thing I never seem to have enough of, and the ability to put a huge amount of weight on one shelf (the platform) makes it a great place to stow several heavy items.
The unit comes with one wire shelf, capable of supporting up to 200 lbs., and additional shelves are available as accessories. The ability to adjust the height of the shelves in 2” increments gives you great flexibility.
Ready To Roll To Greater Heights?
When I learned the Metaltech ScaffoldBench was on its way, I was skeptical, thinking it sounded a bit gimmicky. After seeing the quality, and having the opportunity to try it out in its various configurations, I’m a convert. The Metaltech ScaffoldBench is a very well made and solid scaffolding unit, and will serve very nicely when I need a Baker-style scaffold.
More importantly, when I’m NOT clambering around way up in the air, I have a tool that will be in constant use, rather than one that I need to find storage space for. It will temporarily be used as a workbench, after which I’ll be bolting down my planer for an upcoming project. Meanwhile, the shelving below the platform will serve as welcome storage space.
The Metaltech ScaffoldBench comes with everything you need to use it as a scaffold, workbench, and miter saw stand. Metaltech also offers numerous accessories to make it even more useful – and safer. If the scaffold will be in one place for an extended period, or on uneven surfaces like stairs, base plates or leveling jacks can be substituted for the casters. To add stability, 14” and 46” long outriggers with wheels are available. A guardrail system can help you feel warm and fuzzy when you’re way up high, and a platform with a trap door can make it easier getting up and down.
Other options, including additional shelves and support rollers, are also available. You can check them out, and get more information from the Metaltech web site. The Metaltech ScaffoldBench is covered by a one-year warranty, and you get 90 risk-free days to roll it around, climb on it, cover it with sawdust, and pile stuff on it. The Metaltech ScaffoldBench is available exclusively at the Home Depot for around $325. Got a lot of work to do? Have twice the fun with the two-pack, for around $560.
At home, we often rely on the cleaning powers of acid—both acidic, white vinegar and grapefruit make great natural additions to your clean-up kit. So it’s no surprise that ketchup—packed with citric acid and vinegar—can help you clean, too. Find out how this condiment can do your home wonders.
Psst! Before going all-out with your ketchup cleaner, we recommend testing out a small discreet spot on your item first.
Copper reacts to air by developing a layer of copper oxide, which causes it to look tarnished. Copper oxide dissolves in a mixture of weak acid and table salt, both of which are found in ketchup. Slather the ketchup onto your copper-bottomed pots and leave it on for as long as you can. Then wipe and rinse. (By the way, you get the same result with lemon juice plus salt. Check out these other things you can clean with lemon.)
It’s important to clean a kitchen range hood filter once a month to remove grease and grime that can make the fan less effective and shorten the fan’s life. Here’s how to go about it:
Metal Filters: Soak metal filters in hot, soapy water. You can also add a small amount of degreaser or ammonia to the water to help breakdown stubborn build-up.
Charcoal Filters: Charcoal filters can’t be cleaned, so replace them every 3-4 months.
This tip brought to you by:
Further Information
Video Transcript A range hood filter clogged with grease and grime will make the fan work harder—reducing the life of your range hood, and making it less effective at removing the grease and toxic smoke from your cooking area. That’s why it is important to clean your filters.
Once a month, soak metal filters in hot, soapy water; or for stubborn build-up add a degreaser or a small amount of ammonia to the water. Charcoal filters for non-ducted applications cannot be cleaned, so replace them every three to four months to ensure peak performance.
These tips brought to you by Broan-NuTone: Bringing Fresh Ideas Home.
One star down for the absurd price that Philips is charging for this, but 4 up for the improvement over the previous gen lights. These are soooooo much better, more responsive, can go much lower in brightness (and infinitely more color control), can be easily chained together, and even synced up with other strips. I have two strips (with extensions), reaching about 45 feet around my bedroom crown, and have zero issues (aside from the cost).
Love the ease of connection, the quality of the LEDs, and the color control! Keep it up Philips, but lower your blasted prices...
In the image, the 2nd gen ones are up top (crown) and the older first gen strip is under my bed. Huge difference in light quality (which I definitely notice as an artist/photographer)!
Воскресенье, 30 Декабря 2018 г. 07:01
+ в цитатник
It’s a scene straight out of a Christmas special: Thrilled children open a bow-bedecked box and pull out a wriggling puppy that eagerly licks their noses. But in real life, adding a new member to the family should be approached thoughtfully—not sprung on everyone on a day when excitement is already at fever pitch. When it's time to welcome a puppy, you'll want its introduction to its new “pack” to be as calm and unstressed as possible.
Better idea: If you've decided that a dog should be in your family's future, give your kids a box containing puppy essentials, such as a leash, food bowl, collar, and toys. Then go down to the local animal shelter to adopt a new dog a week or two later, when everyone can focus on the new addition.
News zu kostenlosen Programmen, Software-Updates und Patches.Um die Bestellung abzuschließen, klicken Sie bitte auf den Bestätigungs-Link, den Sie soeben per Mail bekommen haben.
Понедельник, 24 Декабря 2018 г. 07:16
+ в цитатник
April 12, 2017
No matter who you are or what your style is, you are sure to enjoy a sense of satisfaction from a carefully chosen home improvement project. Most beginners can be intimidated by all the building codes, permit requirements, and variety off tools needed when doing a home improvement. How can a homeowner without a lot of experience prepare for home improvement work? The best idea is to read the following tips and use them in your next home renovation.
If you are renovating your home, consider whether the cost of adding your personal touch will be recouped when you sell it. If you make a very personalized renovation to your home, then it will probably decrease your home’s value because another person will not like this style and won’t be willing to pay for the home and any extra renovations they must make.
One of the best tips to help you on your quest to home improvement, is to take a personalized look at what you wish to achieve. While this is a good idea, you should also make sure that each improvement is practical.
Anything simple, like a lampshade, can look and be boring. You can spice up your lamp shades by painting them using stencils. This helps add personality to your rooms and really enhances a plain lamp shade.
Sponges are great for installing drywall. You should use a sponge rather than sand. A wet sponge can be as effective as careful sanding when it comes to smoothing out seams. The good thing about it is that you do not create dust with the sanding.
Now, are you ready to start your next home improvement project? There is a lot of satisfaction and enjoyment from doing a home improvement project yourself. As you keep these suggestions in mind, you will feel more like a pro at improving your home.
Bedroom wall lighting – Your bedroom is more than the place where you sleep, and the lighting you choose should reflect that. The addition of wall lighting can provide homework, mood and accent lighting to the ambient lighting received by your overhead ceiling lamp. Think about how your room is used to help you plan your lighting scheme. Do you need task lighting? Do you want ambient lighting?
Select where you want to place your bedroom wall lighting mounted on the wall. Place the lights mounted on the wall where they will illuminate work spaces or accent areas. Measure the available space for each unit mounted on the wall. Decide if the lamps will be controlled by a wall switch or regulator, or if they should be autonomous. If you are going to connect to an outlet, make sure you locate them near the outlets.
Decide if you want to use wall-mounted bedroom wall lighting that are connected to a power outlet or to them with permanent connection in the electrical system of your home. Consider your budget when deciding what kind of lights mounted on the wall to reach. Consider the decor and style of your bedroom to help narrow your options.
A raunchy puppet murder mystery, Peter Berg's latest action flick starring Mark Wahlberg, and more are all in the works for Blu-ray.
New info has been revealed for several upcoming Blu-rays from Warner Bros., Mill Creek Entertainment, and Universal.
Here's a full rundown of recently revealed details and title announcements:
Fist up, Warner Bros. is prepping John Milius' Big Wednesday starring Jan-Michael Vincent, William Katt, and Gary Busey for Blu-ray on September 11. Supplements will include:
Audio Commentary by Director/Cowriter John Milius
Retrospective Documentary - "Capturing the Swell"
Trailer
Meanwhile, the studio is set to release Fox's Lethal Weapon: The Complete Second Season starring Damon Wayans, Clayne Crawford, and Jordana Brewster on September 18. No other details have been announced at this time.
In addition, Michael Crichton's Looker starring Albert Finney, James Coburn, Susan Dey, and Leigh Taylor-Young is in the works for September 18 as well. The disc will feature a brand new remaster of the film, and supplements will include:
Introduction and Commentary by Michael Crichton
Deleted Scene (As Used in Network Television Version)
Trailer
Likewise, Franklin J. Schaffner's Papillon starring Steve McQueen, Dustin Hoffman, Don Gordon, and Anthony Zerbe is also due to arrive on September 18. Supplements will include:
Featurette "The Magnificent Rebel"
Trailer
Irwin Allen's The Swarm starring Michael Caine, Katharine Ross, Richard Widmark, Richard Chamberlain, and Olivia de Havilland will then follow on September 25. The disc will feature a brand new remaster of the extended version of the film, and supplements will include:
Behind The Scenes Documentary - Inside the Swarm
Theatrical Trailer
In addition, Edward Bernds' Queen of Outer Space starring Zsa Zsa Gabor, Eric Fleming, and Dave Willock will hit Blu-ray on September 25 as well. The disc will feature a brand new remaster of the film, and supplements will include:
Commentary by Laurie Mitchell and Film Historian Tom Weaver
And rounding out Warner's upcoming lineup will be Bert I. Gordon's The Cyclops starring James Craig, Gloria Talbott, Lon Chaney Jr. on September 25. The disc will feature a brand new remaster of the film, and supplements will include:
Mill Creek Entertainment is bringing Harry Elfont and Deborah Kaplan's Can't Hardly Wait: 20 Year Reunion starring Jennifer Love Hewitt, Seth Green, and Ethan Embry to Blu-ray on October 9. Supplements will include:
Original Commentary with Filmmakers and Cast
Can't Hardly Wait: The Making of a Teen Classic
The Life of the Party
Deleted Scenes
In addition, the label will release Joe Camp's Benji's Very Own Christmas Story starring Benji, Ron Moody, and Patsy Garretton November 6. No other details are currently listed for the disc.
Universal is set to release Tim Wardle's documentary Three Identical Strangers on October 2. Supplements will include:
Audio Commentary with Director Time Wardle and Editor Michael Harte
Q&A with David Kellman, Robert Shafran, Brenda Galland, Ellen Cervone, and Director Tom Wardle
Photo Gallery
Trailer
Likewise, the studio is also prepping Debra Granik's Leave No Trace starring Ben Foster, Jeff Kober, and Dale Dickey for Blu-ray on October 2. Supplements will include:
Creating Leave No Trace - Featurette
Deleted Scenes
Behind the Scenes Vignettes
Location Scout Photo Gallery
Meanwhile, Brenda Chapman, Steve Hickner, and Simon Wells' The Prince of Egypt starring Val Kilmer, Ralph Fiennes, and Michelle Pfeiffer will then follow on October 16. Supplements will include:
The Making of The Prince of Egypt
"When You Believe" Multi-Language Presentation
The Basics of Animation: The Chariot Race
Focus on Technical Effects
Feature Commentary with Directors Brenda Chapman, Steve Hickner, and Simon Wells
In addition, Eric Darnell and Tim Johnson's Antz starring Woody Allen, Sharon Stone, and Gene Hackman will also be released on October 16. Supplements will include:
Production Featurette
Basics of Computer Animation
Antz Facial Animation
Character Design
Feature Commentary with Directors Tim Johnson and Eric Darnell
Don Michael Pau's Scorpion King: Book of Souls starring Zach McGowan, Pearl Thusi, Nathan Jones, and Katy Louise Saunders will hit Blu-ray on October 23. No supplements are currently listed for the release.
In addition, the studio is preparing a Scorpion King 5-Film Collection starring Victor Webster, Dwayne Johnson, Michael Copon, and Zach McGowan for Blu-ray on October 23. Supplements will include:
Disc 1 - The Scorpion King
Includes a digital copy of Scorpion King (Subject to expiration. Go to NBCUCodes.com for details.)
Feature Commentary with Director Chuck Russell
Disc 2 - The Scorpion King 2: Rise of a Warrior
Disc 3 - The Scorpion King 3: Battle for Redemption
Includes a digital copy of Scorpion King 3: Battle for Redemption (Subject to expiration. Go to NBCUCodes.com for details.)
Deleted/Extended Scenes
Deleted Shots Montage
Gag Reel
Swords and Scorpions: A Making Of
Preparing for Battle
Feature Commentary with Director Roel Reine
My Scenes
D-BOX
BD-Live
pocket BLU App
Disc 4 - The Scorpion King 4: Quest for Power
Includes a digital copy of Scorpion King 4: Quest for Power (Subject to expiration. Go to NBCUCodes.com for details.)
Deleted Scenes
Gag Reel
The Making of Scorpion King 4: Quest for Power
Feature Commentary with Director Mike Elliott and Stars Victor Webster, Barry Bostwick, Ellen Hollman & Will Kemp
Disc 5 - Scorpion King: Book of Souls
Includes a digital copy of Scorpion King: Book of Souls (Subject to expiration. Go to NBCUCodes.com for details.)
Brian Henson's The Happytime Murders starring Melissa McCarthy, Elizabeth Banks, and Maya Rudolph is also in the works for Blu-ray. Supplements and an exact release date have not been announced yet, but pre-orders are now live.
Likewise, Peter Berg's Mile 22 starring Mark Wahlberg, Lauren Cohan, and Iko Uwais is available for pre-order as well. Supplements and an exact release date have not been announced yet.
You can find the latest specs for all of the titles listed above linked from our Blu-ray Release Schedule.
Telltale Games hat offenbar auch seine verbliebenen Entwickler mittlerweile entlassen. Ende September wurde bereits klar, dass das Gros der Mitarbeiter seinen Hut nehmen musste. Zwischenzeitlich gab es zumindest etwas Hoffnung für „The Walking Dead: The Final Season“, da man offenbar an Optionen getüftelt hatte, um die letzte Staffel noch abzuschließen. Allerdings sieht es derzeit danach aus, als ob man den letzten Optimismus wohl begraben sollte.
So hat die mittlerweile ehemalige Telltale-Games-Mitarbeiterin Rachel Noel bestätigt, dass auch sie und ihr Team mittlerweile vor die Tür gesetzt worden seien. Noel zählte zuvor zu den letzten 25 Angestellten, die beim Entwickler noch verblieben waren. Ihrem Frust hat die Spieledesignerin bei Twitter Gehör verschafft. Sie äußert dabei auch abermals Unmut über das Management. Wochen, in denen Arbeitszeiten von 80 Stunden für Mitarbeiter die Regel gewesen seien, hätte es beispielsweise laut ihr durchaus gegeben.
Noel hat aber auch klargestellt, dass es durchaus noch einige wenige gute Mitarbeiter bei Telltale Games gebe. Ihr Team sei aber eben nun ebenfalls entlassen worden. Wie es nun mit dem Entwicklerstudio weitergehe, könne sie nicht sagen. Allerdings scheint es weiter und weiter bergab zu gehen. Ich selbst war mal großer Fan der Telltale-Spiele, stumpfte aber doch in den vergangenen Jahren etwas ab. Wie ist es euch da ergangen?
Воскресенье, 09 Декабря 2018 г. 07:06
+ в цитатник
Photo: quikrete.com
Whether you’re hosting a summer barbecue or entertaining Christmas carolers around the chiminea, an outdoor bar provides a welcome surface for drinks and food and sets the scene for an outdoor living area. But the right bar can be a compromise: Professionally constructed masonry bars are statement structures but budget-heavy, and store-bought wicker bars tend to be ready for the landfill in a few short years.
This trendy stucco-sided outdoor bar, on the other hand, is both sturdy and budget friendly. It’s a permanent feature that any handy do-it-yourselfer can make, thanks to its dry-stack concrete block construction, which requires no special masonry skills. Plus, this bar’s concrete countertop is durable enough to serve in any season. So, what are you waiting for? Get started building an outdoor bar that will provide years of entertaining pleasure. All you need is a little help from the concrete professionals at Quikrete.
Photo: quikrete.com
Dry-Stacking Concrete Blocks
Mortaring bricks or blocks in place is labor-intensive, and most of the time it’s a job better left to the pros. Luckily, this particular outdoor bar doesn’t require any mortar. (To see exactly how it’s done, check out Quikrete’s video tutorial.) Instead, regular concrete blocks (available at any home improvement store) are dry-stacked to form the body of the bar, then the structure is solidified with a stucco coating. This construction opens up a range of possibilities—you can design your bar in a rectangle, an L-shape, a U-shape, or any shape that complements the layout of your entertaining area. For the best results, keep the following in mind when laying the concrete blocks:
Lay the blocks on a level concrete slab. Grass, sand, and gravel have a tendency to settle and shift over time, so they don’t provide an adequate base for this entertainment bar. If you don’t have a concrete slab, consider pouring one following the instructions in this slab-pouring video from Quikrete.
Start with a perfectly level surface. Uneven areas on an existing concrete slab can throw the entire bar out of kilter. Dips in the slab caused by surface flaking should be filled with a quality concrete filler, such as Quikrete’s Vinyl Concrete Patcher, before you start laying the blocks.
Alternate the block pattern. For strength, don’t place blocks directly over blocks, with the joints aligned. Instead, stagger the joints on each successive course of blocks in a running bond pattern.
Fill the entire base with blocks. Since no mortar is used, the bar gets its structural stability from its solid block base. Avoid placing blocks only along the exterior walls of the base and leaving the inside area empty.
Tap blocks into place when necessary to make the sides of the walls even. Use a rubber mallet rather than a regular hammer, which can chip the blocks.
Build to your desired height. A standard bar height is 40 to 44 inches from the ground, but you might choose to make yours just 30 inches tall if you intend to use it as an eating surface surrounded by standard chairs. When designing, know that concrete blocks are typically eight or 16 inches long, and they come in four-inch, six-inch, and eight-inch heights. And remember: The countertop will add another two inches to the bar’s total height.
Photo: quikrete.com
Applying a Stucco Finish
After building the base of your outdoor bar from blocks, it’s a snap to apply a durable coat with Quikrete’s Quikwall Surface Bonding Cement. Quikwall contains fiberglass-reinforced Portland cement, and a single coating provides a stunning stucco finish, so the block base will actually be stronger than being built using mortar. Just trowel on an even, 1/8-inch-thick coat over the blocks as shown in Quikrete’s bar-constructing video; when mixed as directed, a 50-pound bag of Quikwall will cover 50 square feet. Be sure to saturate the blocks (just spray them with a hose) before you apply the coating, because dry blocks tend to draw moisture out of the coating too quickly, which can result in a cracked surface.
Quikwall will naturally cure to an attractive light gray, but just add Quikrete Cement Color as you mix the product and you can achieve a splash of natural color: terra cotta, buff, charcoal, brown, or red. Adding more or less pigment to the water will allow you to create your own custom hue. Ensure a uniform color on the entire bar by measuring all ingredients and using the same ratio for each successive batch.
Photo: quikrete.com
Topping It Off with a Concrete Countertop
With the base finished, all that stands between you and a night of outdoor entertainment is creating and installing the concrete countertop. Since a countertop should be strong, smooth, and beautiful, use high-strength concrete. Quikrete’s Countertop Mix is designed specifically for casting these work surfaces, and it contains super-plasticizer additives, which prevent air bubbles and create a smooth finish.
Concrete is extremely heavy—a 2-foot-by-3-foot section (two inches thick) weighs 145 pounds—so don’t attempt to pour a large countertop in one piece. Instead, mix and pour it in sections, each about two feet wide. The materials you use to build the forms for pouring the sections should be waterproof and smooth on one side; melamine-coated plywood is a good option. Quikrete’s bar-making video shows you how to frame and pour countertop sections, but keep these tips handy:
Don’t skimp on mixing time. This mix needs a full five minutes of mixing to ensure all ingredients are thoroughly blended.
After pouring the sections, give them at least 18 hours to cure before removing the forms and sanding the rough edges of the countertop.
Get assistance. Setting the slabs requires two or more people to lift and position the sections on the block base.
To stabilize the slabs, considering applying globs of silicone caulk (half-dollar size) to the bearing points on the base before positioning the slabs. The silicone offers a measure of cushioning and will keep the slabs in place.
Photo: quikrete.com
Consider Sealing the Surface
Whether or not you seal the concrete countertop is up to you. After all, this surface, like the concrete blocks and Quikwall coating, is already weatherproof. Base your decision on your aesthetics and your tendencies. Left unsealed, the countertop will naturally develop a beautiful patina over time, but its porous surface may also absorb stains from spilled red wine, splattered barbecue sauce, and the like. Coating your finished top with a high-quality sealer, such Quikrete Concrete and Masonry Gloss Sealer, will help preserve its original appearance and add an attractive high sheen at the same time. Finally consider coating with a food safe wax for added protection.
Photo: quikrete.com
This content has been brought to you by Quikrete. Its facts and opinions are those of BobVila.com.
When you think about worker’s compensation fraud, we’re usually talking about faking an injury to get worker’s comp rather than an employer trying to avoid a claim. The thing is that claims on your worker’s comp plan can really jack your rates up, so employers have some motivation to cover it up if they’re not worried about getting caught.
SUPPORT OUR ADVERTISERS
How prevalent is worker’s compensation fraud on the job site?
I heard a firsthand account of an example recently and it’s not that uncommon.
Worker’s Compensation Fraud on the Job Site: A Real (and Common) Example
A good worker has an accident and splits his knee open. The super sees him bleeding profusely and tells him he’s got to get to the ER to let a doctor stitch him up. There’s just one problem.
This guy smoked a joint the night before and it’s going to show up in his blood test since it’s a workplace accident. We can debate how long the effects of marijuana stay in your system another time. For now, this guy says he’ll just resign rather than get that positive drug test on his record.
So far, there’s not a major issue. But this guy’s solid so the super tells him to hold on and starts making a few phone calls. By the time he runs it up the line – way up the line – they make a decision to say he didn’t come into work that day and that he just had an accident at home.
Health insurance covers the cost, there’s no effect on the worker’s compensation policy, and the company keeps a key employee. It’s a win-win all the way around except for the issue of worker’s compensation and health insurance fraud.
SUPPORT OUR ADVERTISERS
We Want to Hear Your Story!
We want to know what you think. Tell your thoughts in the comments below.
Do you have a story about worker’s compensation fraud on the job site you’d like to share but stay anonymous?
Send us a direct message on Facebook, Instagram, or Twitter or you can contact us here. We won’t mention your name or company.
Want more? Join our newsletter and get the latest tool reviews every week!
Your information will *never* be shared or sold to a 3rd party.


 /1pa6q42ounl23kigam363hm3-wpengine.netdna-ssl.com/wp-content/uploads/2018/10/Womens-Rainier-Duck-Boot-Rain-150x134.png" target="_blank">https://1pa6q42ounl23kigam363hm3-wpengine.netdna-s...ier-Duck-Boot-Rain-150x134.png
 /1pa6q42ounl23kigam363hm3-wpengine.netdna-ssl.com/wp-content/uploads/2018/10/Womens-Fashion-Casual-Over-The-Knee-Pull-On-Slouchy-Boots-134x150.png" target="_blank">https://1pa6q42ounl23kigam363hm3-wpengine.netdna-s...l-On-Slouchy-Boots-134x150.png
 /1pa6q42ounl23kigam363hm3-wpengine.netdna-ssl.com/wp-content/uploads/2018/09/Womens-Hurricane-Wellie-14-Solids-and-Prints-Glossy-Matte-Waterproof-Hi-Calf-Rainboots-93x150.png" target="_blank">https://1pa6q42ounl23kigam363hm3-wpengine.netdna-s...f-Hi-Calf-Rainboots-93x150.png
 /1pa6q42ounl23kigam363hm3-wpengine.netdna-ssl.com/wp-content/uploads/2018/10/Womens-Woven-Strappy-Lattice-Caged-Cutout-Chunky-Low-Heel-Ankle-Bootie-150x99.png" target="_blank">https://1pa6q42ounl23kigam363hm3-wpengine.netdna-s...w-Heel-Ankle-Bootie-150x99.png
 /1pa6q42ounl23kigam363hm3-wpengine.netdna-ssl.com/wp-content/uploads/2018/10/Womens-Winter-Snow-Boots-150x137.png" target="_blank">https://1pa6q42ounl23kigam363hm3-wpengine.netdna-s...-Winter-Snow-Boots-150x137.png
 /1pa6q42ounl23kigam363hm3-wpengine.netdna-ssl.com/wp-content/uploads/2018/09/Womens-Lace-up-Strappy-Knee-High-Combat-Stacked-Heel-Boot-102x150.png" target="_blank">https://1pa6q42ounl23kigam363hm3-wpengine.netdna-s...-Stacked-Heel-Boot-102x150.png


 /homefixated.com/wp-content/uploads/2018/12/scaffold-please-300x225.jpg" target="_blank">https://homefixated.com/wp-content/uploads/2018/12/scaffold-please-300x225.jpg
 /homefixated.com/wp-content/uploads/2018/12/4-in-1-metaltech-300x108.jpg" target="_blank">https://homefixated.com/wp-content/uploads/2018/12/4-in-1-metaltech-300x108.jpg
 /homefixated.com/wp-content/uploads/2018/12/5-table-300x225.jpg" target="_blank">https://homefixated.com/wp-content/uploads/2018/12/5-table-300x225.jpg
 /homefixated.com/wp-content/uploads/2018/12/5-saw-mounted-300x225.jpg" target="_blank">https://homefixated.com/wp-content/uploads/2018/12/5-saw-mounted-300x225.jpg
 /homefixated.com/wp-content/uploads/2018/12/2-big-box-in-driveway-300x225.jpg" target="_blank">https://homefixated.com/wp-content/uploads/2018/12/2-big-box-in-driveway-300x225.jpg
 /homefixated.com/wp-content/uploads/2018/12/3-assy-casters-300x200.jpg" target="_blank">https://homefixated.com/wp-content/uploads/2018/12/3-assy-casters-300x200.jpg
 /homefixated.com/wp-content/uploads/2018/12/3-assy-brace-platform-support-300x200.jpg" target="_blank">https://homefixated.com/wp-content/uploads/2018/12...e-platform-support-300x200.jpg
 /homefixated.com/wp-content/uploads/2018/12/3-assy-wire-shelving-300x225.jpg" target="_blank">https://homefixated.com/wp-content/uploads/2018/12/3-assy-wire-shelving-300x225.jpg
 /homefixated.com/wp-content/uploads/2018/12/2-platform-clamp-300x225.jpg" target="_blank">https://homefixated.com/wp-content/uploads/2018/12/2-platform-clamp-300x225.jpg
 /homefixated.com/wp-content/uploads/2018/12/3-all-together-300x225.jpg" target="_blank">https://homefixated.com/wp-content/uploads/2018/12/3-all-together-300x225.jpg
 /homefixated.com/wp-content/uploads/2018/12/4-locking-button-300x225.jpg" target="_blank">https://homefixated.com/wp-content/uploads/2018/12/4-locking-button-300x225.jpg
 /homefixated.com/wp-content/uploads/2018/12/4-upper-end-off-300x225.jpg" target="_blank">https://homefixated.com/wp-content/uploads/2018/12/4-upper-end-off-300x225.jpg
 /homefixated.com/wp-content/uploads/2018/12/4-low-level-300x200.jpg" target="_blank">https://homefixated.com/wp-content/uploads/2018/12/4-low-level-300x200.jpg
 /homefixated.com/wp-content/uploads/2018/12/3-high-scaffold-200x300.jpg" target="_blank">https://homefixated.com/wp-content/uploads/2018/12/3-high-scaffold-200x300.jpg
 /homefixated.com/wp-content/uploads/2018/12/4-scaffold-three-levels-metaltech-150x150.jpg" target="_blank">https://homefixated.com/wp-content/uploads/2018/12...e-levels-metaltech-150x150.jpg
 /homefixated.com/wp-content/uploads/2018/12/4-anti-tip-bracket-300x225.jpg" target="_blank">https://homefixated.com/wp-content/uploads/2018/12/4-anti-tip-bracket-300x225.jpg
 /homefixated.com/wp-content/uploads/2018/12/5-1-workbench-300x200.jpg" target="_blank">https://homefixated.com/wp-content/uploads/2018/12/5-1-workbench-300x200.jpg
 /homefixated.com/wp-content/uploads/2018/12/5-attach-brackets-300x225.jpg" target="_blank">https://homefixated.com/wp-content/uploads/2018/12/5-attach-brackets-300x225.jpg
 /homefixated.com/wp-content/uploads/2018/12/5-saw-slides-300x225.jpg" target="_blank">https://homefixated.com/wp-content/uploads/2018/12/5-saw-slides-300x225.jpg
 /homefixated.com/wp-content/uploads/2018/12/5-tighte-it-up-300x225.jpg" target="_blank">https://homefixated.com/wp-content/uploads/2018/12/5-tighte-it-up-300x225.jpg
 /homefixated.com/wp-content/uploads/2018/12/5-secure-with-mounting-clamps-300x225.jpg" target="_blank">https://homefixated.com/wp-content/uploads/2018/12...th-mounting-clamps-300x225.jpg
 /homefixated.com/wp-content/uploads/2018/12/5-adjustable-material-supports-with-stops-300x225.jpg" target="_blank">https://homefixated.com/wp-content/uploads/2018/12...upports-with-stops-300x225.jpg
 /homefixated.com/wp-content/uploads/2018/12/5-support-roller-in-place-300x225.jpg" target="_blank">https://homefixated.com/wp-content/uploads/2018/12...rt-roller-in-place-300x225.jpg
 /homefixated.com/wp-content/uploads/2018/12/6-cart-metaltech-150x150.jpg" target="_blank">https://homefixated.com/wp-content/uploads/2018/12/6-cart-metaltech-150x150.jpg
 /homefixated.com/wp-content/uploads/2018/12/7-storage-metaltech-150x150.jpg" target="_blank">https://homefixated.com/wp-content/uploads/2018/12/7-storage-metaltech-150x150.jpg
 /homefixated.com/wp-content/uploads/2018/12/feature-3-300x225.jpg" target="_blank">https://homefixated.com/wp-content/uploads/2018/12/feature-3-300x225.jpg
 /homefixated.com/wp-content/uploads/2018/12/4-scaffold-stairs-metaltech-150x150.jpg" target="_blank">https://homefixated.com/wp-content/uploads/2018/12...d-stairs-metaltech-150x150.jpg
 /homefixated.com/wp-content/uploads/2018/12/finale-300x225.jpg" target="_blank">https://homefixated.com/wp-content/uploads/2018/12/finale-300x225.jpg
 /www.todayshomeowner.com/wp-content/uploads/2013/10/tsv-broan-nutone-range-hood-filter-cleaning-tips-400x196.jpg" target="_blank">https://www.todayshomeowner.com/wp-content/uploads...lter-cleaning-tips-400x196.jpg 400w, https://www.todayshomeowner.com/wp-content/uploads...lter-cleaning-tips-230x113.jpg 230w, https://www.todayshomeowner.com/wp-content/uploads...ilter-cleaning-tips-100x49.jpg 100w" sizes="(max-width: 510px) 100vw, 510px" />


 /i2.wp.com/stadt-bremerhaven.de/wp-content/uploads/2018/09/telltale_final.jpg?resize=768%2C387&ssl=1" target="_blank">https://i2.wp.com/stadt-bremerhaven.de/wp-content/...jpg?resize=768%2C387&ssl=1