����� ��������� "�������":������� ������� �������.
����� 1 - �������-�����:������� ���� �������. ������� �������.�
����� 2 - ��� ���������
����� 3 - ����
�������-�����:������� ���� �������. ������� �������.� |

|
|
��� ��������� |
|
���� |
������� |
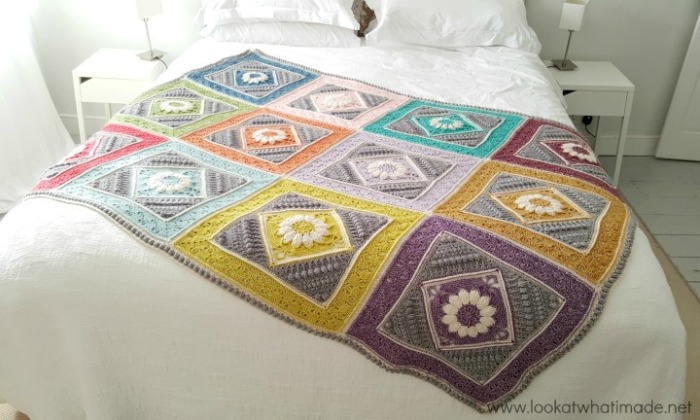
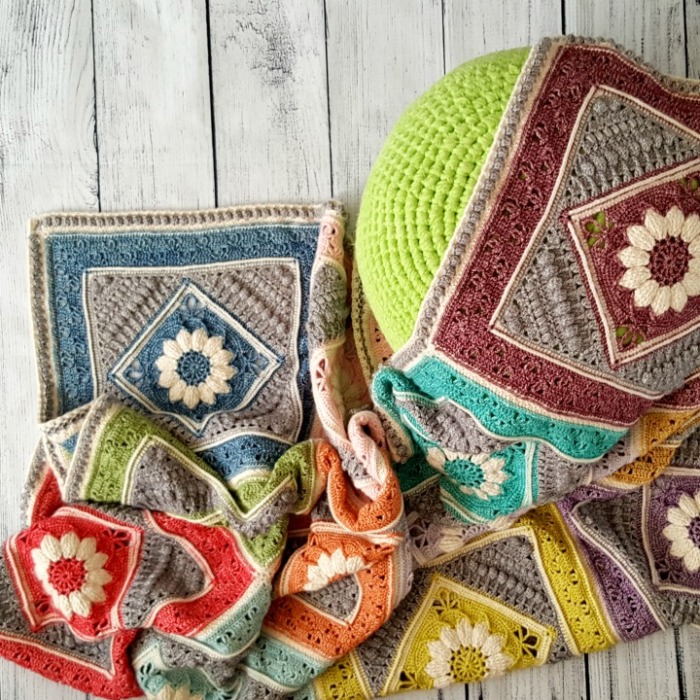
Heehee. Some projects make me feel like a child again (or, in this case, like a character in a Brontë novel)! I cannot tell you how excited Jenny and I are about bringing you this pattern. Charlotte’s Dream has been just that: A dream!
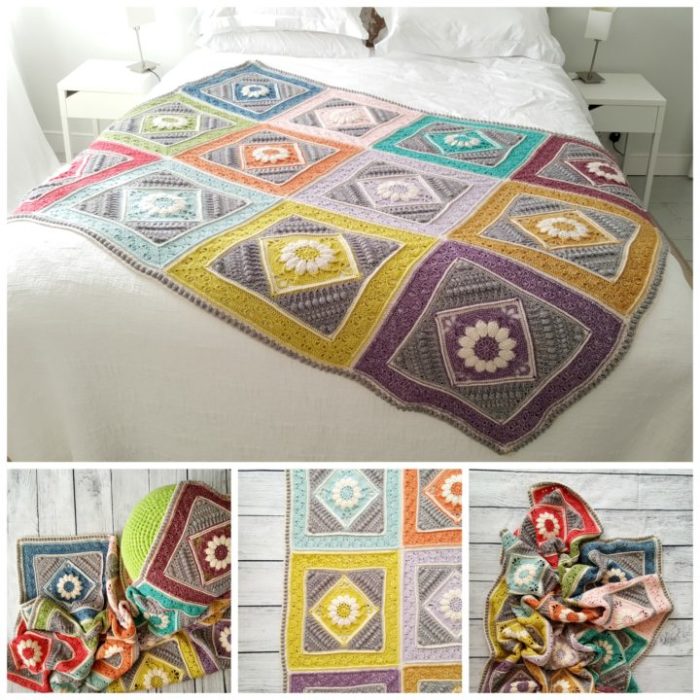
This blanket was made by my dear friend Jenny and consists of 12 Charlotte squares in 12 different colours. It is bordered with a simple popcorn edge. From the very first square, this blanket sparked my imagination. I keep imagining myself sitting on it under a huge tree, reading a really good book while the dappled sunlight dances over the pages.
Jenny and I have spent many happy hours choosing colours, chatting about a name, and oohing and aahing over the individual squares. I hope this project brings you as much joy as it has brought us.
The Charlotte Square was specifically designed for 67 Blankets for Mandela Day. I would like to thank my friend John Kelly for allowing me to use a smaller version of the flower he designed for his Mandala in Bloom pattern.
© Dedri Uys and Jenny Lowman 2016. All Rights Reserved.
 /lookatwhatimade.net/wp-content/uploads/2016/10/Charlottes-Dream-Crochet-Blanket-Reveal-2-300x180.jpg" target="_blank">https://lookatwhatimade.net/wp-content/uploads/201...t-Blanket-Reveal-2-300x180.jpg 300w, https://lookatwhatimade.net/wp-content/uploads/201...t-Blanket-Reveal-2-700x420.jpg 700w" style="box-sizing: border-box; border: 0px; max-width: 100%; height: auto; width: auto; margin-bottom: 12px;" width="720" />
* The square was originally designed using the colour references Colour A, Colour B, and Colour C. When following the photo tutorials for the individual squares, you will replace Colour A with CC, Colour B with MC1, and Colour C with MC2 as listed above.
Yarn packs for this project are available from Wool Warehouse (offers international shipping and includes printed version of the pattern) and Deramores. You can also buy Stonewashed from Scheepjes (NL).
US Terminology {US/UK Conversion HERE}
The rest of the Abbreviations and Special Stitches will be found in the individual parts for the Squares (see Charlotte Squares below).
* An asterisk indicates pattern repeats. You will need to repeat all the instructions between asterisks the number of times specified. This is a hard-core repeat and will consist of multiple instructions.
Parentheses () indicate repeats. You will need to repeat the instructions between parentheses the number of times specified. This is a lower level repeat. Parentheses are also used to indicate a group of stitches to be worked into the same stitch/space.
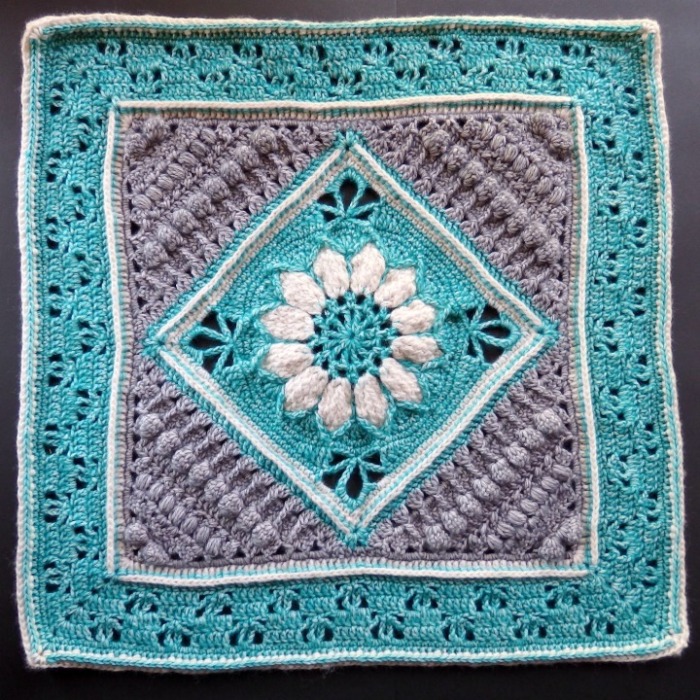
At the end of Round 18, your square should measure 20 cm (8”). Each finished square should measure 42 cm (16.5”).
172 cm (68”) x 130 cm (51”)
The central flower of this square is textured and raised slightly above the surface. When you have only made the flower, it will look like it bulges too much (because of all those front post stitches) but, as the square progresses, this will become less noticeable. With use, the flower will relax down even further, but it will always remain slightly raised above the surface of the square.
If you find that your flower bulges a lot and the rest of your square refuses to become ‘square’ by Round 18, you are making your chains too tight, and you will need to either relax your tension when making your chains or use a bigger hook for chains only.
You will need to make 12 squares, using a different Contrasting Colour (CC) for each square. Below you will find the links to the 3-part Charlotte Square (published at the start of the year), as well as the two additional rounds that will need to be added to each square before joining. Remember to reference the colours and hook size (above) when making your squares.
 /lookatwhatimade.net/wp-content/uploads/2016/10/Charlottes-Dream-Part-1-150x150.jpg" target="_blank">https://lookatwhatimade.net/wp-content/uploads/201...ottes-Dream-Part-1-150x150.jpg 150w, https://lookatwhatimade.net/wp-content/uploads/201...ottes-Dream-Part-1-700x700.jpg 700w, https://lookatwhatimade.net/wp-content/uploads/201...ottes-Dream-Part-1-250x250.jpg 250w, https://lookatwhatimade.net/wp-content/uploads/201...ream-Part-1-e1477679044491.jpg 720w" style="box-sizing: border-box; border: 2px solid rgb(207, 207, 207); max-width: 100%; height: auto; width: auto; padding: 5px;" width="300" />
 /lookatwhatimade.net/wp-content/uploads/2016/10/Charlottes-Dream-Part-2-150x150.jpg" target="_blank">https://lookatwhatimade.net/wp-content/uploads/201...ottes-Dream-Part-2-150x150.jpg 150w, https://lookatwhatimade.net/wp-content/uploads/201...ottes-Dream-Part-2-700x700.jpg 700w, https://lookatwhatimade.net/wp-content/uploads/201...ottes-Dream-Part-2-250x250.jpg 250w, https://lookatwhatimade.net/wp-content/uploads/201...ream-Part-2-e1477679092298.jpg 720w" style="box-sizing: border-box; border: 2px solid rgb(207, 207, 207); max-width: 100%; height: auto; width: auto; padding: 5px;" width="300" />
Sl st into the next ch-2 corner space. Ch 2 (counts as hdc). (Hdc, ch 2, 2 hdc) into the same ch-2 corner space. This is your first corner made.
*Skip the first (hidden) stitch. Hdc in each of the remaining 85 st’s across. (2 hdc, ch 2, 2 hdc) in the next ch-2 corner space.* Repeat from * to * 3 more times, omitting the last corner on the last repeat. Join to the top of the beginning ch-2 with a sl st. Fasten off and work away your ends.
Stitch Count: 356 hdc’s and 4 ch-2 corner spaces {89 hdc’s per side}
Join your yarn by making a standing single crochet in any ch-2 corner space. (Ch 2, sc) in the same ch-2 space. This is your first corner made.
*BPhdc around each st. (Sc, ch 2, sc) in the next ch-2 corner space.* Repeat from * to * 3 more times, omitting the last corner on the last repeat. Join to the first sc with a sl st. Fasten off and work away your ends.
Stitch Count: 8 sc’s, 356 BPhdc’s, and 4 ch-2 corner spaces {2 sc’s and 89 BPhdc’s per side}
 /lookatwhatimade.net/wp-content/uploads/2016/10/Charlottes-Dream-Individual-Square-150x150.jpg" target="_blank">https://lookatwhatimade.net/wp-content/uploads/201...-Individual-Square-150x150.jpg 150w, https://lookatwhatimade.net/wp-content/uploads/201...-Individual-Square-300x300.jpg 300w, https://lookatwhatimade.net/wp-content/uploads/201...-Individual-Square-700x700.jpg 700w, https://lookatwhatimade.net/wp-content/uploads/201...-Individual-Square-250x250.jpg 250w" style="box-sizing: border-box; border: 0px; max-width: 100%; height: auto; width: auto; margin-bottom: 12px;" width="720" />
When you have made all 12 squares, you will need to join them to each other. I am going to show you how we chose to do our layout, but you are free to move the colours around. If you do decide to move the colours, try not to put too many light or dark colours next to each other as this will make the blanket appear a bit lopsided.
 /lookatwhatimade.net/wp-content/uploads/2016/10/Charlottes-Dream-Layout-225x300.jpg" target="_blank">https://lookatwhatimade.net/wp-content/uploads/201...ottes-Dream-Layout-225x300.jpg 225w, https://lookatwhatimade.net/wp-content/uploads/201...ottes-Dream-Layout-525x700.jpg 525w" width="600" />
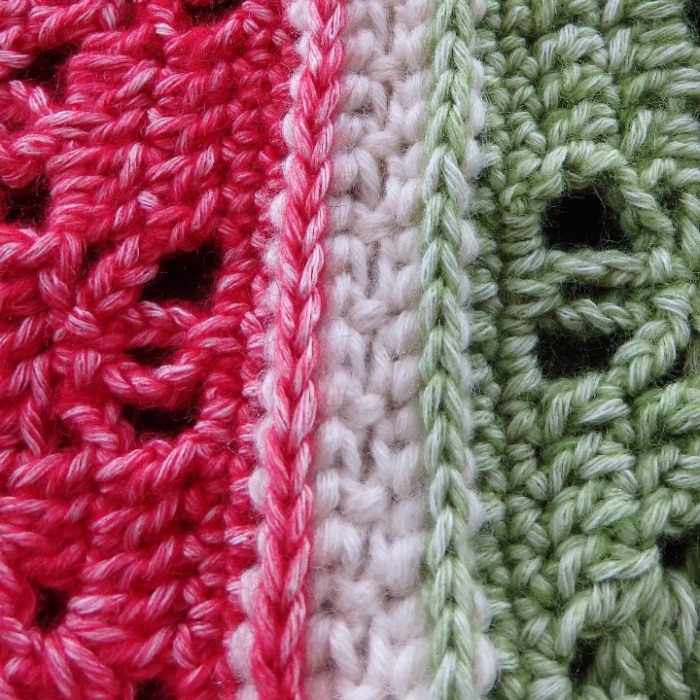
The squares are joined using a (Sc, ch 1, skip 1) join. It yields a flat seam on the front of your work that will look like little stitches. On the back of your work, the seam will be raised (but not as much as if you had made a sc in each stitch). This seam is reasonably elastic, provided that you don’t make your chains too tight.
 /lookatwhatimade.net/wp-content/uploads/2016/10/Charlottes-Dream-Joining-Photo-150x150.jpg" target="_blank">https://lookatwhatimade.net/wp-content/uploads/201...ream-Joining-Photo-150x150.jpg 150w, https://lookatwhatimade.net/wp-content/uploads/201...ream-Joining-Photo-300x300.jpg 300w, https://lookatwhatimade.net/wp-content/uploads/201...ream-Joining-Photo-700x700.jpg 700w, https://lookatwhatimade.net/wp-content/uploads/201...ream-Joining-Photo-250x250.jpg 250w" style="box-sizing: border-box; border: 0px; max-width: 100%; height: auto; width: auto; margin-bottom: 12px;" width="720" />
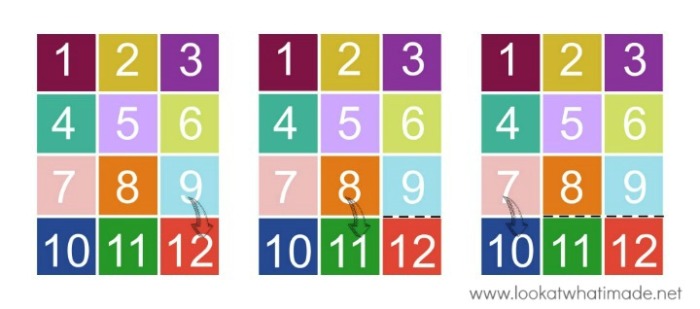
The squares are joined in a grid. You will be making all the horizontal joins first, followed by the vertical joins. Unless otherwise specified, you should be inserting your hook into both loops of both layers for each indicated stitch. To make it easier for you to understand, I have numbered the squares from 1 to 12, starting in the top left-hand corner and ending in the bottom right-hand corner.
Place Square 9 on top of Square 12 with right sides together. With a slip knot (MC1) already on your hook, start joining the two squares by making a standing single crochet in the ch-2 corner space. (Ch 1, skip the next st, and sc in the next st) until you have one stitch left before the next corner space. Ch 1, skip the last st, and sc in the ch-2 corner space. Ch 1 before joining the next 2 squares.
Place Square 8 on top of Square 11 with right sides together. *Make a sc in the ch-2 corner space, again remembering to work though both layers. (Ch 1, skip the next st, and sc in the next st) until you have one stitch left before the next corner space. Ch 1, skip the last st, and sc in the ch-2 corner space. Ch 1.*
Without fastening off, place Square 7 on top of Square 10 with right sides together and repeat from * to *. Fasten off and work away your ends.
 /lookatwhatimade.net/wp-content/uploads/2016/10/Joining-Squares-1-3-Charlottes-Dream-Lookatwhatimade-300x133.jpg" target="_blank">https://lookatwhatimade.net/wp-content/uploads/201...am-Lookatwhatimade-300x133.jpg 300w, https://lookatwhatimade.net/wp-content/uploads/201...am-Lookatwhatimade-700x309.jpg 700w" style="box-sizing: border-box; border: 0px; max-width: 100%; height: auto; width: auto; margin-bottom: 12px;" width="720" />
You have now completed your first horizontal strip. Repeat the whole process, laying Square 6 on Square 9, Square 5 on Square 8, and Square 4 on Square 7. Then repeat it again with the last 3 squares.
Now turn your blanket 90 degrees so that you can start joining the squares vertically. Fold the row containing squares 3, 6, 9, and 12 onto the row containing squares 2, 5, 8, and 11.
Just like when you were joining the squares horizontally, repeat the instructions between asterisks (*) above for each square, remembering to chain 1 between squares. Fasten off when you have joined all four squares and then repeat the process to join squares 2, 5, 8, and 11 to squares 1, 4, 7, and 10.
 /lookatwhatimade.net/wp-content/uploads/2016/10/Joining-Squares-4-and-5-Charlottes-Dream-Lookatwhatimade-300x197.jpg" target="_blank">https://lookatwhatimade.net/wp-content/uploads/201...am-Lookatwhatimade-300x197.jpg 300w, https://lookatwhatimade.net/wp-content/uploads/201...am-Lookatwhatimade-700x459.jpg 700w" style="box-sizing: border-box; border: 0px; max-width: 100%; height: auto; width: auto; margin-bottom: 12px;" width="720" />
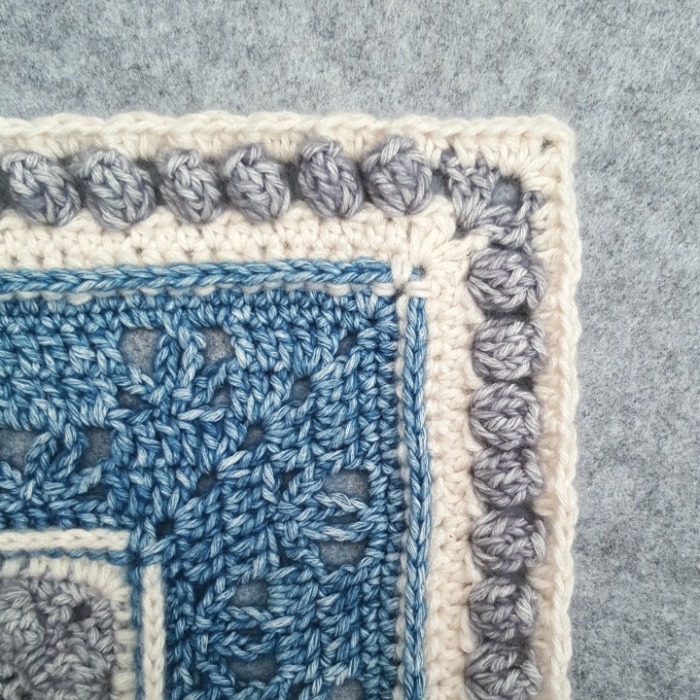
When you have joined all your squares to each other, you are ready to add your border. The Popcorns in this border are created over 2 rounds. In Round 2, you will make a series of 5-dc groups. In Round 3, you will turn these 5-dc groups into Popcorns by using front post stitches.
When adding the first round of the border, the ch-2 corners of each square (along the edges of the blanket) will count as a stitch and should be worked into. Only the four ch-2 spaces in the corners of the blanket will be referred to as a ch-2 space.
Join your yarn by making a standing double crochet in the ch-2 corner space at the start of any long side. (Dc, ch 2, 2 dc) in the same ch-2 space. This is your first corner made.
*Hdc in each st, remembering that the ch-2 spaces along the edge count as stitches and should be worked into. (2 dc, ch 2, 2 dc) in the next ch-2 corner space.* Repeat from * to * 3 more times, omitting the last corner on the last repeat. Join to the first dc with a sl st. Fasten off and work away your ends.
Stitch Counts:
Join your yarn by making a standing double crochet in the ch-2 corner space at the start of any long side. (Dc, ch 2, 2 dc) in the same ch-2 space. This is your first corner made.
*(Ch 2, skip the next 2 st’s, and make 5 dc’s in the next st) until you have 2 st’s left. Ch 2 and skip the last 2 st’s. (2 dc, ch 2, 2 dc) in the next ch-2 corner space.* Repeat from * to * 3 more times, omitting the last corner on the last repeat. Join to the first dc with a sl st. Fasten off and work away your ends.
Stitch Counts:
To make a FPhdc around a 5-dc group, yarn over and insert your hook from front to back into the ch-2 space before the 5-dc group. Insert your hook from back to front into the next ch-2 space so that the 5 dc’s lie on top of your hook. Complete your hdc as normal, making sure that your working yarn is above the 5 dc’s, not in front of them. This will pull the 5 dc’s together and form a neat Popcorn. If you want more help, have a look at my tutorial for the Really Lazy Popcorn.
Join your yarn by making a standing half-double crochet in the ch-2 corner space at the start of any long side. (Hdc, ch 2, 2 hdc) in the same ch-2 space. This is your first corner made.
*Hdc in the first 2 st’s and make 2 hdc’s in the first ch-2 space. (Make a FPhdc around the next 5-dc group, make 2 hdc’s in the next ch-2 space) until you have worked into every ch-2 space. Hdc in the last 2 st’s. (2 hdc, ch 2, 2 hdc) in the corner ch-2 space.* Repeat from * to * 3 more times, omitting the last corner on the last repeat. Join to the first hdc with a sl st. Fasten off and work away your ends.
Stitch Counts:
 /lookatwhatimade.net/wp-content/uploads/2016/10/Charlottes-Dream-Border-1-150x150.jpg" target="_blank">https://lookatwhatimade.net/wp-content/uploads/201...tes-Dream-Border-1-150x150.jpg 150w, https://lookatwhatimade.net/wp-content/uploads/201...tes-Dream-Border-1-300x300.jpg 300w, https://lookatwhatimade.net/wp-content/uploads/201...tes-Dream-Border-1-700x700.jpg 700w, https://lookatwhatimade.net/wp-content/uploads/201...tes-Dream-Border-1-250x250.jpg 250w" style="box-sizing: border-box; border: 0px; max-width: 100%; height: auto; width: auto; margin-bottom: 12px;" width="720" />
And that is Charlotte’s Dream all done :)
 /lookatwhatimade.net/wp-content/uploads/2016/10/Charlottes-Dream-Crochet-Blanket-Reveal-150x150.jpg" target="_blank">https://lookatwhatimade.net/wp-content/uploads/201...het-Blanket-Reveal-150x150.jpg 150w, https://lookatwhatimade.net/wp-content/uploads/201...het-Blanket-Reveal-300x300.jpg 300w, https://lookatwhatimade.net/wp-content/uploads/201...het-Blanket-Reveal-700x700.jpg 700w, https://lookatwhatimade.net/wp-content/uploads/201...het-Blanket-Reveal-250x250.jpg 250w" style="box-sizing: border-box; border: 0px; max-width: 100%; height: auto; width: auto; margin-bottom: 12px;" width="720" />
Thank you for choosing to make this blanket. If you would like to share photos of your finished project, please use hashtag #charlottesdreamcrochetblanket so that Jenny and I can see it!
Want to see more of our Charlotte’s Dream journey?
Please remember to subscribe to my Newsletter if you would like to be kept in the loop. You can also like my Facebook page or follow me on Bloglovin, Google+, Pinterest, Twitter, or Instagram.
Happy Hooking!

This blog post contains affiliate links. I only link to products I personally use or would use. All opinions are my own.
|
|
| ��������: | [1] |