Вышивка по пластиковой канве Ведьма
|
|
Среда, 24 Сентября 2014 г. 19:44
+ в цитатник

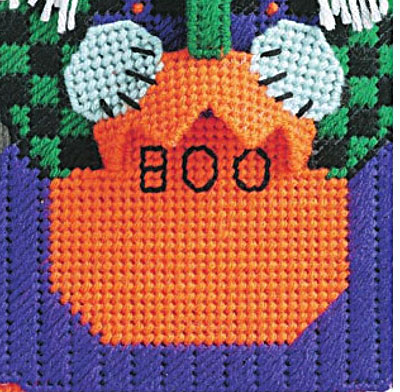
Приглянулась вот такая симпатичная Ведьмочка, вышитая по пластиковой канве. Можно использовать как декор к Хэллоуину, сделать магнитик или просто подарить.
Журнал англоязычный (Happy Holiday Celebrations). Пробовала перевести через переводчик Google. Но получилась такая абракадабра, что я решила не тратить время на её повторный перевод в читабельный текст.
Внизу после схемы вышивки можете найти оригинальный текст (возможно вы владеете английским, а может, вам просто знакомы приведенные в статье рукодельные термины).
Во всяком случае, есть схема и разобраться можно.
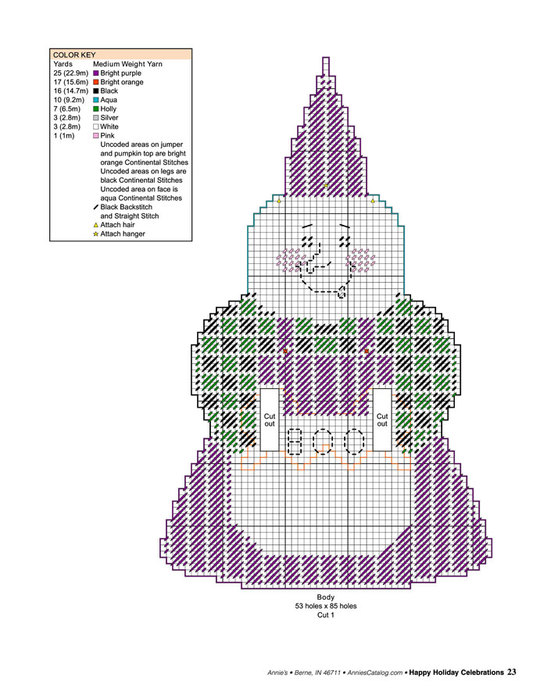
Верх шляпы и верхушка тыквы вышивается отдельно и, видимо, приклеивается сверху на уже вышитую основу.
Materials
-
1 sheet 7-count plastic canvas (1 лист пластиковой канвы)
-
Medium weight yarn as listed in color key (цветная пряжа как на схеме)
-
#16 tapestry needle (гобеленовая игла №16)
-
Hot-glue gun (клеевой пистолет)
Cutting & Stitching
-
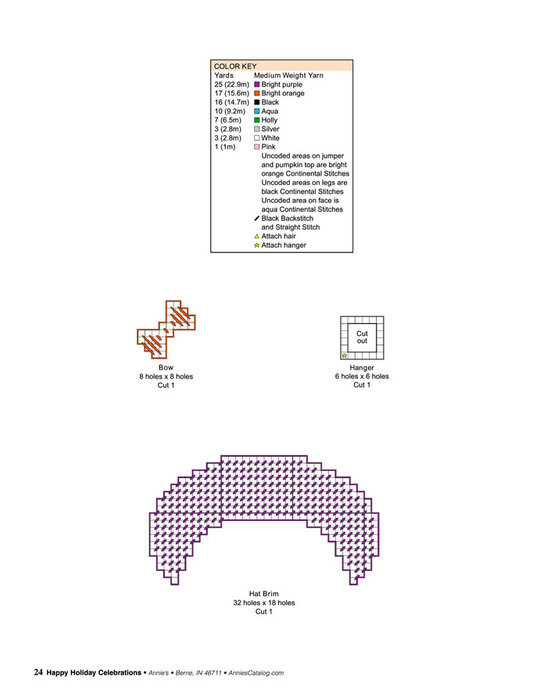
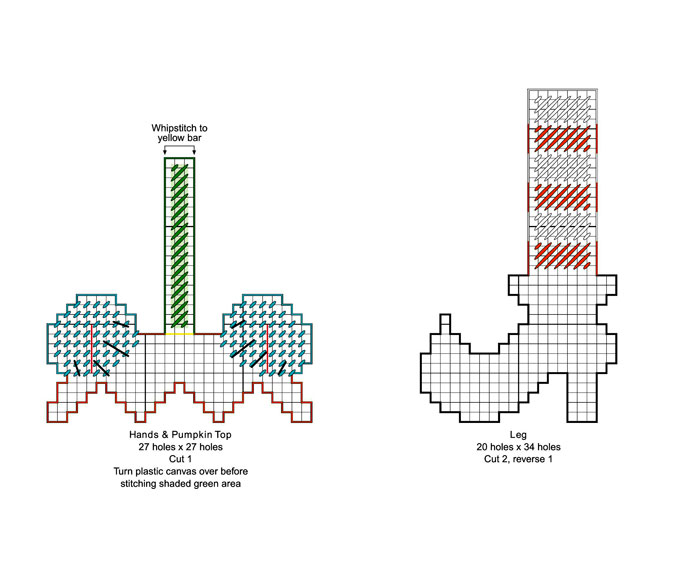
Cut plastic canvas according to graphs (pages 23-25). Cut two 5-hole x 12-hole pieces for hand supports. Hanger and hand supports will remain unstitched.
-
Stitch and Overcast one leg following graph, working uncoded area with black Continental Stitches; reverse remaining leg before stitching.
-
Stitch hands and pumpkin top following graph, working uncoded area on pumpkin top with bright orange Continental Stitches and leaving yellow highlighted bar unstitched. Turn plastic canvas over before stitching shaded green area (stem) with holly on back side.
-
Overcast all edges on hands and pumpkin top except top edge of stem. Fold stem toward front so wrong sides are facing; use holly to Whipstitch top edge to yellow highlighted bar.
-
Stitch and Overcast remaining pieces following graphs, working uncoded area on face with aqua Continental Stitches and uncoded area on jumper (pumpkin) with bright orange Continental Stitches. Do not Overcast edges of cutout areas on body.
-
When background stitching is completed, work black embroidery on face, pumpkin and hands.
Assembly (сборка)
-
Tb attach hands and pumpkin top, center one hand support behind each opening on body; temporarily tack in place. Place hands and pumpkin top over openings where indicated on body with orange lines. Use aqua to permanently tack each hand to a support where indicated with red lines on hands. Note: Hands are tacked to supports through openings. Remove temporary tacking for hand supports.
-
For hair, cut 12 (9-inch/22.9cm) lengths silver yarn. For each hair section, hold six lengths together and tie a knot in center. Glue knots to head where indicated on graph.
-
Using photo as a guide through step 5, glue legs to back side of body. Glue bow to hat brim and hat brim to head and hat over knots on hair.
-
Glue hanger to back of body where indicated on graphs.
-
Grasp stem on pumpkin top and pull up to reveal message.
Серия сообщений "Вышивка для праздников":
Часть 1 - Вышивка по пластиковой канве Ведьма
Часть 2 - Пасхальные мотивы для вышивки крестом
Метки:
вышивка по канве
декор к хэллоуину
вышивка
ведьмочка
-
Запись понравилась
-
0
Процитировали
-
0
Сохранили
-


