-Музыка
- Мирей Матье - Влюблённая женщина
- Слушали: 20289 Комментарии: 6
- Алла Пугачева - Позови меня с собой
- Слушали: 5833 Комментарии: 0
- Tsaritsa moya preblagaya
- Слушали: 63 Комментарии: 0
- Оооофигенная музыка,спер у Интресс:)
- Слушали: 418242 Комментарии: 0
-Рубрики
- церковное рукоделие (53)
- рукоделие (45)
- крой и шитьё (36)
- бисероплетение (35)
- кулинария (34)
- Пасха (25)
- Разное (18)
- украшение дома (17)
- вязание крючком (16)
- волосы (13)
- www (13)
- мыловарение (12)
- lent (11)
- Новый год (11)
- вязание спицами (10)
- Житие (9)
- крестины (9)
- маникюр (9)
- Мастер-класс (9)
- интерьер (9)
- цветы (6)
- candles (5)
- вышивка (5)
- бубончики (5)
- how is clean your house? (3)
- goldwork (3)
- Просфоры (2)
- вышивка биссером (2)
- Janome (2)
- Allotment (1)
- Fish (1)
- come dine with me (1)
- cupcakes (1)
- Halogen oven (1)
- enjoy yourself (1)
- orchids (1)
-Поиск по дневнику
-Подписка по e-mail
-Статистика
Без заголовка |
Step 1:
Apply a base coat prior to nail polish application. Apply 2 coats of Nail Fantasy color no. 66 which is peach shade with specks of gold.

Step 2:
Apply a clear polish or a top coat, any polish that is not thick in consistency, I am using Sally Hansen's Clear Polish.

Step 3:
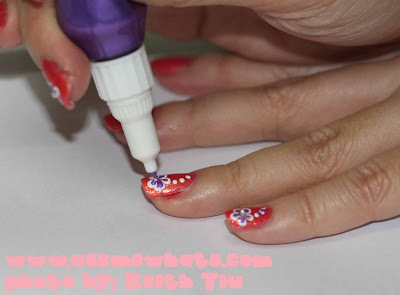
Making sure to apply the clear polish one finger nail at a time. While the clear polish is still wet, drop 5 dots of Prettynails' white nail art pen, do not worry if the dots spread out a bit. It should be that way so the flowers will turn out as part of your nail polish. Continue dotting below the petals.

Step 4:
Making sure to work fast, while the white dots/petals are still wet, drop another colored nail art pen on top of the white dot. I chose Prettynails' Nail Art Pen in purple. Using the tip of the art pen or a needle to spread the colors together and connect it going inwards.

Step 5:
You can choose to drop a different shade for flower bud. I opted for a clear rhinestones. Press it in and the rhinestones will stay with you for weeks :)

Step 6:
To protect your hard work, apply a coat of your favorite Top Coat.

Enjoy your flower nail art with a twist of 2 tones!
You can create same flowers with different color combinations!

| Рубрики: | маникюр |
Процитировано 2 раз
| Комментировать | « Пред. запись — К дневнику — След. запись » | Страницы: [1] [Новые] |


