Нашла себя на Ravelry |
Метки: вязание |
ДНЕВНИКИ (МАШИННОЕ ВЯЗАНИЕ)... НАШЛА В ОДНОМ ИЗ ДНЕВНИКОВ.. |
Shestal вязание,журналы по вязанию в том числе и на вяз маш.
[user=Margarit
Метки: вязание |
ТОП 200 ЛУЧШИХ САЙТОВ ПО РУКОДЕЛИЮ: |
|
1. ВЯЗАНИЕ РУКОДЕЛИЕ ТОП 200 лучших сайтов по рукоделию:- https://vk.com/knitting 2. Домашний Очаг - женский журнал. 3. Сайт, посвященный вязанию http://vse-sama.ru
|
Метки: вязание |
КОЛЛЕКЦИЯ (АРХИВ) ЖУРНАЛОВ БУРДА МОДЕН BURDA MODEN С 1998 ГОДА НА РУССКОМ ЯЗЫКЕ |
Журналы BURDA MODEN 1998 год


Журналы BURDA MODEN 1999 год


ЖУРНАЛЫ БУРДА МОДЕН 1990-1999 В ПРОДАЖЕ
Журналы BURDA MODEN 2000 год


Журналы BURDA MODEN 2001 год


Журналы BURDA MODEN 2002 год


Журналы BURDA MODEN 2003 год


Журналы BURDA MODEN 2004 год


Журналы BURDA MODEN 2005 год


Журналы BURDA MODEN 2006 год


Журналы BURDA MODEN 2007 год


Журналы BURDA MODEN 2008 год


Журналы BURDA MODEN 2009 год


Журналы BURDA MODEN 2010 год


 2010 09 (сентябрь)")
 2010 10 (октябрь)")
 2010 11 (ноябрь)")
 2010 12 (декабрь)")
Журналы BURDA MODEN 2011 год
 2011 01 (январь)")
 2011 02 (февраль)")
 2011 03 (март)")
 2011 04 (апрель)")
 2011 05 (май)")
 2011 06 (июнь)")
 2011 07 (июль)")
 2011 08 (август)")
 2011 09 (сентябрь)")
КАТАЛОГ ЖУРНАЛОВ BURDA MODEN ONLINE 1950-1988 НА НЕМЕЦКОМ ЯЗЫКЕ
Здесь ссылка на журналы, которые есть в продаже
При копировании материалов просим ссылаться на наш сайт. Спасибо за понимание
| Оценить материал: | |||||
|
| Комментарии посетителей: | |
|
Метки: вязание |
RAVELRY ДЛЯ ЧАЙНИКОВ . |
Раз уж я вылезла из кустов (в которых мне было очень комфортно ), напишу о сайте Ravelry.
Про Ravelry слышали все. Многие не только слышали, но и регулярно там бывают.
О том, что и как делать на этом сайте, рассказывали не раз и не два. И в интернете, и в моём персональном блоге Natali’s Mysterious Garden информации достаточно.
А вот о том, чего НЕЛЬЗЯ делать на Ravelry, как-то позабыли. А нельзя тоже довольно много.
Прежде всего сайт американский. Официальный язык сайта - английский.

Метки: бизнес вязание бохо |
КРАСИВОЕ ВЯЗАНИЕ ОТ YOKO ASADA |
Метки: вязание |
КАК ИЗМЕНИТЬ ГЛАДКУЮ ПОВЕРХНОСТЬ ТКАНИ.НЕСКОЛЬКО ТЕХНИК |
Этот мастер-класс от Tatiana Connor.


Метки: тильды |
ШАРНИРНАЯ КУКЛА МК |
не является руководством к дествию) это скорее как делать не надо)) потому как все можно было сделать гораздо проще,если прислушиваться к инструкциям в уроках шарнирной куклы. я же делала как придется=)


итак. пластик я купила вот такой, он самотверждаемый

самая главная ошибка - не нарисовала ее на бумаге,с лицом и размерами шарниров. это нужно сделать
Метки: тильды |
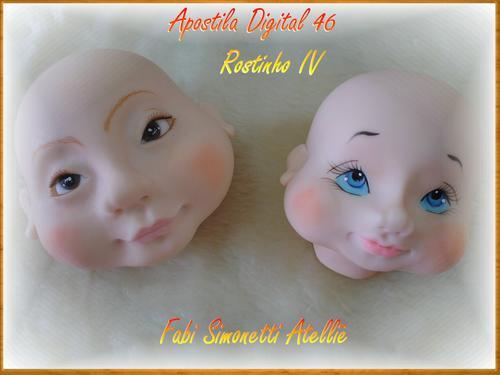
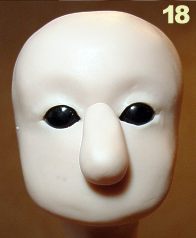
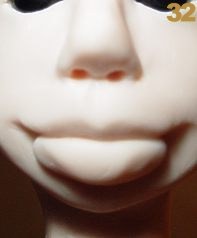
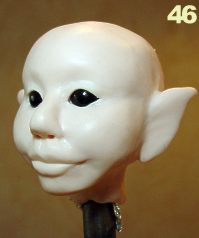
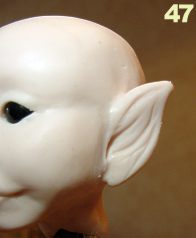
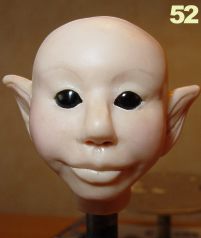
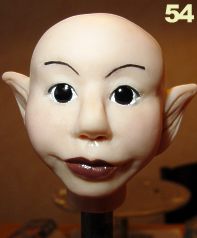
РОСПИСЬ ЛИЦА И ТЕЛА КУКЛЫ |
Роспись лица и тела авторской куклы
 При изготовлении авторской куклы из самоотвердевающих пластиков чаще всего ее требуется окрасить и расписать.
Это позволит сделать образ более выразительным, подчеркнет характер куклы красками.
Для окрашивания и росписи нам понадобятся:
 Сначала тонируем всю поверхность тела куклы. Для этого используем краску glorfix телесного цвета. Она дает матовую "фарфоровую" поверхность. При необходимости, ее можно смешать с акриловой краской, чтобы получить другой тон кожи. Краску наносим на небольшую поверхность сначала кистью (№6), затем сразу, пока краска не высохла тампонуем губкой. Это позволяет добиться более ровного распределения краски по поверхности, без разводов от кисти, и создает близкую к коже фактуру.
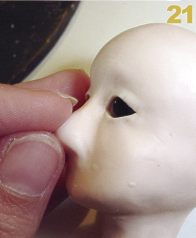
 Наносим румянец.
Для этого смешиваем охру красную с медиумом. От количества медиума зависит яркость получившегося тона.
Кистью №3 наносим краску на щеки, немного на лоб, подбородок и нос. Для более тщательной растушевки можно использовать губку.
 Таким же образом тонируем плечи, локти, коленки, кончики пальцев и ладошки, пятки и прочие части тела куклы, где это необходимо.
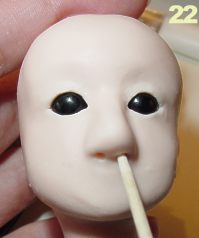
Охрой красной с медиумом подчеркиваем рот куклы.
Рисуем веснушки. Используем охру красную и сиену жженую.
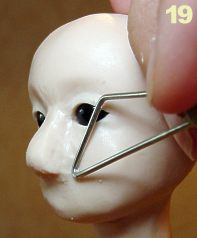
 Роспись глаз.
При росписи глаз необходимо уделить внимание следующим областям:
1 - в уголках глаза наносим немного охры красной, это сделает взгляд более естественным и белок не будет так выделяться
2 - в нижней части радужки под зрачком делаем блик более светлого цвета, чем цвет глаз
3 - верхнюю часть радужки делаем более темной, т.к. здесь падает тень от века, также можно нанести легкую тень под веко в верхней части всего глаза
4 - вокруг радужки глаза делаем ободок более темного цвета, чем цвет глаз.
Сначала наносим белый на всю поверхность глаза.
Добавляем охру красную в уголках. Сиеной жженой рисуем радужку.


Смешиваем сиену жженую и белую и получившийся более светлый цвет наносим в нижнюю часть радужки, оставляя небольшой темный ободок по краю. Добавляем еще белой и желтую темную, этим цветом рисуем небольшой светлый блик в нижней части радужки.
Черной рисуем зрачок и затемняем верхнюю часть радужки.


Подчеркиваем веки и рисуем ресницы.


Белой ставим небольшие блики по краю зрачка.
Рисуем брови. Сначала охрой красной, затем прорисовываем волоски сиеной жженой и черной.
Когда роспись закончена, покрываем всю поверхность куклы матовым лаком. После того, как он полностью просохнет, наносим глянцевый лак на глаза и губы.


Роспись куклы завершена.

Метки: тильды |
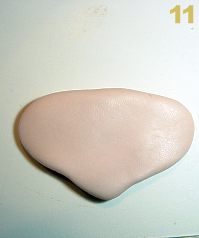
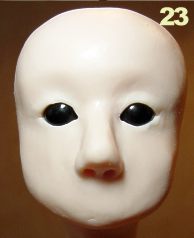
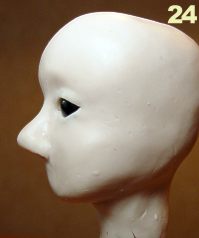
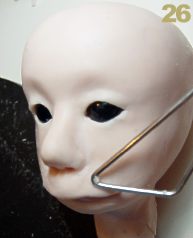
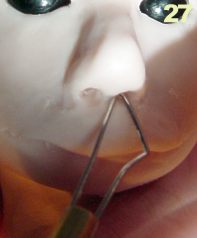
ЛЕПКА КУКОЛНЫХ ГОЛОВОК |
Метки: тильды |
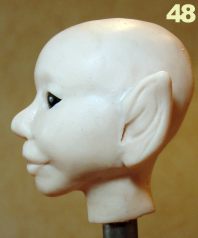
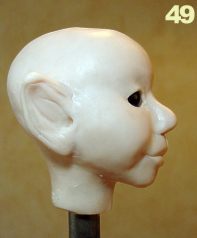
ФЕЕЧКИ И ЭЛЬФИКИ |
Diane Guelinckx-Becker живёт в Boutersem, деревни в Hageland. Более 20 лет она занималась лепкой различных фигур из полимерной глины. Но с 1996 года Диана вдохновившись сказочным миром стала лепить только фей, причём разного возраста. У каждой феечки есть имя и свой размер. Два раза в год автор этих скульптурок принимает участие в выставках кукол.Такая феечка может украсить интерьер детской спальни и любого помещения в целом. Придав при этом невинную красоту.


из дневника Аdelini
Метки: тильды |
ФЕЕЧКИ И ЭЛЬФИКИ |


Метки: тильды |
Лепка кукол Эльфиек. |
На этот раз, куклы Эльфийки. Без перевода, согласна, минус.
Но,это так же, подробный мастер класс.
1.

Метки: тильды |
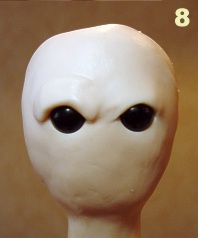
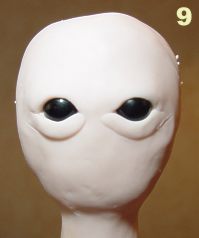
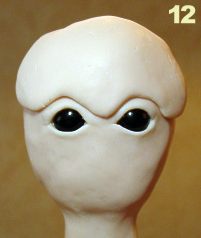
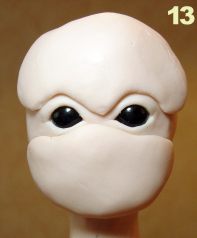
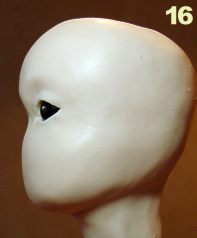
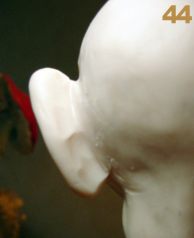
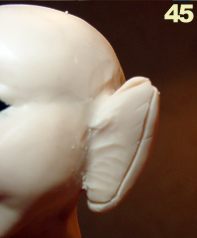
ЛЕПКА ГОЛОВЫ |
К сожалению картинки без перевода. Но всё интуитивно понятно.
На столько подробный мастер класс, что понятен без слов.
1.

Метки: тильды |
ЛЕПКА ГОЛОВЫ |
В этой статье, адресованной начинающим долмейкерам, вы найдете информацию о том, как слепить голову куклы из fimo.
 |


Метки: тильды |
КАК ЛЕПИТЬ ГУБКИ |

Метки: тильды |
ОЧЕНЬ ПОДРОБНЫЙ МК ПО КУКОЛЬНОЙ НОЖКЕ! |
Стащила отсюда http://members.home.nl/asrai/cursus-en.htm
|
The foot in this tutorial is from heel to big toe about 1.8 inch long. Always use the head as a comparison for the size of the feet. The length of the feet is equal to the size of the head. |
 |
 |
|
In this tutorial I will only make the right foot. Try to work simultaneously on both feet because it is hard to make an equal looking foot afterwards. You start off by making a 2.5 inch long cylinder shaped roll of clay, about 0.8 inch thick (pict. 1). Bend the roll of clay in an angle like in pict. 2. The top will become a part leg and the other part the foot. |
|
 |
 |
| Flatten the clay by pressing it together between thumb and point finger towards the 'toes'. Be careful not to make it too flat. (pict. 3 + 4). | |
 |
 |
|
Now it is time to form the heel. Push/smear some clay from under the foot backwards (towards the heel) and push/smear some clay from the lower leg down (towards the heel) (pict. 5). This way you'll get more clay on the heel and a better shape at the sole of the foot. Press the clay with your thumb on the inside of the foot to make it more hollow (pict. 6). |
|
 |
 |
|
Before you can make incisions for the toes, the front of the foot needs to be reshaped a bit. Cut off a piece of clay slantwise starting at the 'big toe' (pict. 7). After this smooth the edge with your fingers (pict. 8). |
|
 |
 |
|
Look at the foot to see if it's not too thick, if it is you can make it thinner by smearing the clay from the instep to the leg. You can also smear clay upwards just above the heel towards the leg, this way the foot will become slimmer (pict. 9). Sculpt as smooth as possible, use a damp finger to rub the clay for a smooth finish. Now you can make incisions for the toes with the help of a sharp tool. Don't forget the big toe needs to be bigger than the other toes (pict. 10). |
|
 |
 |
|
Spread out the toes gently so you have more working space (pict. 11). Hold the toes one by one between your point finger and thumb. While warming the clay by the warmth of your hands, very gently roll the toes slightly back and forth, so the inside of the toes will also become round. This will probably make the toes become too long but that doesn't matter (pict. 12). When the toes have the right thickness and are nice and round, you can cut them off at the right size. Smooth the edges of the toes with your fingers. |
|
 |
 |
|
You can use a sculpting tool for the areas that are difficult to reach, like between the toes (pict. 13). If everything is nice and smooth, we are ready to make the nails (pict. 14). |
|
 |
 |
|
You could use the small hollow chisel again as I used in the hands lesson, but this time I will sculpt the lines by hand. For this I used a sharp sculpting tool, the one in pict. 10. You could also use a small knife (not too sharp). Press left and right from the 'nail' a straight line in the clay (pict. 15). Now you have to connect those two lines, this is a very precise work. You could also use a sharp wooden toothpick for this (pict. 16). They start to look more and more like real nails. |
|
 |
 |
|
Some polymer clay brands can become overworked, it can become too soft. So at this time I gave the nails some rest and focused on the sole of the foot. Halfway each toe I draw a line on the inside, except the small and the great toe (pict. 17) The nails weren't finished yet. We also have to connect the lines at the front of the toe with a sharp tool, as you can see in pict. 18. |
|
 |
 |
|
Draw lines on the 'knuckle' area of the toes with a small sculpting tool or toothpick , the same way as I did in the hands tutorial. This makes it look more natural (pict. 19). The sole of the foot needs some more modeling. Place 3 slices of clay on the heel, ball and big toe, like in pict. 20, carefully blend the seams with your sculpting tool or fingers until the seams are blended in with the sole. |
|
 |
 |
|
Moisten your finger and polish everything smooth.This also works for removing unwanted fingerprints. At pict. 21 you can see a sideview of the foot, it looks much better now because of the modeling we did at the sole of the foot. Use a sculpting tool or rubbertip brush to add lines to accentuate the tendons/bones of the foot (pict. 22). |
|
 |
 |
|
Rub the lines with a wet finger to blur and make it look more natural (pict. 23). Now it's time to make the knuckles on the ankles. Before you start check out the foot from all sides to see if it still looks okay (pict. 24). |
|
 |
 |
|
Pay attention to the ankle area that it is not too fat. If it is you still have the chance now to sculpt it slimmer (pict. 25). Place a small slice of clay on both sides of the ankle where the knuckle should be. Study your own foot to see how this looks (pict. 26). |
|
 |
 |
|
Blend the seams with a sculpting tool (pict. 27), don't blend it too wide because it wouldn't look like bone anymore. Just blend only the edges. Gently rub over the knuckles with a slightly wet finger to make it smooth (pict. 28). |
|
 |
 |
|
The foot is almost ready now. Before curing check the feet from all sides and correct any mistakes, don't forget the sole of the feet (pict. 29 + 30). |
|
 |
 |
|
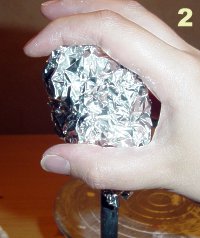
Cut off the leg at about 1.40 inch. Use a wooden toothpick to make a hole in the leg, make sure it's deep enough, about 0.80 inch. Twist the stick a little to make the holes wider so it will fit the armature. I use a small wooden board with big nails through it, as a stand to place the feet on (pict. 31). I pre-heat the oven at 220-266 Fahrenheit and bake the feet for about 30 minutes. Always use an oven thermometer to make sure the oven is at the right temperature, because if it gets too hot the polymer clay may turn yellow/brown. Leave the feet to cool in the oven before you take them out (pict. 32). |
|
 |
 |
|
After cooling down I made it a little smoother by sanding the clay with a polishing sponge. Sometimes rubbing it with a soft cloth is enough. If there are any small scratches visible, you can gently touch them with some acetone on a brush and usually they disappear. Use very little acetone because too much can give white spots on the clay! Next step is painting and coloring the foot. This can be done by either acrylics, watercolor paint or water- or oil based patina. For this foot I use watercolor paint and acrylic paint (pict. 33). First I rub the clay in with some skin powder make-up to give it a warmer tone. The color of the nails was created by blending different shades of watercolor paint. I use a thin paintbrush to apply the paint, I paint the nails several times, letting it dry in between coats. This paint is transparent and doesn't really stick to the clay. So you need to do this a few times, some of the paint's pigment will be absorbed by the clay, just enough for a natural color (pict. 34). |
|
 |
 |
|
I mix white acrylic paint with a bit black or yellow to get an off-white shade. With a very thin painting brush I paint the 'half moons' and the 'nail borders' (pict. 35). After the paint is dry I add some Fimo gloss varnish (not the water-based one) to finish the nails (pict. 36). I like this varnish a lot, it will not turn yellow and even after several years it will still look glossy. Now the foot is finished...! (pict. 37) |
|
 |
|
|
You can now attach the feet to the armature. If the hole in the leg is too wide you can add some papertape to the wire for a better fit. Later on you can use some glue (for instance hot glue gun) to attach them permanently.
|
|
 |
|
| The best moment for this depends on the kind of clothes he or she will be wearing. Sometimes it is easier dressing the doll, if the feet can still be detached from the legs. | |
 |
|
Метки: тильды |