-Метки
-Поиск по дневнику
Шарики из бисера МК |
http://handmade-jewelry-club.com/tag/bead-tutorial
Beaded balls or beads are fun to make! I usually make beaded balls during Holiday Season and use as Christmas ornaments. You can make them as colorful as they can be. 3D Beading.com
Use as charms, pendants or earrings. You can even string them together to make a bracelets and necklaces.

Now let’s start to play ball with a Beginner Beaded Ball or Bead Tutorial. In this tutorial we used 2 colors of bicones so you can clearly see how layers are created. The threads are represented as “R” for right thread and “L” for left thread.Step 1:
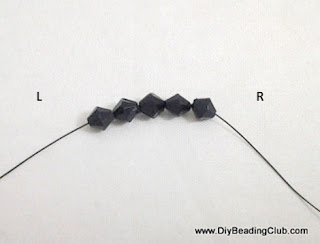
Cut an arm span of thread and thread both ends into a needle. String 5 bicones and position at the center of the thread. You have your L and R.

Step 2:
Going to your left, pass the R into a bicone.

Pull the thread. You now have a circle of beads.

Step 3:
On your L slide in a bicone and your R with 3 bicones.

Going to your left pass R into the nearest 2 bicones shown in brackets.

Pull the thread and you will have 2 circles of beads side by side.

Step 4:
Position your beadwork like so and slide in a bicone on your L and 2 bicones on your R.

Going to your left pass R into the nearest 2 bicones shown in brackets.

Pull the thread and you’ll have 3 circle of beads. Repeat Step 4 twice going around your beadwork.

Step 5:
After repeating Step 4 twice you will arrive at this stage of your beadwork. Your L is coming out of a bicone from the 1st layer while your R is coming a last bicone from the 2nd layer. You also need 1 more bicone to complete the 2nd layer.

Going left pass L into the nearest bicone.

Step 6:
Then slide in 1 bicone on your L and R.

Going left pass R into the nearest bicones shown in brackets.

Pull the thread. As you pull you would notice the beadwork starts to have the dome shape.

Step 7:
Flip your beadwork like so and slide in a bicone on your L and 2 bicones on your R.

Going left pass R into the nearest 3 bicones shown in brackets.

Step 8:
Continue by sliding in a bicone on your L and a bicone on your R.

Going left pass R into the nearest 3 bicones shown in brackets and pull. Repeat Step 8 twice, going around the bead.


Step 9:
After Step 8 you will now arrive at this stage of your beadwork, with only 1 bicone needed to fill the space.

Your thread is now coming out of a bicone from the 2nd layer, which is shown in red arrow. Pass L into the nearest bicone from the 3rd layer shown in black arrow.

Step 10:
Your threads are now both coming out a bicone from the 3rd layer. At this point, you can prefer to slide in a large bead or leave it as is and continue to complete your 3rd layer.

To complete the 3rd layer and close your beaded bead cross both threads into a bicone.

Pull tight to close the circle. Pass the threads back thru the 3rd layer of beads and have them meet again. Tie a knot, cut excess threads.

Here’s something you can do with a Beaded Ball, a Beaded Ball Ring!

Ciao!
Read more at http://handmade-jewelry-club.com/tag/bead-tutorial#HHypMrJgWKAecsSj.99
Процитировано 4 раз
Понравилось: 1 пользователю
| Комментировать | « Пред. запись — К дневнику — След. запись » | Страницы: [1] [Новые] |


