




Галерея
Хотите узнать подробнее о том, что видите на картинке?
Нажмите на изображение!

Детские суши

Сари

Амигуруми
свадебные бокалы мк |
|
Метки: свадебные бокал |
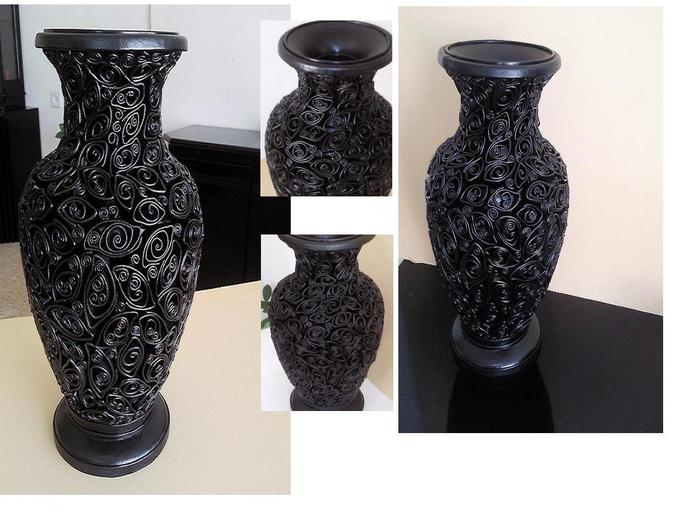
квиллинг из кожи |
|
Метки: квиллинг кожа декор ваза |
фоны на стене |

Sponge Painting How-To
Add visual punch to a plain-color wall with sponging. It's a quick and easy way to achieve a subtle texture and add depth to your walls. And if you mess up, it's easy to fix less-than-perfect spots. Just follow our no-fail steps and study the how-to photos for can-do confidence.


Using a paint roller, base-coat a clean, dry wall with a Jack o' Lantern; let dry. Apply a second coat if needed and allow to dry. Use wide painter's tape to mask around doors, windows, the ceiling, and the floor.
In a paint bucket, mix 1 part Harvest Brown and 4 parts Studio Finish latex glaze. Fill another bucket half full of water for rinsing sponges.
1. Pour a small amount of glaze mixture onto a paper plate.

2. Dampen a sponge with water and wring it out thoroughly. Dip the sponge into the glaze mixture and blot excess onto newspaper. Practicing on a piece of cardboard, dab the sponge lightly, overlapping edges of color and rotating the sponge for a random effect. When comfortable with the color intensity and texture, apply the sponging technique to the wall, beginning in an upper corner.

3. Cover 8-foot-square sections at a time, dipping sponge into glaze mixture as needed.

4. When the sponge becomes saturated with glaze mixture, rinse it in the bucket of water and wring it out thoroughly before continuing.

5. After sponging 8 square feet, dampen a clean sponge in clean water; wring it out thoroughly. Using the damp sponge, dab the wet glaze mixture to remove some of it from the wall so the base coat peeks through; rinse and wring the sponge as needed.
6. When finished removing glaze mixture from one area, continue the technique until the entire wall is finished, then move to an adjacent wall.
More Color Combos and Tips
When sponging, there's no magic formula for selecting the perfect color combination. If you favor subtle texture, choose colors with little contrast and use a dense application so less of the base color shows through.
For bold texture, choose colors that sharply contrast and use a sparse application. Or try anything in between. The key is to experiment with colors and coverage. In the meantime, let our color combinations inspire you.

Base coat: Blue Jean 2062-50
Sponge glaze: Blue Daisy 2062-40

Base coat: Bayberry 2080-50
Sponge glaze: Raspberry Truffle 2080-10

Base coat: Mellow Yellow 2020-50
Sponge glaze: Jack o' Lantern 2156-30

Base coat: Acadia Green 2034-50
Sponge glaze: Cedar Green 2034-40

http://www.bhg.com/decorating/paint/decorative-painting/
Серия сообщений "Paintings":
Часть 1 - Wall Mural
Часть 2 - Re-style your Cell Phone
...
Часть 15 - Asian-clouds Look Wall Techniques
Часть 16 - Asian walls - Grass Cloth Wall
Часть 17 - Sponge Painting How-To
Часть 18 - antique cars
Часть 19 - vintage paintings
...
Часть 28 - shoe paintings
Часть 29 - portrait
Часть 30 - paisley patterns
Серия сообщений "Walls":
Часть 1 - Salt Dough Fish
Часть 2 - Nylon Flowers
...
Часть 31 - Asian-clouds Look Wall Techniques
Часть 32 - Asian walls - Grass Cloth Wall
Часть 33 - Sponge Painting How-To
Часть 34 - creative art display
Часть 35 - Paper hat
...
Часть 38 - wall storage
Часть 39 - recycle egg carton
Часть 40 - wall decor out of carton rolls
|
Метки: фоны декор дизайн стен |
фоны продолжение |
Grass Cloth Wall Project
Grass cloth wall coverings are a popular way to evoke the faraway cultures of Asia as well as the rich texture of natural grasses.
A painted grass cloth finish can be a stylish substitute for expensive wall coverings without their potential fraying and easy soiling. Also, by painting instead of wallpapering the design, you can vary the colors to suit your decor.
Grass cloth adds interest to a wide variety of settings. It is a natural choice for plantation- and Asian-theme rooms, but also works in transitional and relaxed modern decor.


http://www.bhg.com/decorating/paint/decorative-painting/
Серия сообщений "Paintings":
Часть 1 - Wall Mural
Часть 2 - Re-style your Cell Phone
...
Часть 14 - Wall Watercolor
Часть 15 - Asian-clouds Look Wall Techniques
Часть 16 - Asian walls - Grass Cloth Wall
Часть 17 - Sponge Painting How-To
Часть 18 - antique cars
...
Часть 28 - shoe paintings
Часть 29 - portrait
Часть 30 - paisley patterns
Серия сообщений "Walls":
Часть 1 - Salt Dough Fish
Часть 2 - Nylon Flowers
...
Часть 30 - Wall Watercolor
Часть 31 - Asian-clouds Look Wall Techniques
Часть 32 - Asian walls - Grass Cloth Wall
Часть 33 - Sponge Painting How-To
Часть 34 - creative art display
...
Часть 38 - wall storage
Часть 39 - recycle egg carton
Часть 40 - wall decor out of carton rolls
|
Метки: фоны |
фоны 2 |
To show off your chic sense of interior design, dress your walls in a fabric-like finish. The process consists of rolling a tinted glaze over a white or cream-color wall, then dragging a weaver brush vertically and horizontally through the wet glaze.
Because pink is the "new black," we chose a preppy pink glaze, but the finish looks equally enticing with glaze colors from pastels to deep shades.
http://www.bhg.com/decorating/paint/decorative-painting/
Серия сообщений "Paintings":
Часть 1 - Wall Mural
Часть 2 - Re-style your Cell Phone
...
Часть 10 - Crackle finish with Elmer's Glue
Часть 11 - paint-a-faux-venetian-plaster-finish
Часть 12 - fabric-like finish
Часть 13 - Stone textured look
Часть 14 - Wall Watercolor
...
Часть 28 - shoe paintings
Часть 29 - portrait
Часть 30 - paisley patterns
Серия сообщений "Walls":
Часть 1 - Salt Dough Fish
Часть 2 - Nylon Flowers
...
Часть 26 - fan from plastic forks
Часть 27 - paint-a-faux-venetian-plaster-finish
Часть 28 - fabric-like finish
Часть 29 - Stone textured look
Часть 30 - Wall Watercolor
...
Часть 38 - wall storage
Часть 39 - recycle egg carton
Часть 40 - wall decor out of carton rolls
|
Метки: фон |
фоны1 |
Do you love the look of the aged-plaster walls found in European country manors? Re-create that look with nothing more than paint -- no messy plaster required.
From Paint Decor
The Basics
Troweling on thin layers of paint creates the timeworn look of aged Venetian plaster in minutes instead of centuries. If your tastes or color choices change after using this technique, you can simply paint over the layers with little, if any, sanding.

|
Метки: фон |
клипарт трава |


Серия сообщений "Фото, картинки, клипарт":
Часть 1 - Векторные картинки
Часть 2 - Тайланд
...
Часть 98 - Сайты с красивой анимацией и красивыми картинками
Часть 99 - Анимашки - Надписи - ThankYou/Спасибо
Часть 100 - Глиттеры
|
Метки: клипарт трава |
уголки клипарт |


Серия сообщений "~ Фотошоп - Клипарты":
Часть 1 - Клипарты - Цветы 2
Часть 2 - Клипарты - Цветы
...
Часть 7 - Фотошоп - клипарт
Часть 8 - Уголки от Инны.
Часть 9 - Уголки от Джулии
Часть 10 - Как сделать картинку с прозрачными краями в формате PNG
Часть 11 - Клипарт-веер
...
Часть 98 - Принцессы
Часть 99 - Диснеевские принцессы
Часть 100 - Коттеджи, слои в png
|
Метки: клипарт уголки |
декоративные элементы |
|
Метки: декор элементы |
клипарт детки |
|
Метки: клипарт дети |
восточный стиль - море ссылок |
Детские суши
Сари
Амигуруми
|
Метки: восточный стиль |
декор оформление штукатуркой морская тема подробно |
Во время работы над созданием интерьера внутреннего помещения приходится выполнять роспись стен по декоративной фактурной штукатуркой. Часто поверхность стены с рельефной штукатуркой граничит с живописью или является основанием для настенной росписи. Выполнение рисунка декоративной фактуры на стене невозможно доверить другому человеку, если штукатурка должна служить основанием под живопись или роспись орнаментом.
В моем случае нанесение художественной штукатурки выполнялось на всех стенах комнаты интерьера. Главный декор концентрировался на художественном оформлении центральной колонны расположенной у входа в комнату, являясь акцентом в интерьере.
По дизайнерскому проекту в зале установлен большой аквариум. Тема моря выбрана для украшения интерьера, чтобы гармонично вписываться с декором аквариума. Для фона аквариума на задних стенах была помещена декоративная живопись, вместо стандартных изображений. Фотографии внутреннего помещения в целом и декоративную живопись аквариума выставлю позже.
Все рельефные части декора были сделаны из фактурной штукатурки. Объемные детали накладывались по всем сторонам колонны, постепенно переходя из рисунка в декоративную штукатурку. После полного высыхания лепного декора, поверхность колонны покрывалась тонированным воском.
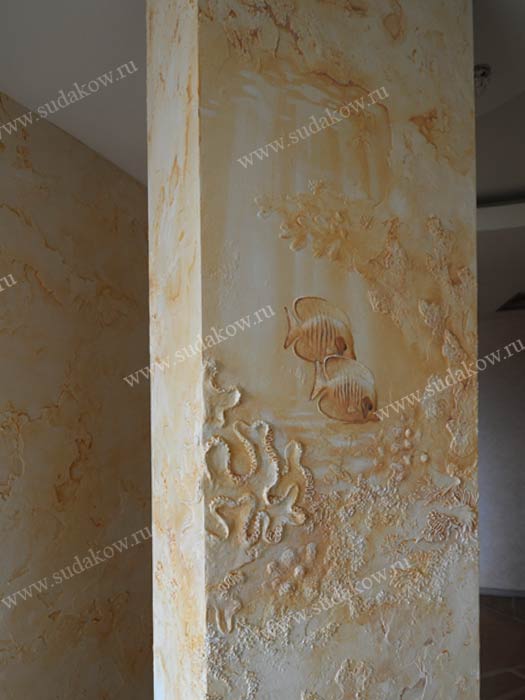


Способ нанесения на поверхность рельефной декоративной штукатурки состоит из нескольких этапов. Необходимо соблюдать технологию нанесения фактурной штукатурки. Высыхание слоя фактуры зависит от толщины и температуры в комнате. Если не выдерживать определенное время для просушки слоев, то возможны отслаивания фактуры от стены или появление глубоких трещин на самой штукатурке. На всех декоративных смесях производителем указывается свой метод нанесения и технологические требования, которые нужно соблюдать. Но в основном эти способы одинаковы.
Поверхность стены должна быть пористая, сухая, обезжирена. Первым слоем наносится грунт-фото 1, в состав которого обычно входит мелкая крошка – для придания декорируемой поверхности дополнительной пористости. Вторым слоем наносится декоративная фактурная штукатурка – фото 2,3,4. Метод и техника нанесения фактурной штукатурки у каждого мастера различны, как и применяемые для этого инструменты. На полное высыхание слоя фактуры требуется времени около суток, в зависимости от температуры помещения и толщины слоя. Рельеф можно зашкурить или нанести следующий слой пасты только после полного высыхания, если это требуется. Моделировка объемных деталей проводится только по сырой фактурной пасте-фото5,6 т.к. после высыхания штукатурка становится твердой и очень сложно придать нужную форму декорируемой поверхности. Следующим этапом наносится слой краски или финишное покрытие воском - фото 7. Для придания нужного цвета воск колеруется. Для точного подбора цвета обязательно выкрашиваются пробные части т.к. после высыхания тонированный воск меняет цвет и тон.


Остальные изображения декора можно посмотреть на моем сайте в альбоме Декоративная фактурная штукатурка.
Судаков Сергей 22.09.2010
|
Метки: моская тема декоративная штукатурка |
дневник по декору - интерено |
|
Метки: декор идеи дневник |
светильник из стекла и пластиковых уголков мк |
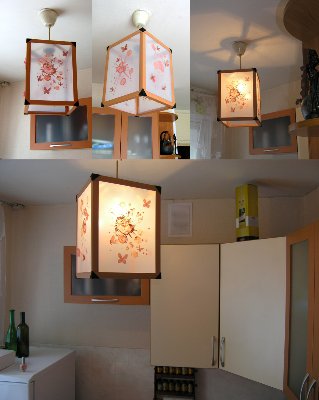
Давным-давно, когда в нашем городе не было ИКЕИ, я захотела сделать себе в спальню (в тот момент еще пустую обшарпанную комнату с бумажными обоями в цветочек) светильник в китайском стиле.
Первоначальные опыты были проведены на более мелком объекте - абажуре. Изготовила я его из обычных пластиковых уголков, которые продаются в любом строительном магазине.
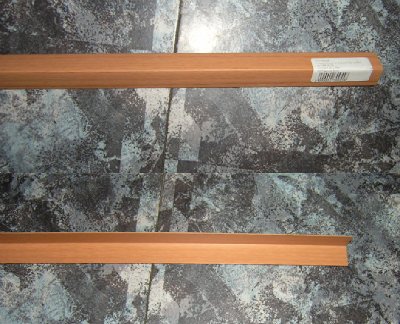
Уголки клею внахлёст на суперклей. Сверху угол маскируется кусочком кожи / бархатной бумаги и т.д. Получается быстро и достаточно симпатично. Ещё и рисунок менять можно, если надоест.
|
Метки: светильник восток |
мк пластика - серьги |
Автор: Магазин Kalinkapolinka

|
Метки: мк пластика серьги |
окошки для клип арт |
|
Метки: окошки для клип арт |
картинки трафареты для росписи |
Рисунки для росписи
www.golandart.ru/glasslinks2.html
www.chantalstainedglass.50megs.com/1suncatchers.html
www.panedexpressions.com/free-stained-glass-patterns-archive.html
www.sg-patterns.com/free-stained-glass-patterns.html
www.gratis-malvorlagen.de/1stLady/1/
www.hugolescargot.com/coloriages-animaux-nature.htm
Много ссылок на сайты с витражами - http://www.dfly.com/links.html
Восточные узоры - www.janr.perm.ru/arabic/usor1.html
Орнаменты - www.bibliotekar.ru/ornamenty/
Трафареты - www.h-mlab.com/forum/viewtopic.php
Серия сообщений "Витражи и роспись по стеклу":
Часть 1 - Детские рисунки для росписи
Часть 2 - Цветочные мотивы для росписи
...
Часть 5 - Каталоги витражных рисунков и рисунков для росписи
Часть 6 - Изготовление витража в домашних условиях
Часть 7 - Картинки для росписи по стеклу. Трафареты
|
Метки: роспись |
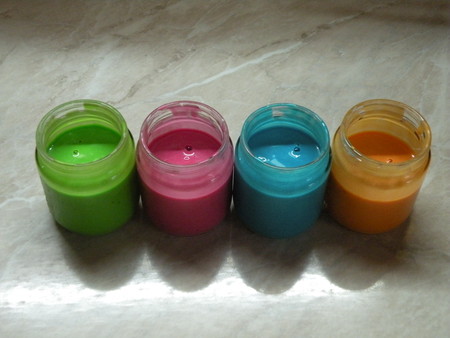
пальчиковые краски своими руками |
|
Метки: пальчиковые краски своими руками |
мельнички из бутылок |
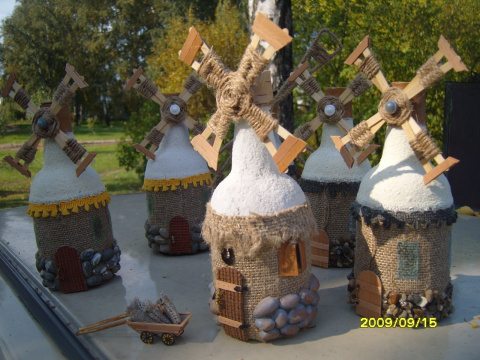
Автор:Ольга Яушева nitochka09.mirtesen.ru/blog/43415670493 Декорирование бутылок-идея не новая.А мне-то как раз нравится всё необычное,редкое и нестандартное.
|
Метки: для сада из пластиковых бутылок |
орнаменты ампир |
|
Метки: орнамент ампир |


