Букет цветов в корзине. Вышивка крестом.
ПОМИДОРЫ "ЦАРСКИЕ": - (0)ПОМИДОРЫ "ЦАРСКИЕ": Мой любимый рецепт, придумала сама, изменяла его из года в год...
Хвощ полевой - чудо-травка для волос - (0)Чудо-травка для волос-Хвощ полевой Открыла для себя ее совсем недавно.И не могу не нарадоваться!...
Лоскутные одеяла (для каждого-лоскутный блок). - (0)Лоскутные одеяла (для каждого-лоскутный блок). 1. 2. 3. 4. 5. 6. 7....
КАРТОФЕЛЬНЫЕ РУЛЕТИКИ С МЯСОМ - (0)КАРТОФЕЛЬНЫЕ РУЛЕТИКИ С МЯСОМ Ингредиенты: -Картофель – 500-600г -Яйцо сырое ...
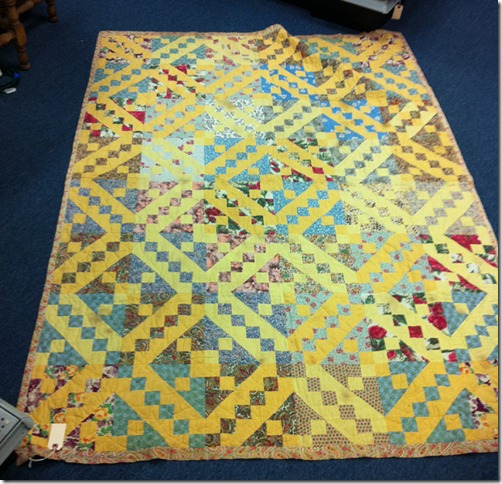
Блок Флорибунда |

There is SOMETHING that I have been demo-ing in my workshops that might not be entirely new to you, but might shine a bit of light on why things go the way things go! And while I’m explaining this…I’ll give you the directions to the 9” Jacob’s Ladder variation blocks to recreate this antique quilt I showed last week! Because this quilt was found in Florida, and is made with wonderful 1940s & 1950s Florals, I’ve nicknamed it Florabunda!
Get your printer friendly version HERE!
Yes, I still love this quilt, can’t get it off my mind, and I’ve started in on the blocks! Wanna join me? Here we go! For each block you will need the following cut from two fabrics:

(1) 2” X 21” strip of floral print
(1) 2” X 21” strip of yellow
(1) 3.5” X 9” rectangle of floral print
(1) 3.5” X 9” rectangle of yellow

Place the 3.5” X 9” yellow and floral rectangles right sides together, and using your easy angle ruler, cut 4 triangle pairs from each set using the 3 1/2" line on the ruler. Each block requires 4. There is a bit of margin left at the end of each strip set as cushion for cutting and squaring up!
**Note** These half square triangles will measure 3.5” before being sewn into the block, finishing at 3”. You can use any method that gives you 3” finished triangle units.


Sew the two 2” strips together. Press toward the floral strip and measure the strip set. It should be 3.5” wide. If it is too narrow, your seam allowance is too wide. Adjust where necessary! Sew the triangle pairs as well. Press seams toward the floral. Clip dog ears! The triangle units should measure 3.5". Double check that seam allowance if they are not!

Tip #1!!
Do YOU do this? I cut the strip set in half…and then layer it with yellow on floral, and floral on yellow…so when I make my sub-cuts, the 4-patch parts are already matched with right sides together and ready to feed through the machine! This saves HUGE amounts of time..just think of all that time it takes to align the two-sies one at a time to get them lined up before sewing pairs. Give this a try! You can feel the seam lock as you lay them together.
Cut five pairs of two-sies! There will be a small extra margin for squaring/trimming left over.
Each block will use five 4 patches! ((I was cutting for two blocks at once, that is why there are more shown here!)) Each 4 patch will measure 3.5" and finish at 3" in the quilt.


Tip #2
See the left hand pic? All my pairs are stacked the same way! THIS IS IMPORTANT! You will notice the X on the last pair in the pic on the right… "One of these things is not like the others!” and he’s wrong!


And THIS is why!
See how they are all being fed in the same direction? Florals are leading, yellows are following. Then look at the right hand pic! Mr. No-no with the red X is heading to be fed in upside down! Can you guess why this is a bad idea?! You might think it doesn’t make a difference, but it DOES! Stick with me! I’ll show you why!
Tip #3!


Let’s spin those seams! I know this technique has been around for a long time, but in the beginning, I couldn’t figure out WHY half of my 4 patches would spin clockwise, and the other half would go counter clockwise. There seemed to be no rhyme or reason, and it meant that when I sewed 4 patch to 4 patch, my seams wouldn’t butt and oppose any more and it drove me nuts. Are you with me?
It all goes back to TIP #2! If you want your 4 patch seams to all go around in the same direction…they have to be fed through the MACHINE the SAME when you are joining the two-sies! SERIOUS!
To get them to pinwheel like this I grab the 4 patch with the center seam going side to side as shown. A quick twist will let a couple stitches loose within the seam allowance and allow you to spin them around. Which way will yours go? Look at the TOP seam allowance to see which way it is pointing. In this case, they are pointing right, so mine will go clockwise, like this:

Does it matter which direction they go? Clockwise or counter clockwise? Nope! You just want them all to go the SAME direction. The only time it wouldn’t matter is if you are joining all these 4 patches to units with seams that don’t need to match up. And some patterns, no matter what you try, you’ll find you have to re-press a different direction depending what you are sewing the units next to. So think it out. Of course, if you are joining all of these to plain alternate squares, you can press them any way you want because butting up doesn’t matter.
Let’s finish that block!


Lay out the five 4 patches for each block as shown. Now, lay out your four half square triangle units for each block as shown. Remember…the yellow is the ladder down the center! All the 4 patches chain in the same direction…

One block done! The Antique quilt above has blocks set 6 X 8 for 48 blocks. This will give you a quilt center that measures 54" X 72" before borders. As for me? I’m thinking bigger! 8X9 is 72 blocks for a center that measures 72" X 81" before borders. Do-able? Definitely! And a great place to use all those florals I have not had any clue how to use! I'm gonna be RUTHLESS!
ИСТОЧНИК:http://quiltville.blogspot.com/2011/06/floribunda-re-post.html
| Рубрики: | Лоскутки |
| Комментировать | « Пред. запись — К дневнику — След. запись » | Страницы: [1] [Новые] |


