Добавить любой RSS - источник (включая журнал LiveJournal) в свою ленту друзей вы можете на странице синдикации.
Исходная информация - http://www.feelingstitchy.com/.
Данный дневник сформирован из открытого RSS-источника по адресу http://www.feelingstitchy.com/feeds/posts/default?alt=rss, и дополняется в соответствии с дополнением данного источника. Он может не соответствовать содержимому оригинальной страницы. Трансляция создана автоматически по запросу читателей этой RSS ленты.
По всем вопросам о работе данного сервиса обращаться со страницы контактной информации.
[Обновить трансляцию]
Let's Meet: Hawthorne & Heaney |
As this lovely sampling of their projects indicates, they work in a myriad of traditional, gorgeous styles, scroll down for a visual sampler of their work...

Hawthorne & Heaney operate the London Embroidery School which offers numerous classes in beginner to advanced embroidery techniques.
A bit more on their company, in their own words:
HAWTHORNE & HEANEY are a London based embroidery company specialising in excellent, innovative design and rigorous production expertise. With 15 years collective experience of the industry we offer design, consultation, management and production services for couture fashion embroidery, military and ceremonial gold work, monograming and embroidery for interiors and art projects. We work from a studio in Islington, which is easily accessible via car and public transport or alternatively our designers can come to you to offer advice and help with design.
Our team includes specialists in various fields including military, tailoring, theatre, film, fashion and art making us superbly capable of taking on any project at any stage from design and consultation through to production.
We're very pleased to meet you, Hawthorne & Heaney!
http://www.feelingstitchy.com/2015/06/lets-meet-hawthorne-heaney.html
|
Метки: Hawthorne Heaney London Embroidery School |
Let's Meet: Hawthorne & Heaney |
As this lovely sampling of their projects indicates, they work in a myriad of traditional, gorgeous styles, scroll down for a visual sampler of their work...

Hawthorne & Heaney operate the London Embroidery School which offers numerous classes in beginner to advanced embroidery techniques.
A bit more on their company, in their own words:
HAWTHORNE & HEANEY are a London based embroidery company specialising in excellent, innovative design and rigorous production expertise. With 15 years collective experience of the industry we offer design, consultation, management and production services for couture fashion embroidery, military and ceremonial gold work, monograming and embroidery for interiors and art projects. We work from a studio in Islington, which is easily accessible via car and public transport or alternatively our designers can come to you to offer advice and help with design.
Our team includes specialists in various fields including military, tailoring, theatre, film, fashion and art making us superbly capable of taking on any project at any stage from design and consultation through to production.
We're very pleased to meet you, Hawthorne & Heaney!
http://www.feelingstitchy.com/2015/06/lets-meet-hawthorne-heaney.html
|
Метки: Hawthorne Heaney London Embroidery School |
Friday Instagram Finds No. 9 |
On this week's edition of Friday Instagram Finds I'm introducing you to one of my first embroidery friends on Instagram, Kristen of @heypaul. She has done so much for bringing hand embroidery into the public eye through public events called Eat, Drink, Stitch @eatdrinkstitch, and the video tutorials of stitches she creates. She's a dog lover, and has the cutest Puggles (Pug and Beagle mix) named Briscoe and Lollipop!
@heypaul
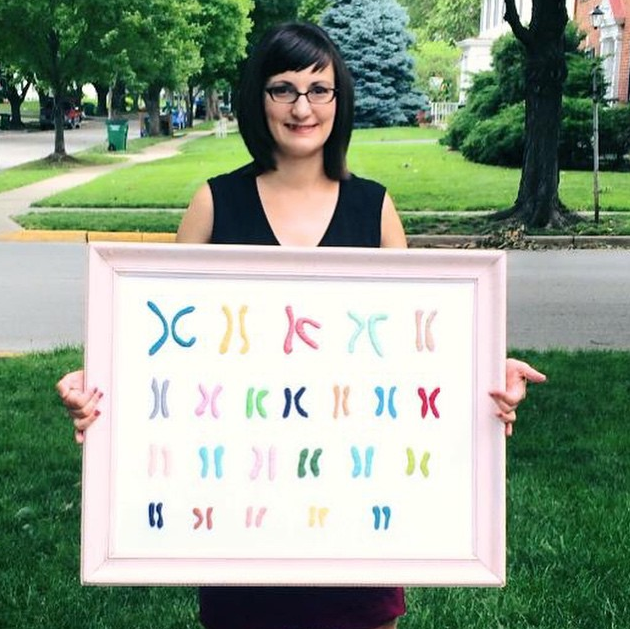
This piece that Kristen did of chromosomes is awesome on so many levels! First and foremost, the chromosomes shown bring Fragile X Syndrome to light, which is a great way to start a conversation about this syndrome. Framing it in this big frame (and painting it pink!) beautifully showcases Kristen's amazing stitches! It looks to me like the chromosomes are made of expertly stitched satin stitches in a variety of great colors.
Not the same piece, and it looks like a smaller scale, but here's a closeup of chromosomes that Kristen's working on.
It was seeing what Kristen was making with stumpwork that got me interested in trying it. (In fact, 2015 is the Year of 3D Embroidery for me.) Take a look at all of these French knots! Built up like this, the French knots make this look like boucle.
This last picture is of Truman and Clinton Lakes in Missouri. I'm glad this picture is a closeup because we can see her teeny, tiny stitches.
Okay, so I bet you've figured out by now that I'm a pet lover, especially dogs. So I'll leave you with this adorable picture of Briscoe and Lollipop. I hope you have a fabulous weekend!
http://www.feelingstitchy.com/2015/06/friday-instagram-finds-no-9.html
|
|
Thimblenest Thursdays: Summer/Winter Stitchalong, Week 2 |
MATERIALS
PROCEDURE
http://www.feelingstitchy.com/2015/06/thimblenest-thursdays-summerwinter_18.html
|
|
Patterns: Tuesday Bassen and the Sublime Stitching Transfer Pen |
Jenny Hart from Sublime Stitching very kindly sent me the new fine tip iron on transfer pen to try. Now I've always been a tracing my patterns with a light box kind of girl and lately I've been using Sulky Solvy, but I've been falling out of love with that. So I was very keen to try a new (for me) method, specially as the pen seemed to be nowhere near as thick as other iron on transfer pens I've seen (the tracing paper in the photo has been in my stash for a long time, as I've always been put off by the thick pens previously).
Now of course to try a Sublime Stitching pen I thought I might as well try it with a Sublime Stitching pattern, now I've got lots in my stash and I had a look through them and some of them are quite simple, like the Heavy Metal Alphabet and some of them are more complicated, with more fine lines, like the Shy Boy and Girl pattern. So I thought I'd pick something a bit more in between to test the pen, so I plumped for the Tuesday Bassen pattern set, which I thought would be perfect for my pre-teen's bedroom.
I was still quite ambitious though, the Tuesday Bassen pattern set it pretty large and I wanted to stitch it almost like a sampler, stitching lots of the designs together. So I transferred the designs I liked onto two sheets of tracing paper and I was already appreciating how much easier that was compared to juggling the patterns and the fabric on a light box. And of course tracing on fabric is always a bit of a nightmare. Also I found that the pen was really nice to use, it has the sort of thin nib you normally find in artist drawing pens and it felt like in handled similarly too.
http://www.feelingstitchy.com/2015/06/patterns-tuesday-bassen-and-sublime.html
|
Метки: patterns Sublime Stitching transferring designs Tuesday Bassen |
Friday Instagram Finds No. 8 |
Happy Friday Everyone! I hope you've had a great week, and will have any even better weekend. This week I'm going to introduce you to @threadthewick! I found Chels because she used #feelingstitchyig to make sure I saw her work. This week, instead of using the embed code from Instagram, I am going to screen cap the pictures from Instagram. You can get to Chels' Instagram account to see all of her work by clicking on her user name below. I hope this fixes the problem that many of us have when viewing Friday Instagram Finds in Feedly or email. Spoiler Alert: I included a bonus account at the very end :)
@threadthewick
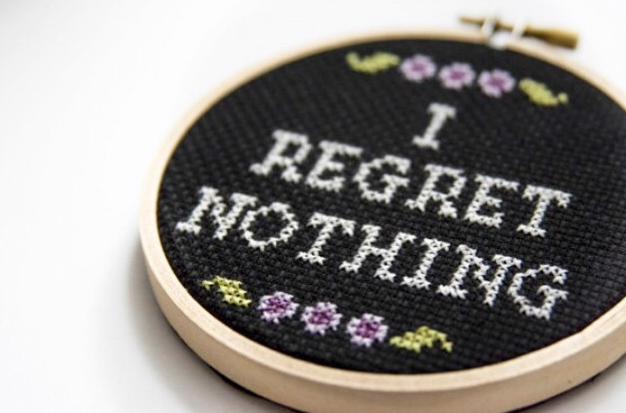
Chels creates pretty embroidery and cross stitch creations. One of the things she does is blend pop culture phrases with classic-looking cross stitch, like this, "I regret nothing" piece. I love how the colors pop on the black Aida cloth.
As a mother, these are words that we all long to hear! Again, I love how she created this phrase with cross stitch.
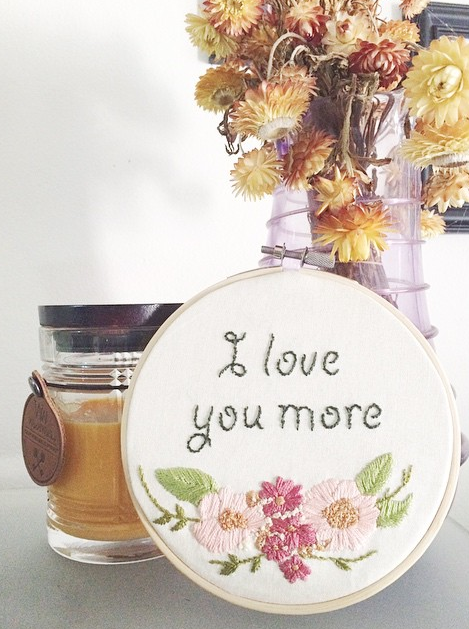
If you've seen my IG account, you know that I have a thing for delicately embroidered flowers. I just love them! These embroidered flowers Chels created are so dainty and pretty, and her stitching is beautifully precise.
http://www.feelingstitchy.com/2015/06/friday-instagram-finds-no-8.html
|
Метки: Amy Chiweenie cross stitch embroidered flowers embroidery Friday Instagram Finds Instagram pop culture Random Acts of Amy |
Mooshie Stitch Mondays: Woven Trellis Stitch |
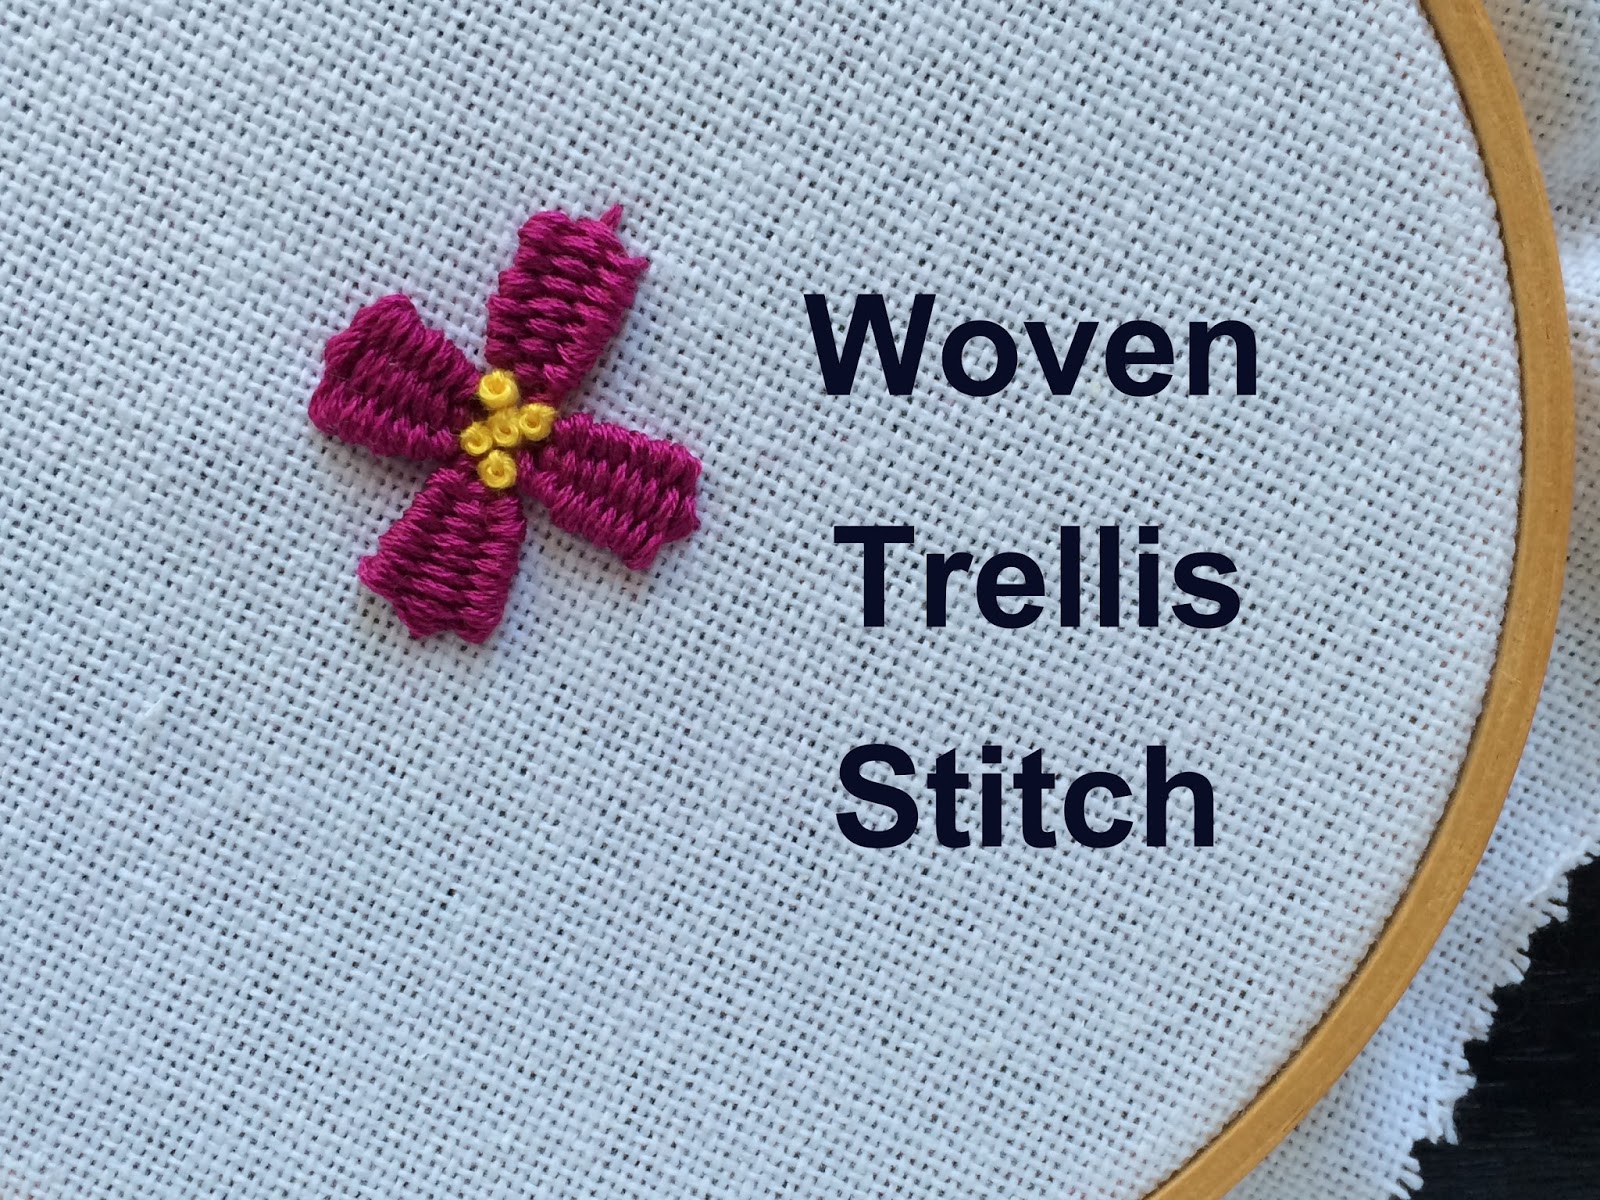
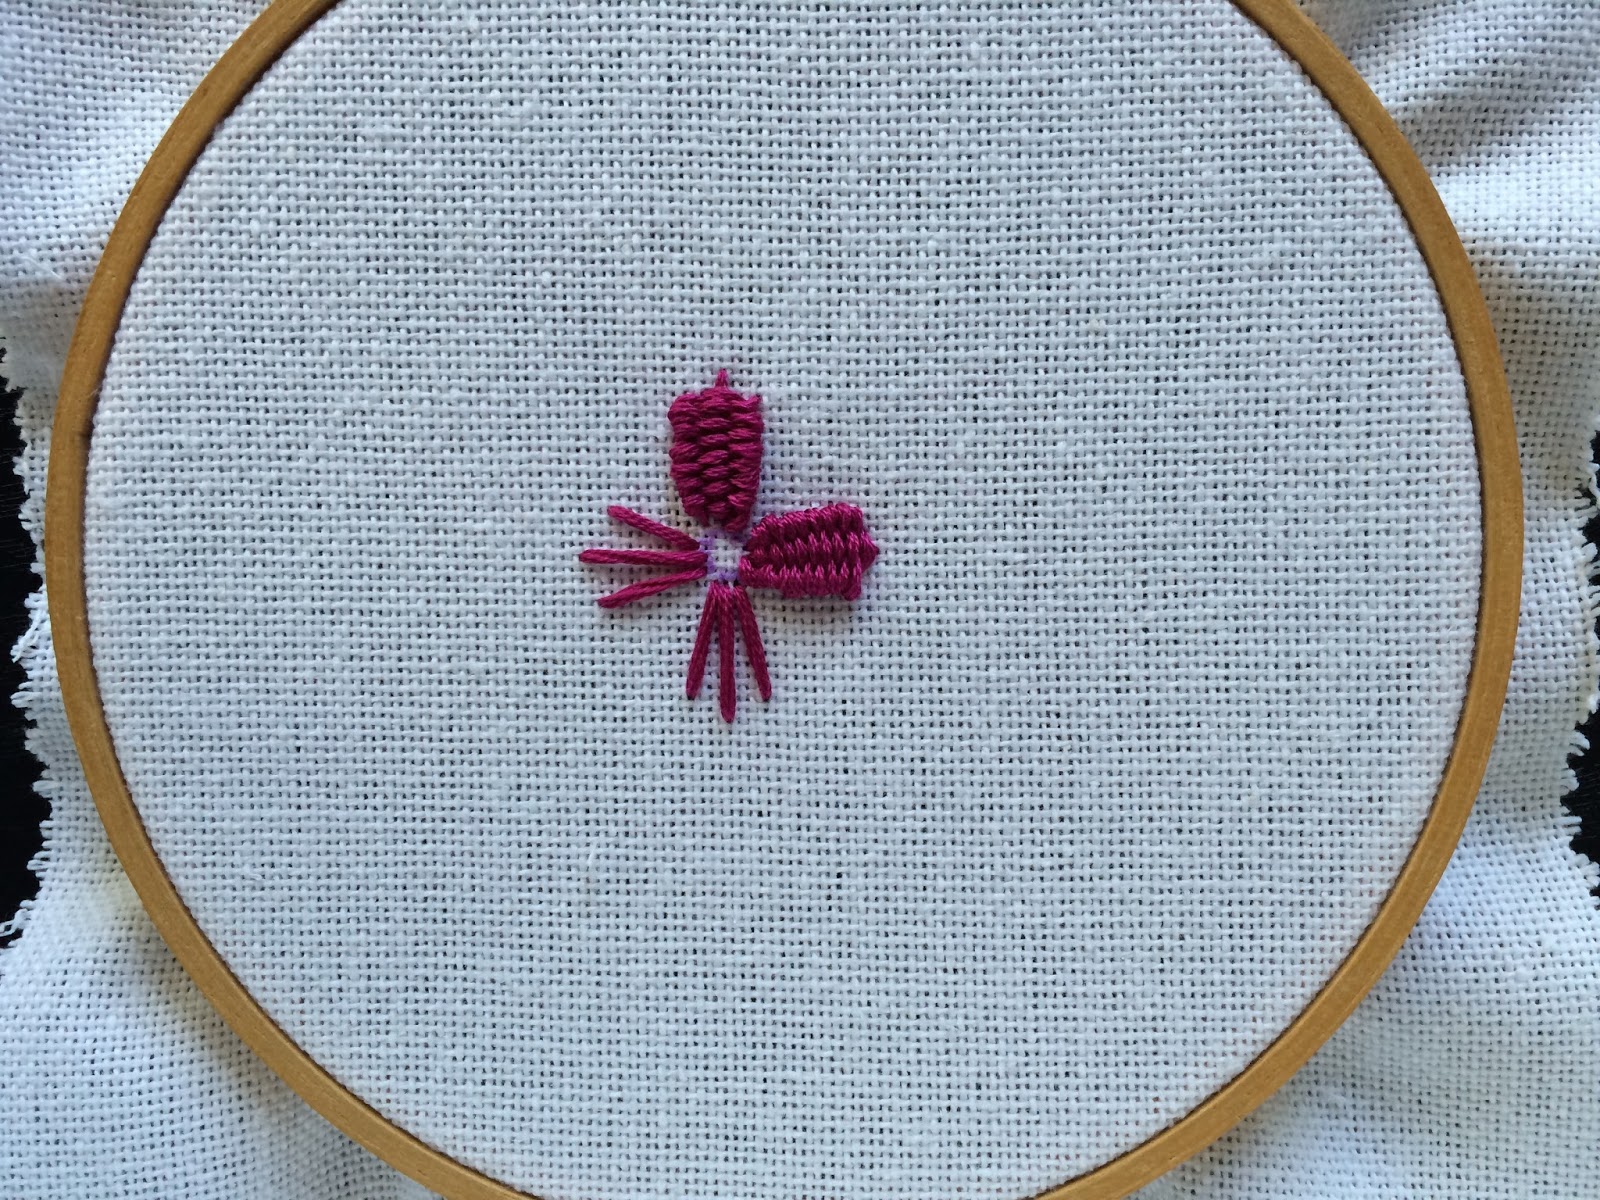
Next, weave back the other way - this time with the needle under the middle straight stitch only and pull the thread through.
Here is the first petal complete!
http://www.feelingstitchy.com/2015/06/mooshie-stitch-mondays-woven-trellis.html
|
Метки: embroidery Mooshie Stitch Mondays trellis stitch woven trellis stitch |
Patterns: Follow the White Bunny |
http://www.feelingstitchy.com/2015/06/patterns-follow-white-bunny.html
|
Метки: Follow the White Bunny patterns |
Patterns: Follow the White Bunny |
http://www.feelingstitchy.com/2015/06/patterns-follow-white-bunny.html
|
Метки: Follow the White Bunny patterns |
Patterns: Follow the White Bunny |
http://www.feelingstitchy.com/2015/06/patterns-follow-white-bunny.html
|
Метки: Follow the White Bunny patterns |
Learn the Butterfly Chain Stitch |
Happy Weekend, fellow stitchers!
It's the first weekend in June, which means summer is officially on the way. I bet many of you are preparing for long weeks ahead filled with travel, gardening projects or maybe figuring out how to entertain your kiddos when they finish up the school year! If that's the case, hopefully you have another week or two to relax and take some time out for yourself, which is why this is the perfect weekend to learn another stitch!
Today we're learning the Butterfly Chain Stitch, a very pretty border/band stitch that you can work on pretty much any fabric or canvas. Maybe it's just because it has the word butterfly in the name, but to me this stitch is perfect for summer. It's simple, but there is a special method to doing it correctly. In fact, I realized after I had taken all my photos that I had done the stitch incorrectly, so I had to go back and do it all again!
Setting up the stitch is simple. I'm working on pretty pale blue aida I found in my stash with stranded floss in a few different colors. To start, you'll make a series of three straight stitches evenly spaced across your fabric. These can be any size you want, and spaced any way you want.
Without piercing your fabric, repeat on all the other stacks. This part of the stitch is worked completely on top of the fabric. Here's another photo further down the row. You'll notice I change colors here, because this is the part I had to redo, after I had done all my other rows correctly :)
And there you have it- the Butterfly Chain Stitch! I love how creative you can be with this technique. I made a little sampler of different versions, most of which I just made up because I thought they would look neat!
I played with the spacing of my straight stitches on the top two rows, doing an even increase/decrease on both sides for the top one, then just showing different spacings on the second. To me, the more space you leave the more celebratory the band becomes. Our middle band is straight forward and by the book. Below that I really enjoyed playing with size. I did sets that were double the height with two evenly spaced decorative chain stitches on top. I think it looks like a little picket fence! The last one is my favorite. The center stitch of each section is slightly longer than the outer two, which makes our pinched sections look like little stars. This option would be lovely on a retro themed project or maybe even and art deco design.
I hope you enjoyed learning this new stitch with me! What ideas do you have for incorporating this into your every day stitching? Share them in the comments below or post projects in our Flickr pool for everyone to see. Happy Stitching!
http://www.feelingstitchy.com/2015/06/learn-butterfly-chain-stitch.html
|
Метки: Butterfly chain stitch embroidery embroidery tutorial stitch sampler summer Whitney s Stitches |
Friday Instagram Finds No. 7 |
It's Friday - hooray! I don't know about you, but even though I LOVE my day job as a library manager, I do look forward to my weekends off so I can stitch. Since it's Friday, that means it's time for another installment of Friday Instagram Finds!! I have a question for you at the very end, and I'd really appreciate it if you would comment on this post or over on our IG account @feelingstitchyish with your thoughts. This week I'm featuring...
@daisyeyes
Daisy Eyes, aka Aimee, used the #feelingstitchyig to make sure I saw her work. I've been following @daisyeyes on my personal account for quite some time, and I like her style. Did you read a few lines back how I mentioned I'm a librarian? Well, among the pieces that @daisyeyes creates are these very lovely bookmarks that utilize @dandelyne mini hoops as a dangly bit on the end!
Aimee also uses black colored fabric accented with white stitching and buttons - BUTTONS - as stars to create this uniquely beautiful hoop. This is the second verse from the song In Western Lands sung by Samwise Gamgee in Lord of the Rings. Look at those teeny tiny stitches!
This custom birth announcement Aimee created is a beautiful piece of art that will always be treasured. That's one of the things I really love about embroidery, if well taken care of, it can last for centuries. What a legacy to leave!
I hope you've enjoyed this edition of Friday Instagram Finds (FIF) on Feeling Stitchy, which is now brought to you weekly! Please leave comments below to let me know what you thought. If you'd like to be considered for FIF, or if you find a great embroiderer or stitch-related needle worker who you think I should feature, be sure to tag their pictures with #feelingstitchyig, and I'll take a look!
http://www.feelingstitchy.com/2015/06/friday-instagram-finds-no-7.html
|
Метки: birth announcement bookmark buttons dandelyne embroidery FeelingStitchyIG FIF Friday Instagram Finds Instagram Lord of the Rings LOTR mini hoop |
Thimblenest Thursdays: Summer/Winter Stitchalong, Week 1 |
Welcome to Week 1 of the Feeling Stitchy Summer~Winter Stitchalong! Whether you're traveling cross country on a road trip or sitting by the pool in the Northern Hemisphere or cozying up with a cup of tea and your favorite sweater in the Southern Hemisphere, it's the perfect season for an embroidery project!
Every two weeks over the next three months I'll be posting a new design for the project with stitch tips/suggestions and hopefully some photos featuring your stitching from previous weeks! (Be sure to share your work in the Feeling Stitchy Flickr group and on Instagram with #feelingstitchy!)
When the Stitchalong is finished, you'll have everything you need ready to stitch together an "AUTUMN" banner/bunting, just as the seasons change once again (sorry, Southern Hemisphere, this is the only part I couldn't get to work out for you, too!).
Since this is Week 1, we have a lot to go over. First, let's gather our materials . . .
MATERIALS
- 6* (or more) 9" x 7" (23 cm x 18 cm) fabric rectangles for embroidering (I'm using linen, but choose whatever you like best!)
- embroidery floss (suggested color palette below)
- AUTUMN embroidery design (get week 1 here)
- embroidery transfer pen, etc.
- embroidery hoop
- pinking shears
- sewing machine
- 6* (or more) 9" x 7" (23 cm x 18 cm) fabric rectangles for backing**
- 6* (or more) 8.5" x 6.5" (21.5 cm x 16.5 cm) rectangles of lightweight iron-on interfacing**
- 1 package/3 yards extra wide double-fold bias tape (or make your own)
SUGGESTED COLOR PALETTE
Prep Fabric
This Week's Letter: A
Click here for the Week 1 embroidery design.Here's what I did with the Letter A; for all stitches I used 3 strands of embroidery floss:
- Chain stitch outline (DMC 720)
- Vertical interior running stitch (DMC 154)
- "Zig zag" between running stitches (DMC 728)
- Acorn bottoms (DMC 3852)
- Acorn "caps" (DMC 154)--3 strands was too much here; I should have used only 1 or 2.
http://www.feelingstitchy.com/2015/06/thimblenest-thursdays-summerwinter.html
|
Метки: autumn bunting embroidery Fall stitchalong Summer/Winter Stitchalong Thimblenest Thursday week 1 |
Random Acts of Amy Will Be at Main Street Market |
Random Acts of Amy, the contributor behind Friday Instagram Finds, will be a vendor at Urban Farmgirl's Main Street Market at Midway Village in Rockford, IL on Saturday June 13th! She (and her husband) will have a wide range of hand embroidered items in a variety of sizes, pillows, reclaimed wood signs, decals, and more.
This is a one day event with over 120 of the best vintage and handmade vendors. Last year's inaugural event brought vendors and shoppers from all over the U.S., and this year's market is expected to be even bigger! There will be food truck, live music, and shopping, shopping, shopping! Preorder tickets, and find out more at the Main Street Market website. If you're not able to make it to the June Market, don't worry! There's a second Main Street Market added this year on Saturday, September 12th, and Random Acts of Amy will be at that one, too!!
If you live anywhere near Rockford, which is about 90 miles northwest of Chicago, 70 miles southeast of Madison, and 90 miles southeast of Dubuque, IA, she hopes you'll stop by her booth and introduce yourself as a Feeling Stitchy reader.
http://www.feelingstitchy.com/2015/05/random-acts-of-amy-will-be-at-main.html
|
Метки: embroidery hand embroidery Illinois Main Street Market Midway Village Museum Random Acts of Amy Rockford Urban Farmgirl |
Friday Instagram Finds No. 6 |
I have some exciting news for you! Starting today, Friday Instagram Finds will be published EVERY Friday!! Woo hoo! I'll feature one embroidery or stitch-related artist each week. Tag your Instagram photos with #feelingstitchyig for a chance to be featured. Today I'm featuring...
@sarucabuca
Sarah Benea creates gorgeous hand embroidered pieces! Her lines of sign language and constellation mini hoop necklaces are clever and beautiful. The detail on these mini hoops is mind boggling! She's the kind of artist who, when you see her work, it makes you want to push yourself to go beyond what you think your limits are.
Here is her Sign Language Monogram line. Any stitcher worth her/his salt knows how difficult it can be to embroider hands (and eyes) and also make them look real. Well! Sarah has done that in spades, and has created a unique piece of jewelry, to boot.
And here is her Constellation line. The navy blue background is the perfect "night sky" backdrop to Sarah's precise lines and French knots. I'm a Libra, what's your sign?
Sarah also creates whimsical and timely pop culture art like this Miley Cyrus! Her attention to detail (wrist tattoo) and shading (check out her tongue) bring a strong visual appeal.
Sarah also thinks outside the hoop and fabric with pieces like the one below that she hand embroidered on a vintage map. Embroidering on paper can get tricky, and once again, Sarah's attention to detail takes her artwork to the next level.
I hope you've enjoyed this edition of Friday Instagram Finds (FIF) on Feeling Stitchy, which is now brought to you weekly! Please leave comments below to let me know what you thought. If you'd like to be considered for FIF, or if you find a great embroiderer or stitch-related needle worker who you think I should feature, be sure to tag their pictures with #feelingstitchyig, and I'll take a look!
http://www.feelingstitchy.com/2015/05/friday-instagram-finds-no-6.html
|
Метки: Amy constellation embroidery FIF Friday Instagram Finds hand embroidery magpie mini hoop Penguin Random Acts of Amy sign language |
Mooshie Stitch Mondays: Whipped Wheel Stitch |
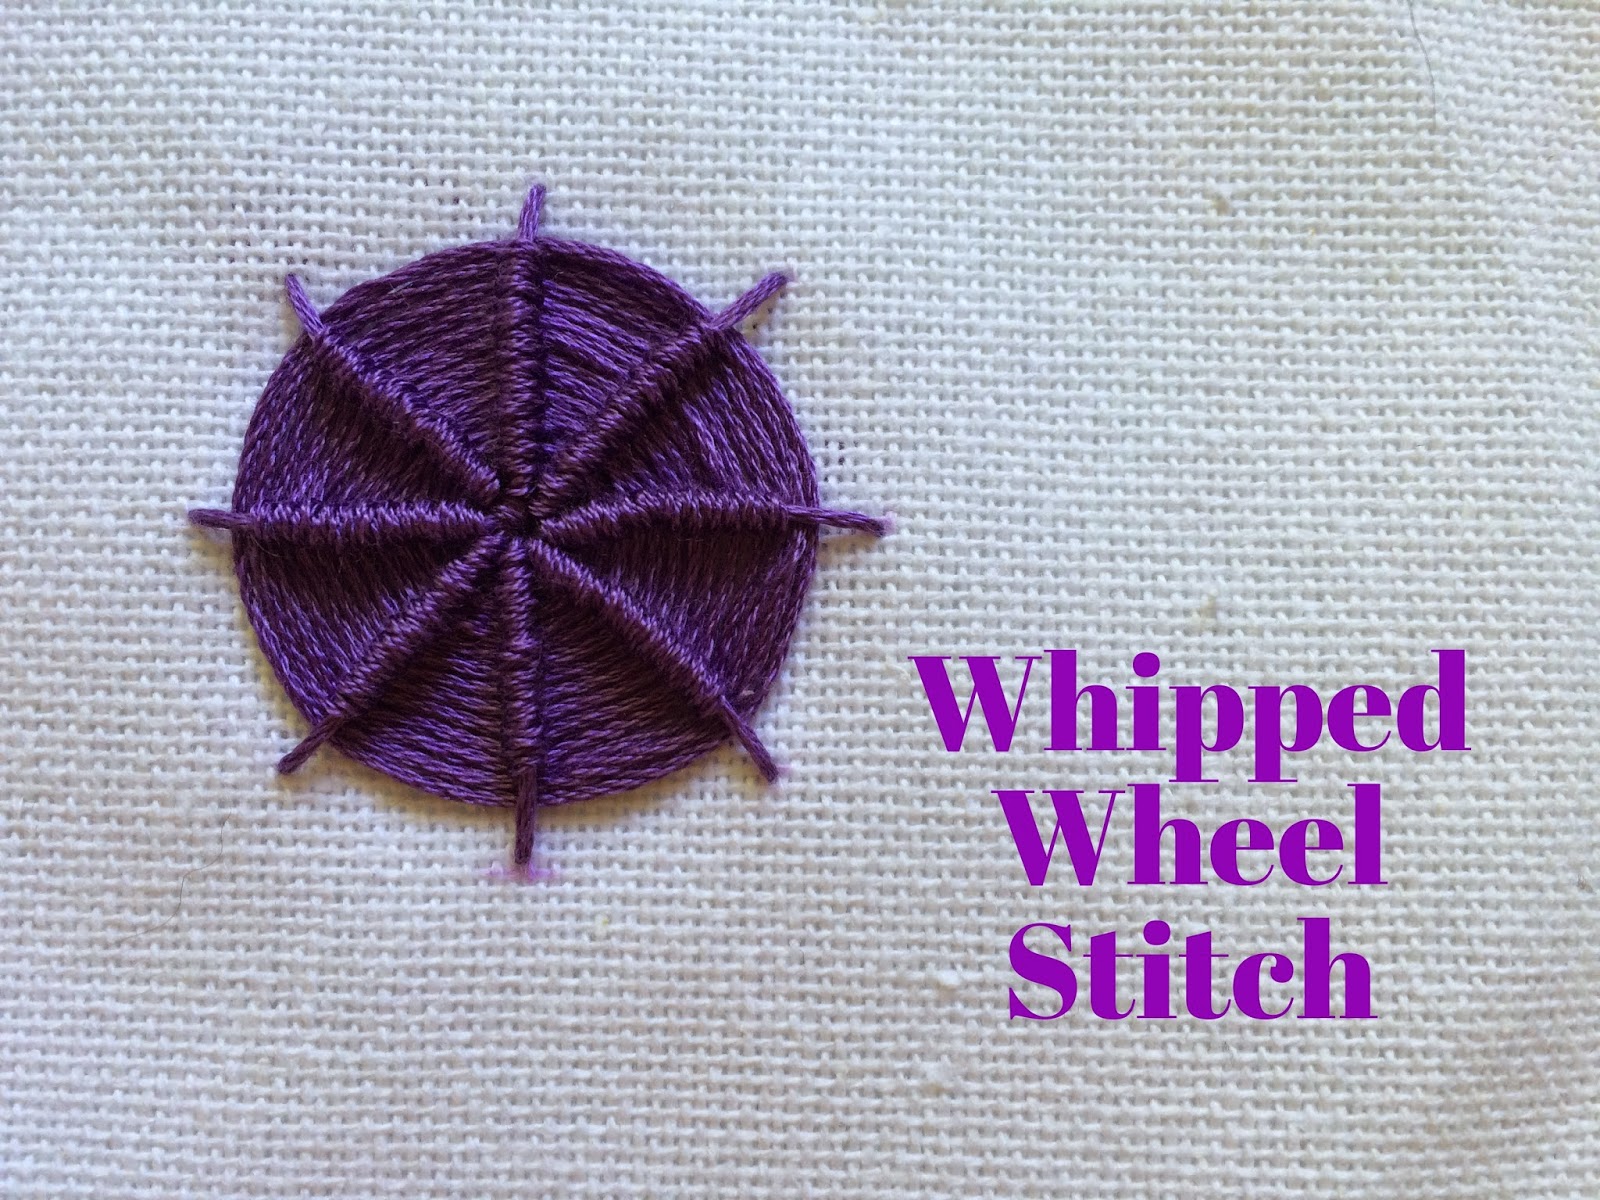
The whipped wheel is a stitch I learned from the Take a Stitch Tuesday Challenge. I really like how it looks and it's fun to stitch. I have also seen it referred to as the whipped spider wheel or ribbed spider web stitch.
So grab your tapestry needle and let's get started!
I traced a circle using a template and drew 8 spokes towards the center of the circle. You can stitch this with as many spokes as you like.
Straight stitch each spoke towards the center.
Bring your needle up through the center.
Slide your needle under the first spoke.
Then whip (or backstitch) around the spoke. Do not pluck the needle into the fabric.
This is where the tapestry needle works best because it has a blunt tip and will be easier to weave under and over the spokes!
Move onto the next spoke - slide your needle under it, and whip around.
Repeat the steps around and around - whipping each spoke before moving onto the next until you fill the entire wheel!
This is where I stopped whipping and just pulled the thread under each spoke a few times around and ended my wheel.
My second whipped wheel I worked 5 spokes with green floss.
This time I did not trace a circle - only the spokes.
Try out the whipped wheel stitch and share your photos in the Embroidery Group on Flickr!
http://www.feelingstitchy.com/2015/05/mooshie-stitch-mondays-whipped-wheel.html
|
Метки: Mooshie Stitch Mondays ribbed spider wheel whipped spider wheel whipped wheel |


