���������� ���� ��������.
|
|
�����������, 10 ������ 2008 �. 16:01
+ � ��������
Tutorial 004

from: to:
to: or:
or: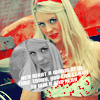
made in photoshop cs3, not translatable, uses selective colouring
PSD here
001.
Make a 100x100 base from your image. I used a picture of Taryn Terrell from Miss Terrell.
002. 
Duplicate the base and set it to screen, 50% opacity.
003. 
Add a new colour fill layer, fill it with #97dbe2 and set it to colour burn, 100% opacity.
004. 
Add a new colour fill layer, fill it with #f08785 and set it to overlay, 10% opacity.
005. 
Add a new colour fill layer, fill it with #070536 and set it to exclusion, 100% opacity.
006. 
Add a selective colouring layer, set it to:
Reds: -80,80,60,-5
Yellows: 50,-60,-30,10
Neutrals: 0,-10,0,-10
007. 
Add a selective colouring layer, set it to:
Reds: -100,70,50,40
Yellows: 10,-10,-5,0
Neutrals: 5,0,-5,-10
Blacks: 0,0,0,5
008. 
Add a selective colouring layer, set it to:
Reds: 20,15,5,25
Yellows: 20,10,-5,-10
Whites: 0,0,0,-5
Neutrals: -5,0,0,0,
009. 
Add a hue/saturation layer, set it to:
Saturation: 5
010.
Add a colour balance layer, set it to:
Midtones: -20,-15,-20
And your colouring is done!
You can leave it here or carry on.
011. 
Add a new layer (Ctrl+N), then go to Image>Apply image, use the circle marquee tool and select a bit of the face (hold shift to make it a perfect circle), copy and past this image, then desaturate it (Ctrl+shift+U)
008.
Add this texture by me and set it to screen.
Add you are done!
Comments here please :)
http://community.livejournal.com/icon_tutorial/9799363.html
����� ���:
http://www.liveinternet.ru/community/lj_icon_tutorial/post89304929/
������������� 1 ���
-
������ �����������
-
1
�������������
-
0
���������
-


