Пушкина все записи автора
Если нужен перевод - пишите!
1. Painting
You don’t have to be an artist to use paint on your layouts. Dana Smith applied paint to a transparency to achieve this fun look.
TIPS
• Hit the highlights. Dana printed her text on the front of the transparency and then added paint on the back to highlight certain words, making it look as if they were printed on the paint.
• Forget freehand painting. If you’re unsure of your artistic ability, avoid freehand techniques. Both the title and the orange hearts were created with foam stamps, which offer a great way to get the painted look without a steady hand.
SOURCES Cardstock: Bazzill Basics Paper (white, aqua), Prism Papers (orange). Patterned paper, stickers, chipboard accents: Heidi Grace Designs. Font: Chalk by Two Peas in a Bucket. Foam stamps, paint: Making Memories. Transparency: 3M. Design: Dana Smith.
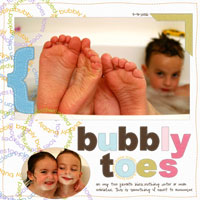
2. Using Fabric and Felt
Patricia Anderson’s fondness for fabric and felt is evident on this layout. She combined felt flowers and letters with a fabric mesh background and a photo mat made of fabric paper.
TIPS
• Back it up. Patricia printed her letters in reverse on cardstock, then attached the felt to the cardstock before cutting it.
• Keep it slim. Fabric can add instant depth and touchable texture to any layout, but be careful not to make your page too bulky.
SOURCES Cardstock: WorldWin Papers. Patterned paper: Autumn Leaves. Decorative paper, brads: K&Company. Fonts: Anthology (numbers, “Written”) off the Internet, Times New Roman (journaling). Ribbon: May Arts. Design: Patricia Anderson.
3. Beading
Erin Roe works beads into many of her layouts. Here, beadwork adds color and dimension in a way that complements her simple design.
Tips
• Let a shape be your guide. Because Erin’s smallest photo was backed by a wide heart-shape mat, it was easy for her to follow the shape when applying the beads.
• Add bling. Beads and jewels bring a touch of sparkle to layouts. Erin adhered her beads with dimensional glaze to make sure they stayed put. For another way to add beads to your pages, download step-by-step instructions for making beaded die cutes here.
SOURCES Cardstock: Bazzill Basics Paper. Patterned paper: Cloud Nine (orange), Bo-Bunny Press (green stripe). Font: Tasklist by Two Peas in a Bucket. Stickers: American Crafts. Pen: Sakura of America. Beads, rub-ons, metal accent: Flair Designs. Circle tag, heart pin: Heidi Grace Designs. Design: Erin Roe.
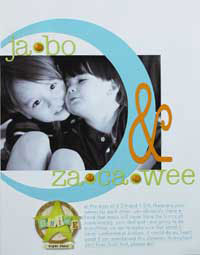
4. Manipulating Text
In this digital era, it is easy to manipulate text on your layouts. Candi Gershon created the circle text on the computer, then used it in a digital layout. For step-by-step instructions on how to create circular text, download these pdfs:
Adobe Photoshop Elements
Miscrosoft Word
TIPS
• Play around. The joy of digital scrapbooking is that nothing is permanent unless you want it to be. You’re free to experiment until you achieve the look you want. I randomly placed my circular text down the left side until I got it right.
• Get a perfect match. Another big perk of digital scrapbooking is to use the eyedropper tool to pick up colors from your layout and apply it to your text. The green text in my layout coordinates perfectly with the green “felt” letter and photo corner.
SOURCES Software: Adobe Photoshop Elements. Cardstock, felt accents, stitching: Digital Design Essentials. Fonts: Century Gothic (circles), Pea Jenny Script (journaling, date) off the Internet. Design: Candi Gershon.
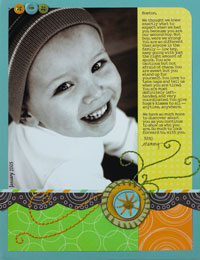
5. Stamping
Tracy Kyle finds that stamping can help solve almost any challenge on her pages.
TIPS
• Go big. After stamping the letters for her title, Tracy scanned them into her photo-editing program and resized them to a larger format. She then printed the letters and cut them out individually to create her title.
• Be an original. On the cream patterned paper, Tracy stamped in various colors to create her own unique design. The result ties in all the other colors on her page perfectly.
SOURCES Patterned paper: Creative Imaginations (blue-and-cream script), 7Gypsies (black), Making Memories (folio). Rubber stamps: Autumn Leaves (title), Postmodern Design (diamonds), Hero Arts (dot circle), Savvy Stamps (“xoxo”). Ink: Tsukineko. Stickers: 7Gypsies (small label), Paper Source (large label). Chipboard accents: Heidi Swapp (shapes). Design: Tracy Kyle.

6. Stitching
A touch of stitching is always welcome on Rhonda Bonifay’s pages. The decorative element at the bottom of her layout is hand-stitched.
TIPS
• Pick a guide. For the stitched swirls on her page, Rhonda printed out a digital element on plain paper and used it as a template to make holes for the stitches she added by hand.
• Dress it up. You can easily dress up embellishments and pieces of patterned paper by adding a little hand stitching around the edges. Rhonda made customized accents by stitching on circles of patterned paper.
SOURCES Patterned paper: KI Memories (yellow), Autumn Leaves (black, orange, circles), Scenic Route Paper Co. (green, stripe). Font: Worn Machine by Autumn Leaves. Buttons: Autumn Leaves. Date stamp: Making Memories. Embroidery thread: DMC. Digital element: Two Peas in a Bucket. Design: Rhonda Bonifay.
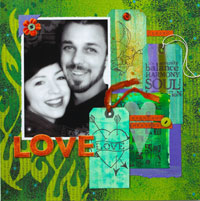
7. Inking
As an artist, Erikia Ghumm often turns to inks and dyes to create her own papers and tags.
TIPS
• Don a mask. To create the flames on her layout, Erikia sprayed dye over a flame mask. Download step-by-step instructions for this technique here.
• Blot blemishes. Erikia applied several light layers of the dye to avoid saturating the paper, which can ruin the masked shape. If a puddle does form, simply blot it up quickly.
SOURCES Cardstock, decorative paper: Club Scrap. Stamps: Sacred Kitsch Studio (love heart, truth bird), Club Scrap (words), Inkadinkado (square collage), Hero Arts (Asian text). Ink, glitter glue: Ranger Industries. Mask: Heidi Swapp. Chipboard accents: We R Memory Keepers. Buttons: Autumn Leaves. Flower: Prima. Design: Erikia Ghumm.
8. Hand-Cutting
Erica Hernandez is a master of the craft knife and rarely makes a layout without a hand-cut title and accents.
TIPS
•Go in circles. You can experiment with circle cutters and almost any circular item to mimic the curved shape in Erica’s layout. Think CDs, plates, and bowls when looking for the right size, and then follow the shape with your craft knife.
•Turn, turn, turn. When cutting with a craft knife, turn your paper, not your knife. This will help you round corners without having the knife slip out of place.
SOURCES Cardstock: Bazzill Basics Paper. Fonts: Teletype (title) off the Internet, Uncle Charles (journaling) by Autumn Leaves. Sticker: K&Company. Brads: SEI. Design: Erica Hernandez.
9. Dry-Embossing
Dry embossing can add a ton of fun texture to your pages. Lisa Storms embossed the color blocks and the title of her layout. Download these step-by-step instructions on dry-embossing.
TIPS
• Make a smooth move. Place waxed paper on your cardstock before you dry-emboss so your tool glides more smoothly and you’ll avoid tearing the paper.
• Texture your title. After placing her title letter stickers on white cardstock, Lisa embossed them. To emphasize the design, she sanded it.
SOURCES Cardstock: Bazzill Basics Paper. Patterned paper: KI Memories. Font: TypoSlab off the Internet. Stickers: American Crafts (“snow”), Chatterbox (“motion,” “2005”), Making Memories (gem). Texture template, embossing tool: Fiskars. Design: Lisa Storms.

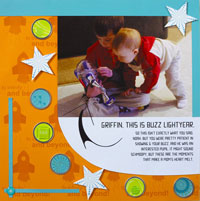
10. Adding Digital Brushes
Digital brushes bring loads of personality. Jen Lessinger used them on her background and tags.
TIPS
• Take a tone. Jen didn’t have a patterned paper that worked well with her theme, so she placed brushes in a hue similar to her cardstock on a blank canvas in Adobe Photoshop CS2 and printed the document on the cardstock for a tone-on-tone look.
• Do it yourself. Can’t find the brush you’re looking for? Make your own. Jen created a text brush that says “to infinity and beyond” to complement the rockets. Download our step-by-step instructions here.
SOURCES Cardstock: DMD Industries. Font: Pastelaria off the Internet. Tags: Avery Dennison. Epoxy stickers: Autumn Leaves. Acrylic accent: KI Memories. Digital brushes: Two Peas in a Bucket. Design: Jen Lessinger.