-Метки

beading beading technique cardigan christmas cloth crafts crochet cross-stitch decoration decoupage embroidery hand knits hand made hand made decor hand made idea handcraft handicraft handmade irish crochet jaquette knitted cloth knitting merlettka merletto irlandese nativity needlework pullover serwetka sewing vintage xmas авторская кукла аксессуары бисер бисероплетение бохо видео-обзор винтаж винтажные телефоны вышивка вышивка крестиком вышивка крестом вязаная салфетка вязание вязание для декора вязание крючком вязание спицами вязаные салфетки вязаный жакет вязаный пуловер гном декор декупаж декупаж мк жакет жакет спицами игрушки интерьер ирландское кружево квилт коллекционная кукла кружево мк нейросеть новый год одежда парогенератор плетение поделки пуловер пуловер спицами пэчворк ретро-телефоны рождество рукоделие ручная работа салфетка своими руками скандинавский гном сумка схема вязания схемы для вышивания схемы для вышивки творчество текстильная кукла техника бисероплетения узоры узоры спицами украшения шитье

 -Поиск по дневнику

Поиск сообщений в _В_И_Н_Т_А_Ж_

 -Подписка по e-mail


 -Статистика

Статистика LiveInternet.ru: показано количество хитов и посетителей
Создан: 10.06.2010
Записей:
Комментариев:
Написано: 53994


DIY проект - как обновить кровать в спальне - меняем изголовье - CROSS STITCH HEADBOARD

Суббота, 11 Июля 2020 г. 10:55 + в цитатник
MerlettKA все записи автора
жак1 (514x700, 492Kb)  
CROSS STITCH HEADBOARD
 
Try the ultimate craft collab –
cross stitch and DIY – to make
Sarah Freeman’s statement headboard
 
Нам всем свойственно желать 
изменений в доме и самый простой
и недорогой способ обновить декор
- это сделать что - то своими руками.
 
Здесь я расскажу как сделать
аутентичное изголовье кровати за
выходные, использую простые материалы.
Всего то необходимы - лист фанеры,
дрель и остатки пряжи.
Фото-масстер-класс и схемы.

MATERIALS 
QPegboard, 120 x 138cm (47 x 54")
QOne can of spray primer
QThree cans of white spray paint
QMedium-weight yarn in nine shades (we used Red Heart Super Saver, one ball each in Hot Red 0390 (Yarn 1), Jade 3862 (Yarn 2), Flamingo 0259 (Yarn 5), Gold 0321 (Yarn 6), Coral 0726 (Yarn 7), Raspberry 0774 (Yarn 8), Cherry Red 0319 (Yarn 9) and Lion Brand, one ball each in Heartland Bryce Canyon 130 (Yarn 3) and Vanna's  Choice, Pink 101 (Yarn 4))
QWashi tape 
QYarn needle 
QDrywall screws and anchors 
QDrill

жак1а (700x652, 334Kb)

жак1а1 (700x500, 274Kb)
.
жак1а1_ (700x498, 262Kb)
.
жак1а1а (700x697, 435Kb)

жак1а1а1 (420x700, 171Kb)

жак1 (514x700, 358Kb)
 
We’re all itching to update our homes at the moment – in the cheapest possible way – so this supersize stitch is a weekend must. Head down to your local hardware store and pick up a sheet of pegboard or, if you’re in the DIY zone, create your own using a sheet of plyboard, a drill, and a bit of precision hole-making.
Use up yarns from your stash to fit with your décor, or just redecorate your bedroom around your new dream headboard. Weekends are looking pretty quiet at the moment, after all.
 
01 First, make sure the pegboard has 53 full squares across and 47 full squares down. Place a dust cloth or old towel underneath the cut pegboard, then clean it as thoroughly as possible, making sure to get all the dust out of the holes, otherwise this will get onto the yarn when stitching.
 
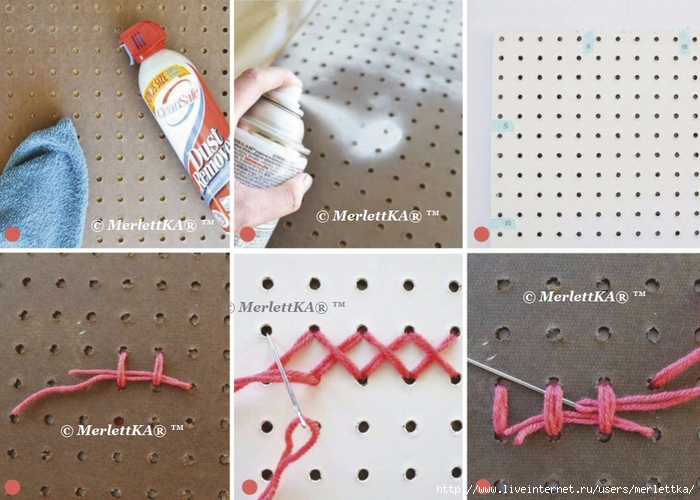
02 Working outside, or in a well-ventilated area, spray the front and sides of the board with primer. Repeat with the spray paint, using two or three coats to ensure the board is evenly covered, leaving it to dry in between each coat.
 
03 Stick a small piece of washi tape between every five holes along the top and side of the board to create a grid – this will make stitching easier. Test the washi tape on a small area first to make sure it won’t pull off the paint.
 
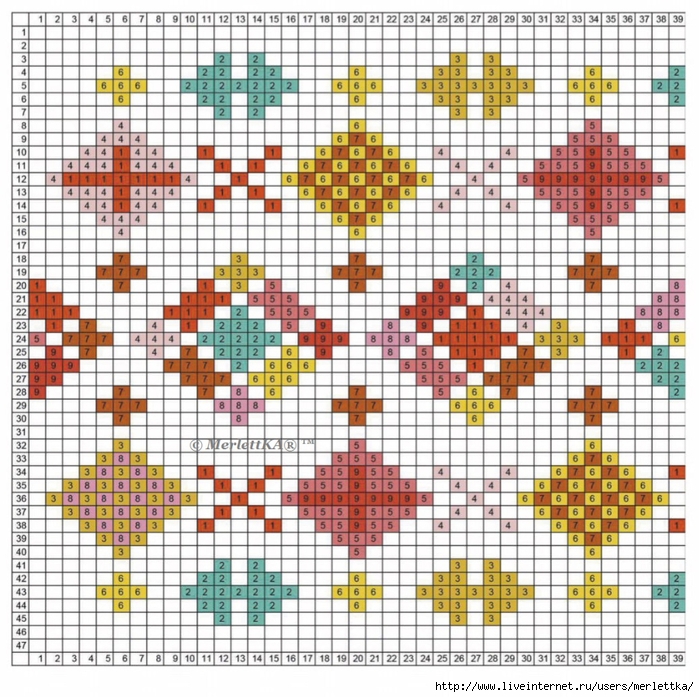
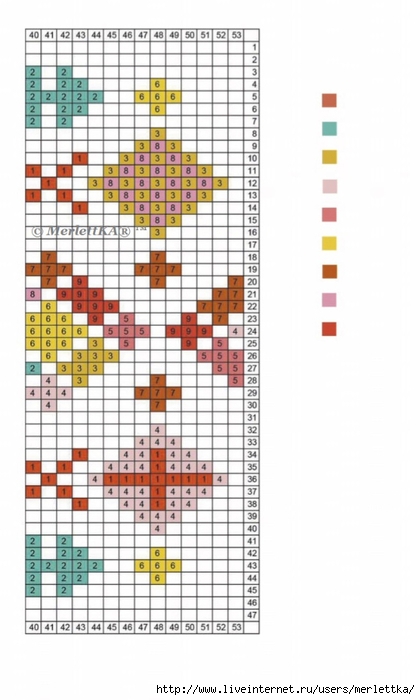
04 Referring to the chart on page 79, start at the top of the board in one area of colour. Mark a small ’X’ with pencil in the centre of the squares to be stitched in that yarn colour – this makes it easier to see where the stitches will go.
 
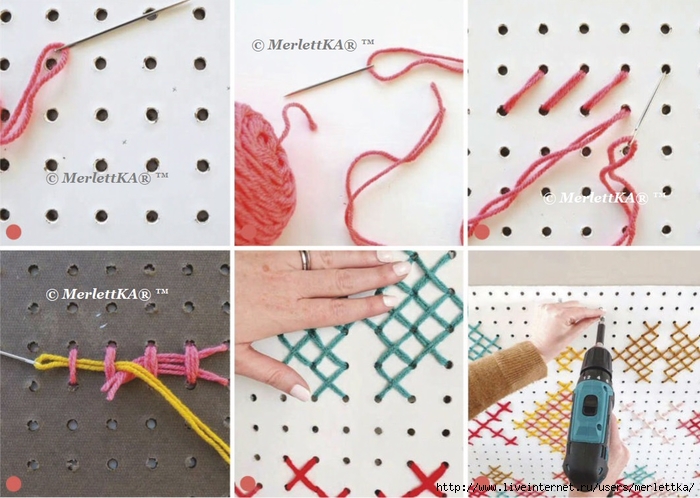
05 Take the yarn colour that corresponds to the area chosen and cut a 3-4m (1181/8-157 ") length. The yarn will be doubled up, so the actual length will be 1.5-2m (591/8-787/8"). For smaller areas, less yarn can be used. Cutting the length too long will take longer to stitch through the holes, but cutting it too short will result in frequent restringing. Thread the yarn through the needle and leave it doubled up, making sure the ends are the same length.
 
06 To start the cross stitch pattern, bring the needle up from the back of the pegboard through the bottom left of one square. Take the needle down through the top right of the square, stitching one half of an ’X’ diagonally. If there are several stitches of the same colour in a row, continue across the row stitching half of each ’X’, catching the yarn tail underneath the stitches at the back to secure it.
 
 
07 At the end of the row, work back toward the first stitch, bringing the needle up through the bottom right hole and back down through the top left hole, as shown.
 
08 Once the chosen area of colour has been stitched, thread the needle and yarn through a few completed stitches at the back to secure the ends. This same technique should be used when finishing a yarn length.
 
09 Using the chart on page 81, pick a second section of colour and repeat Steps 4-8. Continue working in this way until the whole chart has been stitched and the pegboard design is complete.
 
10 Carefully brush off any extra dust from the board using your hand or a soft cloth. If you want to make sure the ends are extra secure at the back, you can stick them down with sticky tape.
 
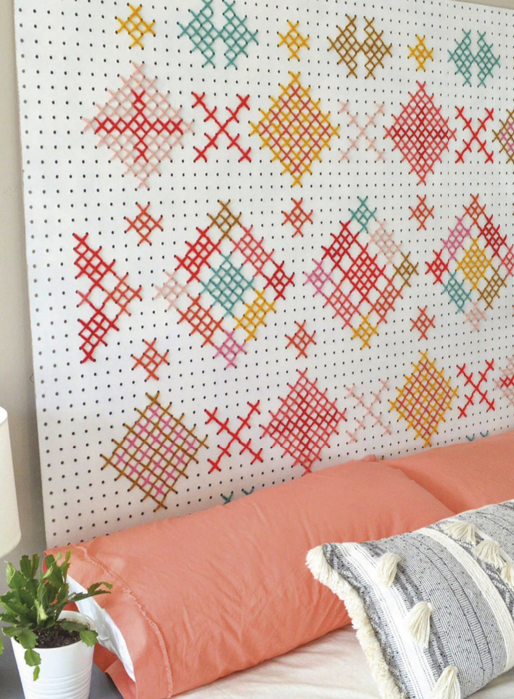
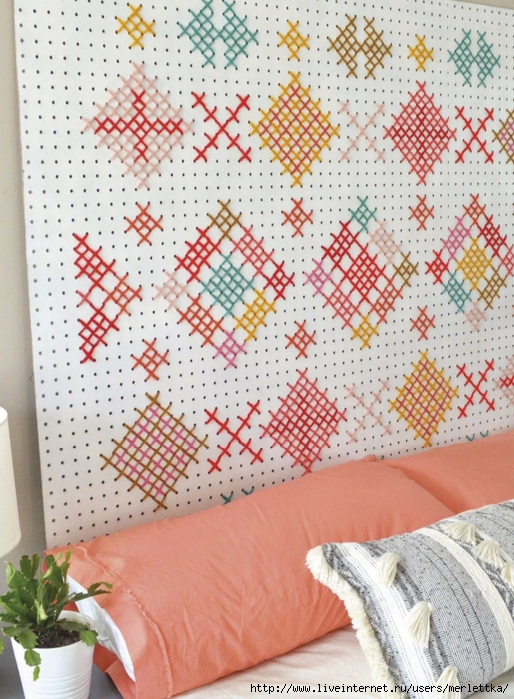
11 To finish, mount the headboard to the wall behind the bed using drywall screws and anchors, and the drill. Because of the weight of the board, make sure to secure it in the two top corners, two bottom corners, and at the top centre.

СЏ (180x254, 38Kb)
MEET THE MAKER SARAH FREEMAN
Sarah lives in Utah, USA, with her husband and four kids. Yarn is her favourite, and she’s almost always crocheting. She also loves designing cross stitch patterns, reading, and eating cookies.
Find Sarah on Instagram @apricotpolkadot. www. apricotpolkadot.com
 
Рубрики:  Декор дома
Метки:  


Добавить комментарий:
Текст комментария: смайлики

Проверка орфографии: (найти ошибки)

Прикрепить картинку:

 Переводить URL в ссылку
 Подписаться на комментарии
 Подписать картинку