Foody Thursday - Busy Mommy's Caramel Tartlets |
 realtormarina at Foody Thursday - Busy Mommy's Caramel Tartlets


|
Метки: recipe dessert |
Foody Thursday - Busy Mommy's Caramel Tartlets |
 realtormarina at Foody Thursday - Busy Mommy's Caramel Tartlets


|
Метки: recipe dessert |
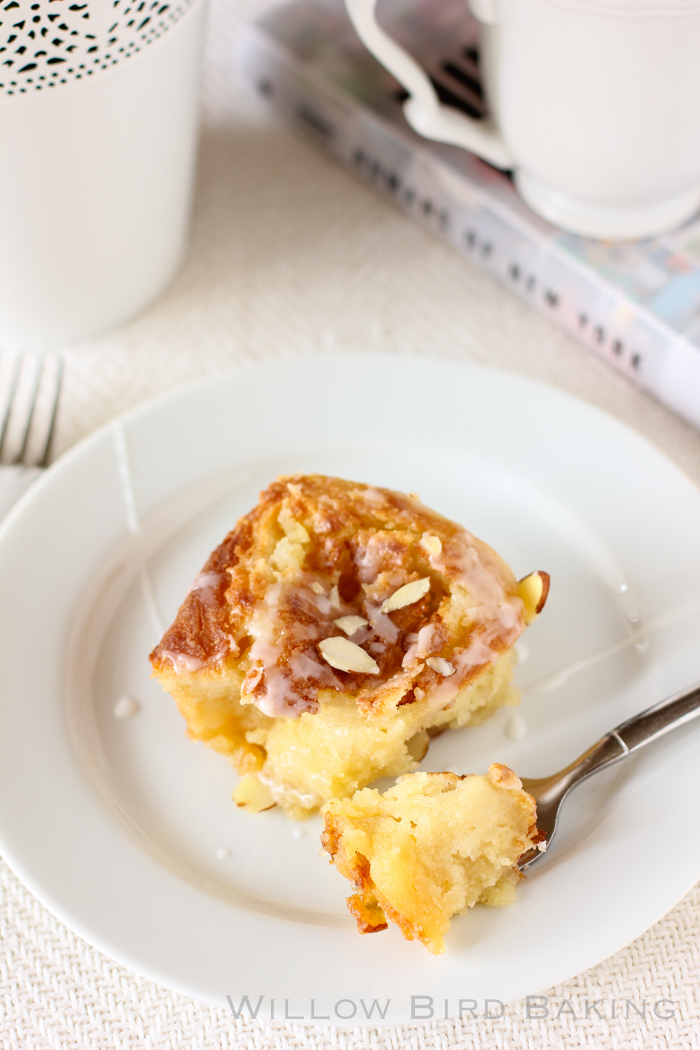
Buttery Almond Stuffed Morning Buns |
layers_of_eli at Buttery Almond Stuffed Morning Buns| Buttery Almond Stuffed Morning Buns Recipe by: Willow Bird Baking Yield: 24 buns If you love yeast rolls and almond croissants, you're going to adore these incredible Buttery Almond Stuffed Morning Buns. The buttery texture and incredible almond flavor make these my new favorite breakfast item! Roll Ingredients: 1/4 cup warm water (100-110 degrees F) 1 package (2 1/4 teaspoons) active dry yeast 2 tablespoons white vinegar 2 cups milk minus 2 tablespoons, room temperature 5 cups flour 3 tablespoons sugar 1 teaspoon salt 1 teaspoon baking soda 1 teaspoon baking powder 2/3 cup cold shortening 2 tablespoons butter, melted, for after baking Filling Ingredients: 1 pound butter, softened (I use Plugr'a Butter) 1 1/4 granulated sugar 2 cups almond paste (this is about two 8-ounce cans) 1 teaspoon almond extract 2 eggs dash of salt 1 1/2 cups sliced almonds, divided Glaze Ingredients: 1/2 cup powdered sugar 1 tablespoon milk 1/8 teaspoon almond extract Directions: Note: I don’t recommend halving yeast recipes; instead, if you don’t want 24 rolls at once, consider freezing some for later. To freeze some of the unbaked rolls, just wrap them well before the second rise and freeze them. Once frozen, pop them out of the pan all together and store in the freezer, wrapped in plastic wrap and in a zip top bag or wrapped in foil. When you want to bake them, stick them back in a greased pan, thaw them in the fridge overnight, proof for the instructed amount of time, and bake like usual. I also love making a full dough recipe and using half to make savory buns (like these or these) and half to make sweet buns for dessert. If you do this, just half the filling recipes and roll out the dough half at a time. Make the yeast dough: Mix the warm water and yeast in a medium bowl and let the yeast foam for about 10 minutes. Put 2 tablespoons white vinegar in a measuring cup and then add milk up to the 2 cup line. Set this aside. In a separate large bowl (or the bowl of a mixer fitted with a dough hook), whisk together flour, sugar, salt, baking soda, and baking powder and cut the shortening into the mixture with two knives or a pastry cutter until the shortening looks like small peas. Stir yeast mixture and milk mixture into the dry ingredients and mix well, kneading just a few turns. Transfer the dough to a bowl lightly sprayed with cooking spray, cover tightly with plastic wrap, and store in refrigerator overnight. Make the filling: The next morning, in a large bowl, cream together softened butter and sugar until pale, fluffy, and smooth. Add in almond paste, dash of salt, and almond extract and mix until well combined -- it'll be a little lumpy, and that's okay. Beat in egg. Roll out the dough: Preheat the oven to 400 degrees F and lightly spray a 9 x 13-inch baking dish (or two smaller baking dishes) with cooking spray. Turn the chilled dough out onto a well-floured surface and roll it into a large rectangle about 1/8-inch thick (I carefully cut the dough in half and worked with half at a time to make it more manageable; if you do this, just spread on half of the filling ingredients for each half you roll). Spread the almond paste mixture gently and evenly all over the dough and sprinkle on about half of your sliced almonds. Gently roll the dough up into a spiral and cut it into rolls, placing them close together in your prepared baking dish (at this point, you could wrap and freeze the rolls for later if you wanted). Proof the rolls, bake, and glaze: Cover the rolls with a clean dish cloth and let them rise in a warm spot (I set them on my oven's heat vent) until they’ve nearly doubled, about 2 hours. Bake them for about 15-20 minutes or until browned on top (if you take them out at just lightly golden brown, they may still be doughy in the center). Brush with 2 tablespoons melted butter and return to the oven for 1 more minute. Whisk together ingredients for the glaze and drizzle it over the rolls. Sprinkle with remaining sliced almonds. Serve immediately. |
|
Метки: breakfast recipe meal |
Buttery Almond Stuffed Morning Buns |
layers_of_eli at Buttery Almond Stuffed Morning Buns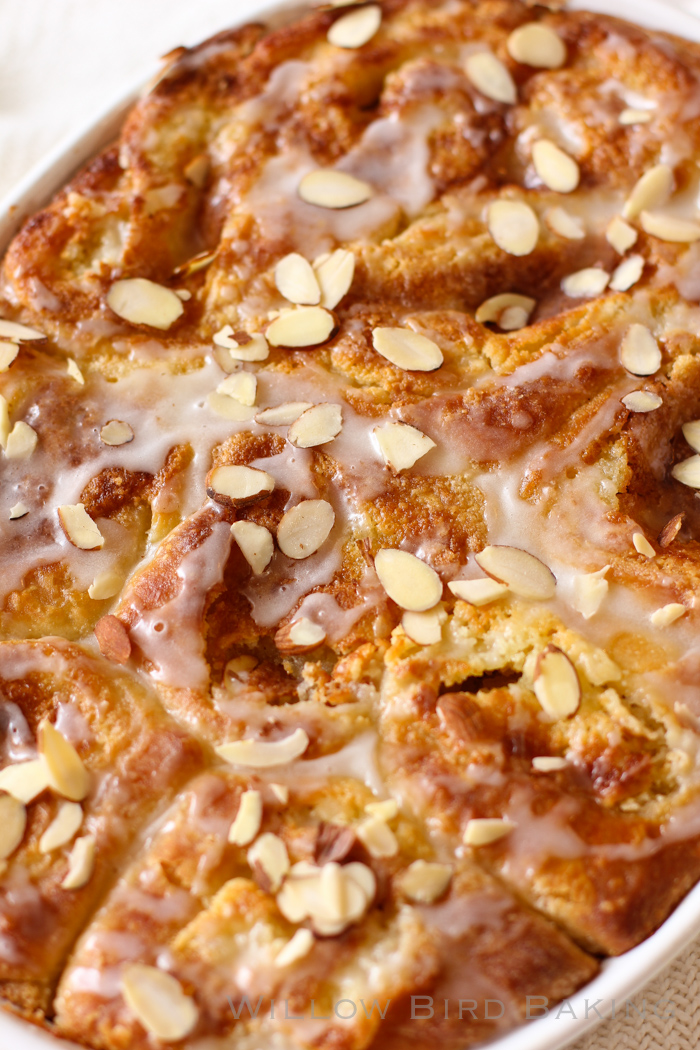
| Buttery Almond Stuffed Morning Buns Recipe by: Willow Bird Baking Yield: 24 buns If you love yeast rolls and almond croissants, you're going to adore these incredible Buttery Almond Stuffed Morning Buns. The buttery texture and incredible almond flavor make these my new favorite breakfast item! Roll Ingredients: 1/4 cup warm water (100-110 degrees F) 1 package (2 1/4 teaspoons) active dry yeast 2 tablespoons white vinegar 2 cups milk minus 2 tablespoons, room temperature 5 cups flour 3 tablespoons sugar 1 teaspoon salt 1 teaspoon baking soda 1 teaspoon baking powder 2/3 cup cold shortening 2 tablespoons butter, melted, for after baking Filling Ingredients: 1 pound butter, softened (I use Plugr'a Butter) 1 1/4 granulated sugar 2 cups almond paste (this is about two 8-ounce cans) 1 teaspoon almond extract 2 eggs dash of salt 1 1/2 cups sliced almonds, divided Glaze Ingredients: 1/2 cup powdered sugar 1 tablespoon milk 1/8 teaspoon almond extract Directions: Note: I don’t recommend halving yeast recipes; instead, if you don’t want 24 rolls at once, consider freezing some for later. To freeze some of the unbaked rolls, just wrap them well before the second rise and freeze them. Once frozen, pop them out of the pan all together and store in the freezer, wrapped in plastic wrap and in a zip top bag or wrapped in foil. When you want to bake them, stick them back in a greased pan, thaw them in the fridge overnight, proof for the instructed amount of time, and bake like usual. I also love making a full dough recipe and using half to make savory buns (like these or these) and half to make sweet buns for dessert. If you do this, just half the filling recipes and roll out the dough half at a time. Make the yeast dough: Mix the warm water and yeast in a medium bowl and let the yeast foam for about 10 minutes. Put 2 tablespoons white vinegar in a measuring cup and then add milk up to the 2 cup line. Set this aside. In a separate large bowl (or the bowl of a mixer fitted with a dough hook), whisk together flour, sugar, salt, baking soda, and baking powder and cut the shortening into the mixture with two knives or a pastry cutter until the shortening looks like small peas. Stir yeast mixture and milk mixture into the dry ingredients and mix well, kneading just a few turns. Transfer the dough to a bowl lightly sprayed with cooking spray, cover tightly with plastic wrap, and store in refrigerator overnight. Make the filling: The next morning, in a large bowl, cream together softened butter and sugar until pale, fluffy, and smooth. Add in almond paste, dash of salt, and almond extract and mix until well combined -- it'll be a little lumpy, and that's okay. Beat in egg. Roll out the dough: Preheat the oven to 400 degrees F and lightly spray a 9 x 13-inch baking dish (or two smaller baking dishes) with cooking spray. Turn the chilled dough out onto a well-floured surface and roll it into a large rectangle about 1/8-inch thick (I carefully cut the dough in half and worked with half at a time to make it more manageable; if you do this, just spread on half of the filling ingredients for each half you roll). Spread the almond paste mixture gently and evenly all over the dough and sprinkle on about half of your sliced almonds. Gently roll the dough up into a spiral and cut it into rolls, placing them close together in your prepared baking dish (at this point, you could wrap and freeze the rolls for later if you wanted). Proof the rolls, bake, and glaze: Cover the rolls with a clean dish cloth and let them rise in a warm spot (I set them on my oven's heat vent) until they’ve nearly doubled, about 2 hours. Bake them for about 15-20 minutes or until browned on top (if you take them out at just lightly golden brown, they may still be doughy in the center). Brush with 2 tablespoons melted butter and return to the oven for 1 more minute. Whisk together ingredients for the glaze and drizzle it over the rolls. Sprinkle with remaining sliced almonds. Serve immediately. |
|
Метки: breakfast recipe meal |
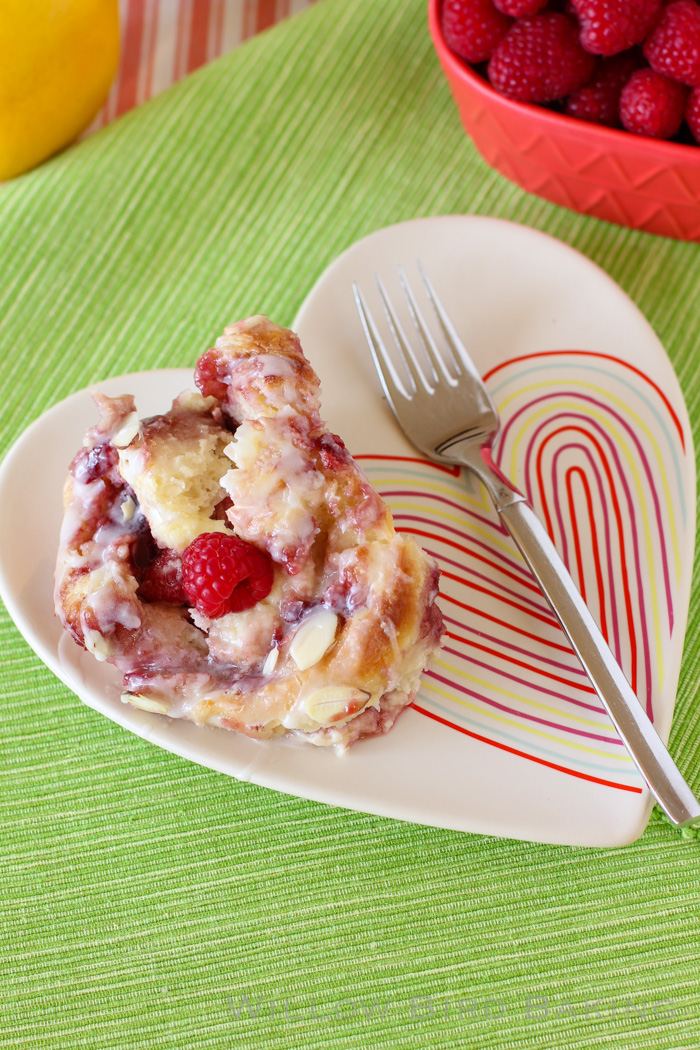
Raspberry Cheesecake Morning Buns |
layers_of_eli at Raspberry Cheesecake Morning Buns| Raspberry Cheesecake Morning Buns Recipe by: Willow Bird Baking Yield: 24 rolls These Raspberry Cheesecake Morning Buns combine the world's best yeast dough with fresh raspberries and indulgent cheesecake. I've used a sweet almond glaze to round out the flavors, but if you're not an almond fan, you can use vanilla extract in the glaze instead. Roll Ingredients: 1 package (2 1/4 teaspoons) active dry yeast 1/4 cup warm water (100-110 degrees F) 2 tablespoons white vinegar 2 cups milk minus 2 tablespoons, room temperature 2/3 cup cold shortening 3 tablespoons sugar 1 teaspoon salt 1 teaspoon baking soda 1 teaspoon baking powder 5 cups flour 2 tablespoons butter, melted, for after baking Filling Ingredients: 4 (8-ounce) packages cream cheese, softened 1 cup sugar 2 eggs, room temperature 2 sticks salted butter (or 2 stick unsalted butter and 1/2 teaspoon salt), melted 1 (12-ounce) jar raspberry jam 1 pint fresh raspberries (plus more for topping) Glaze Ingredients: 1/2 cup powdered sugar 1 tablespoon milk 1/8 teaspoon almond extract (or vanilla if you prefer) sliced almonds for garnish (optional) Directions: Note: I don’t recommend halving yeast recipes; instead, if you don’t want 24 rolls at once, consider freezing some for later. To freeze some of the unbaked rolls, just wrap them well before the second rise and freeze them. Once frozen, pop them out of the pan all together and store in the freezer, wrapped in plastic wrap and in a zip top bag or wrapped in foil. When you want to bake them, stick them back in a greased pan, thaw them in the fridge overnight, proof for the instructed amount of time, and bake like usual. These bun/roll recipes also provide the perfect opportunity to try two different flavor combos. I often make half sweet buns and half savory buns (like these or these) and half to make sweet buns for dessert. If you do this, just half the filling recipes and roll out the dough half at a time. Mix the warm water and yeast in a medium bowl and let the yeast foam for about 10 minutes. Put 2 tablespoons white vinegar in a measuring cup and then add milk up to the 2 cup line. Set this aside. In a separate large bowl (or the bowl of a mixer fitted with a dough hook), whisk together flour, sugar, salt, baking soda, and baking powder and cut the shortening into the mixture with two knives or a pastry cutter until the shortening looks like small peas. Stir yeast mixture and milk mixture into the dry ingredients and mix well, kneading just a few turns. Transfer the dough to a bowl lightly sprayed with cooking spray, cover tightly with plastic wrap, and proof in a warm, draft-free place (such as a closed, turned-off oven), for around 70 minutes or until doubled in size. After proofing the dough, preheat the oven to 400 degrees F and lightly spray a 9 x 13-inch baking dish with cooking spray. Cream the softened cream cheese in a medium bowl until fluffy before adding the sugar and eggs. Mix together until well combined. Turn the dough out onto a floured surface and roll it into a large rectangle about 1/8-inch thick (I carefully cut the dough in half and worked with half at a time to make it more manageable; if you do this, just spread on half of the filling ingredients for each half you roll). Spread the melted butter over the surface of the rolled dough and then dollop the cream cheese mixture all across the surface, spreading gently to create an even layer. Dollop raspberry jam on top and spread it gently across the cream cheese. Sprinkle on raspberries. Gently roll the dough up into a spiral (I find using a bench scraper to encourage the dough to roll up during this process incredibly helpful) and cut it into 2-inch rolls, placing them close together in your prepared baking dishes (at this point, you could wrap and freeze the rolls for later if you wanted). Cover the rolls let them rise in the fridge overnight (they will have nearly doubled.) When you’re ready to bake, preheat the oven to 400 degrees F, letting the rolls rise on top of the preheating oven covered by a clean dish towel. Bake them for about 25-30 minutes or until lightly browned on top (don’t underbake or they’ll still be doughy in the center). Brush with 2 tablespoons melted butter and return to the oven for 1 more minute. Whisk together the glaze ingredients and drizzle the glaze over the warm rolls. Serve immediately. |
|
Метки: breakfast recipe meal |
Raspberry Cheesecake Morning Buns |
layers_of_eli at Raspberry Cheesecake Morning Buns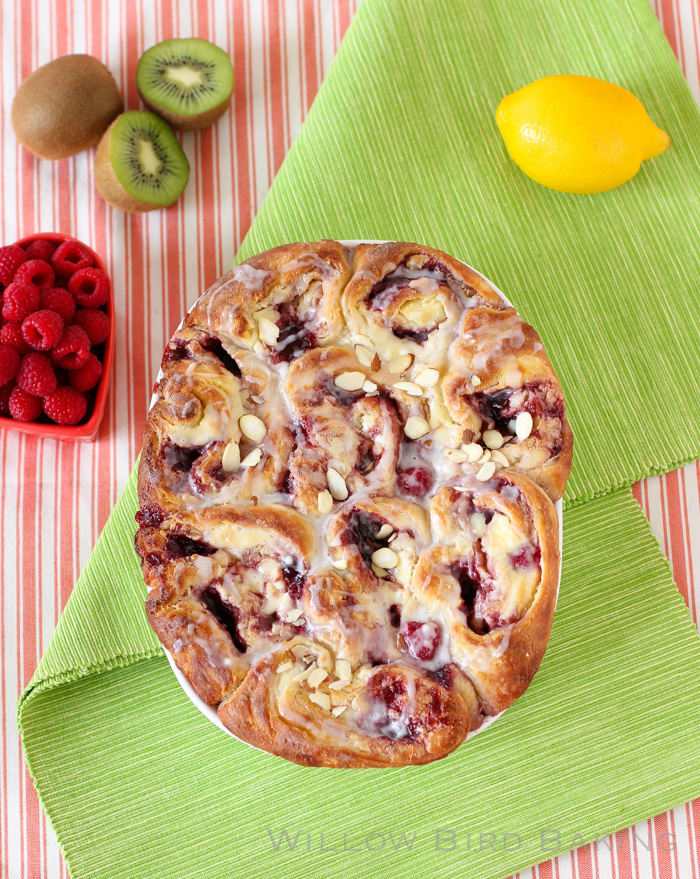
| Raspberry Cheesecake Morning Buns Recipe by: Willow Bird Baking Yield: 24 rolls These Raspberry Cheesecake Morning Buns combine the world's best yeast dough with fresh raspberries and indulgent cheesecake. I've used a sweet almond glaze to round out the flavors, but if you're not an almond fan, you can use vanilla extract in the glaze instead. Roll Ingredients: 1 package (2 1/4 teaspoons) active dry yeast 1/4 cup warm water (100-110 degrees F) 2 tablespoons white vinegar 2 cups milk minus 2 tablespoons, room temperature 2/3 cup cold shortening 3 tablespoons sugar 1 teaspoon salt 1 teaspoon baking soda 1 teaspoon baking powder 5 cups flour 2 tablespoons butter, melted, for after baking Filling Ingredients: 4 (8-ounce) packages cream cheese, softened 1 cup sugar 2 eggs, room temperature 2 sticks salted butter (or 2 stick unsalted butter and 1/2 teaspoon salt), melted 1 (12-ounce) jar raspberry jam 1 pint fresh raspberries (plus more for topping) Glaze Ingredients: 1/2 cup powdered sugar 1 tablespoon milk 1/8 teaspoon almond extract (or vanilla if you prefer) sliced almonds for garnish (optional) Directions: Note: I don’t recommend halving yeast recipes; instead, if you don’t want 24 rolls at once, consider freezing some for later. To freeze some of the unbaked rolls, just wrap them well before the second rise and freeze them. Once frozen, pop them out of the pan all together and store in the freezer, wrapped in plastic wrap and in a zip top bag or wrapped in foil. When you want to bake them, stick them back in a greased pan, thaw them in the fridge overnight, proof for the instructed amount of time, and bake like usual. These bun/roll recipes also provide the perfect opportunity to try two different flavor combos. I often make half sweet buns and half savory buns (like these or these) and half to make sweet buns for dessert. If you do this, just half the filling recipes and roll out the dough half at a time. Mix the warm water and yeast in a medium bowl and let the yeast foam for about 10 minutes. Put 2 tablespoons white vinegar in a measuring cup and then add milk up to the 2 cup line. Set this aside. In a separate large bowl (or the bowl of a mixer fitted with a dough hook), whisk together flour, sugar, salt, baking soda, and baking powder and cut the shortening into the mixture with two knives or a pastry cutter until the shortening looks like small peas. Stir yeast mixture and milk mixture into the dry ingredients and mix well, kneading just a few turns. Transfer the dough to a bowl lightly sprayed with cooking spray, cover tightly with plastic wrap, and proof in a warm, draft-free place (such as a closed, turned-off oven), for around 70 minutes or until doubled in size. After proofing the dough, preheat the oven to 400 degrees F and lightly spray a 9 x 13-inch baking dish with cooking spray. Cream the softened cream cheese in a medium bowl until fluffy before adding the sugar and eggs. Mix together until well combined. Turn the dough out onto a floured surface and roll it into a large rectangle about 1/8-inch thick (I carefully cut the dough in half and worked with half at a time to make it more manageable; if you do this, just spread on half of the filling ingredients for each half you roll). Spread the melted butter over the surface of the rolled dough and then dollop the cream cheese mixture all across the surface, spreading gently to create an even layer. Dollop raspberry jam on top and spread it gently across the cream cheese. Sprinkle on raspberries. Gently roll the dough up into a spiral (I find using a bench scraper to encourage the dough to roll up during this process incredibly helpful) and cut it into 2-inch rolls, placing them close together in your prepared baking dishes (at this point, you could wrap and freeze the rolls for later if you wanted). Cover the rolls let them rise in the fridge overnight (they will have nearly doubled.) When you’re ready to bake, preheat the oven to 400 degrees F, letting the rolls rise on top of the preheating oven covered by a clean dish towel. Bake them for about 25-30 minutes or until lightly browned on top (don’t underbake or they’ll still be doughy in the center). Brush with 2 tablespoons melted butter and return to the oven for 1 more minute. Whisk together the glaze ingredients and drizzle the glaze over the warm rolls. Serve immediately. |
|
Метки: breakfast recipe meal |
Oatmeal Cream Pies |
patsrockmybosox at Oatmeal Cream Pies
|
Метки: recipe cookies dessert |
Oatmeal Cream Pies |
patsrockmybosox at Oatmeal Cream Pies|
Метки: recipe cookies dessert |
Kids in the Kitchen: D is for Donuts |
after_the_ashes at Kids in the Kitchen: D is for Donuts
|
Метки: recipe dessert |
Kids in the Kitchen: D is for Donuts |
after_the_ashes at Kids in the Kitchen: D is for Donuts|
Метки: recipe dessert |
Lemon Raspberry Gooey Butter Cake |
layers_of_eli at Lemon Raspberry Gooey Butter Cake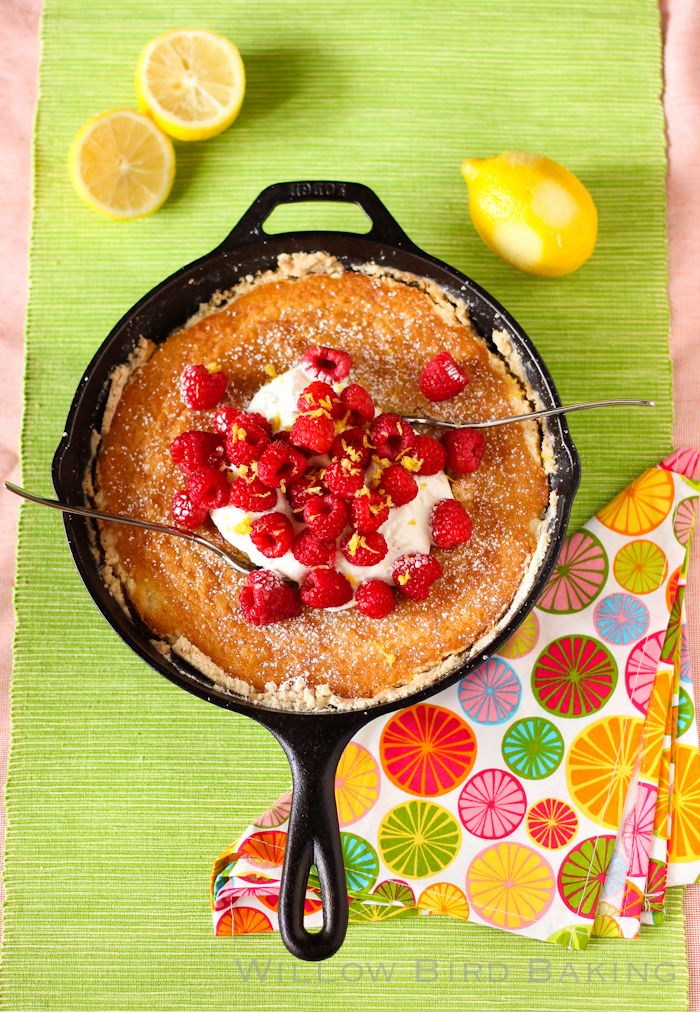
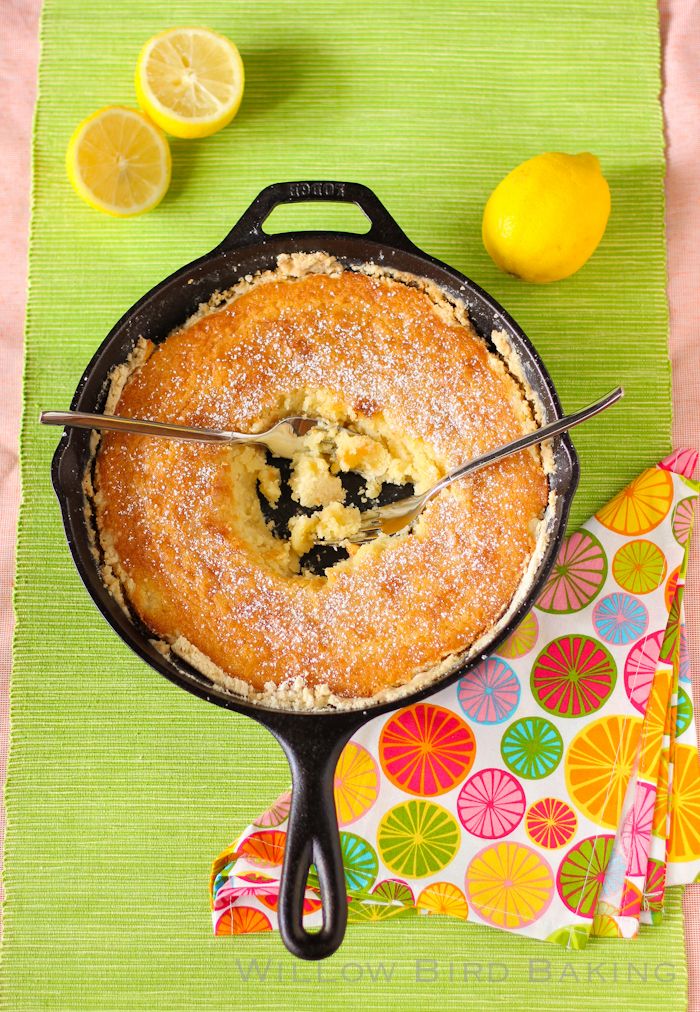
| Lemon Raspberry Gooey Butter Cake Recipe by: Willow Bird Baking, adapted from one provided to St. Louis Today by Fred and Audrey Heimburger of Heimburger Bakery. Yield: would easily serve 4-6 people This was beyond fantastic. The gooey, fluffy texture of this cake along with the subtle lemon flavor was a downright ethereal combination. You're gonna freak out when you taste it! Crust Ingredients: 1 cup cake flour 3 tablespoons granulated sugar 1/3 cup butter, softened 1 teaspoon lemon zest Filling Ingredients: 1 1/4 cups granulated sugar 3/4 cup (1 1/2 sticks) butter, softened 1 egg 1 cup all-purpose flour 2/3 cup evaporated milk 1/4 cup light corn syrup 1/2 teaspoon vanilla extract 1 teaspoon lemon extract 1 teaspoon lemon zest powdered sugar for dusting Toppings Ingredients: fresh raspberries 2 cups heavy whipping cream 2 heaping tablespoons powdered sugar lemon zest Directions: NOTE: If you don’t have a skillet, I believe you can bake this in a greased 9-inch square baking dish (I’d use a glass one if you have it, and check it early and often. Remove when there’s some jiggle left.) Let us know how it goes if you try it this way for all the other skilletless people! Make the crust: Preheat oven to 350 degrees. Whisk together cake flour, zest, and sugar in a medium bowl. Cut in the butter with a pastry cutter or two knives until the mixture resembles fine crumbs and starts to cling together. Press the mixture into the bottom (this step is a lot harder than it sounds, but be patient and use the back of a spoon to help spread/press the mixture down. I also stuck mine in the fridge for a bit to make the butter less sticky) and up the sides of a 10-inch cast iron skillet. Make the filling: Cream together the butter and sugar until fluffy and pale yellow (about 2-3 minutes). Mix in the egg until just combined. Alternate adding the flour and evaporated milk, mixing after each addition. Mix in the corn syrup, vanilla extract, lemon extract, and lemon zest. Pour the filling into the crust and sprinkle the top with icing sugar. Bake and assemble the cake: Bake for 25 to 35 minutes or until cake is nearly set (mine was probably ready around 30). Some jiggle is fine — do not overcook! It’ll finish setting up as it cools. Sprinkle some more powdered sugar on top. Let the cake cool in the skillet for 2 hours. In the meantime, beat heavy cream and 2 tablespoons powdered sugar together in a bowl to stiff peaks. Pile heaps of fresh raspberries into the center of your cooled, set gooey butter cake, top with a mountain of freshly whipped cream and lemon zest, and serve. |
|
Метки: recipe dessert |
Lemon Raspberry Gooey Butter Cake |
layers_of_eli at Lemon Raspberry Gooey Butter Cake
| Lemon Raspberry Gooey Butter Cake Recipe by: Willow Bird Baking, adapted from one provided to St. Louis Today by Fred and Audrey Heimburger of Heimburger Bakery. Yield: would easily serve 4-6 people This was beyond fantastic. The gooey, fluffy texture of this cake along with the subtle lemon flavor was a downright ethereal combination. You're gonna freak out when you taste it! Crust Ingredients: 1 cup cake flour 3 tablespoons granulated sugar 1/3 cup butter, softened 1 teaspoon lemon zest Filling Ingredients: 1 1/4 cups granulated sugar 3/4 cup (1 1/2 sticks) butter, softened 1 egg 1 cup all-purpose flour 2/3 cup evaporated milk 1/4 cup light corn syrup 1/2 teaspoon vanilla extract 1 teaspoon lemon extract 1 teaspoon lemon zest powdered sugar for dusting Toppings Ingredients: fresh raspberries 2 cups heavy whipping cream 2 heaping tablespoons powdered sugar lemon zest Directions: NOTE: If you don’t have a skillet, I believe you can bake this in a greased 9-inch square baking dish (I’d use a glass one if you have it, and check it early and often. Remove when there’s some jiggle left.) Let us know how it goes if you try it this way for all the other skilletless people! Make the crust: Preheat oven to 350 degrees. Whisk together cake flour, zest, and sugar in a medium bowl. Cut in the butter with a pastry cutter or two knives until the mixture resembles fine crumbs and starts to cling together. Press the mixture into the bottom (this step is a lot harder than it sounds, but be patient and use the back of a spoon to help spread/press the mixture down. I also stuck mine in the fridge for a bit to make the butter less sticky) and up the sides of a 10-inch cast iron skillet. Make the filling: Cream together the butter and sugar until fluffy and pale yellow (about 2-3 minutes). Mix in the egg until just combined. Alternate adding the flour and evaporated milk, mixing after each addition. Mix in the corn syrup, vanilla extract, lemon extract, and lemon zest. Pour the filling into the crust and sprinkle the top with icing sugar. Bake and assemble the cake: Bake for 25 to 35 minutes or until cake is nearly set (mine was probably ready around 30). Some jiggle is fine — do not overcook! It’ll finish setting up as it cools. Sprinkle some more powdered sugar on top. Let the cake cool in the skillet for 2 hours. In the meantime, beat heavy cream and 2 tablespoons powdered sugar together in a bowl to stiff peaks. Pile heaps of fresh raspberries into the center of your cooled, set gooey butter cake, top with a mountain of freshly whipped cream and lemon zest, and serve. |

|
Метки: recipe dessert |
Moist Zucchini Carrot Bread |
hardboiledblond at Moist Zucchini Carrot Bread
|
Метки: recipe dessert |
Moist Zucchini Carrot Bread |
hardboiledblond at Moist Zucchini Carrot Bread
|
Метки: recipe dessert |
Cannoli with Ricotta Cheese Filling |
a_boleyn at Cannoli with Ricotta Cheese Filling
|
Метки: recipe dessert |
Cannoli with Ricotta Cheese Filling |
a_boleyn at Cannoli with Ricotta Cheese Filling
|
Метки: recipe dessert |
The Best All Butter Pie Crust Recipe |
hardboiledblond at The Best All Butter Pie Crust Recipe
|
Метки: recipe dessert |
The Best All Butter Pie Crust Recipe |
hardboiledblond at The Best All Butter Pie Crust Recipe
|
Метки: recipe dessert |
Game Day Pretzels |
patsrockmybosox at Game Day Pretzels
|
Метки: recipe dessert |
Game Day Pretzels |
patsrockmybosox at Game Day Pretzels|
Метки: recipe dessert |
Pumpkin Cheesecake Pillow Popovers |
layers_of_eli at Pumpkin Cheesecake Pillow Popovers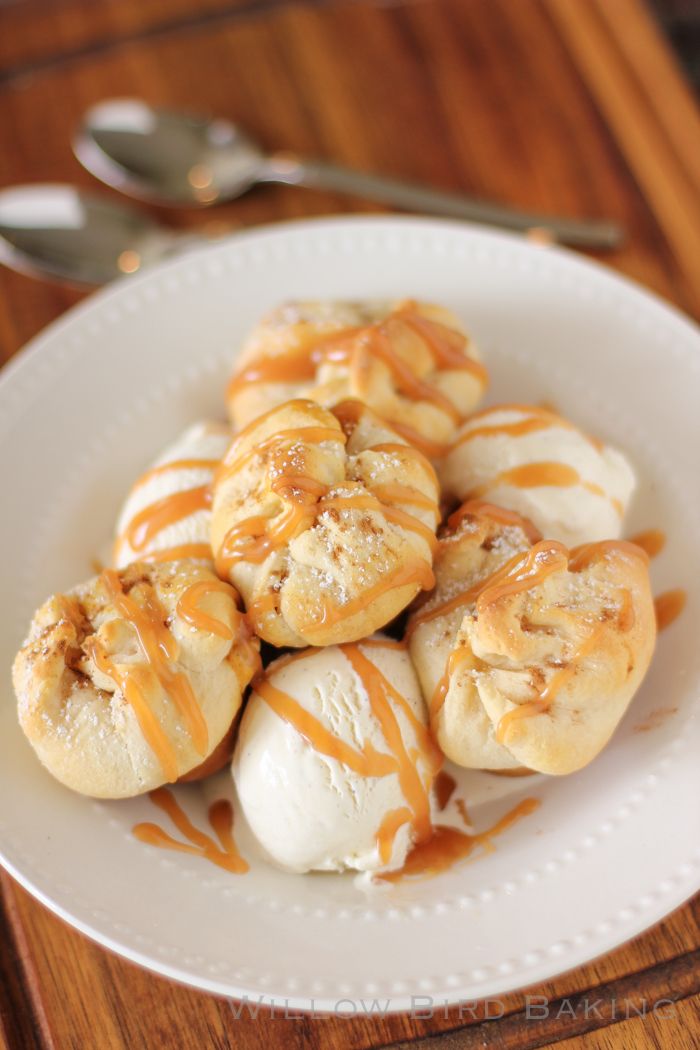
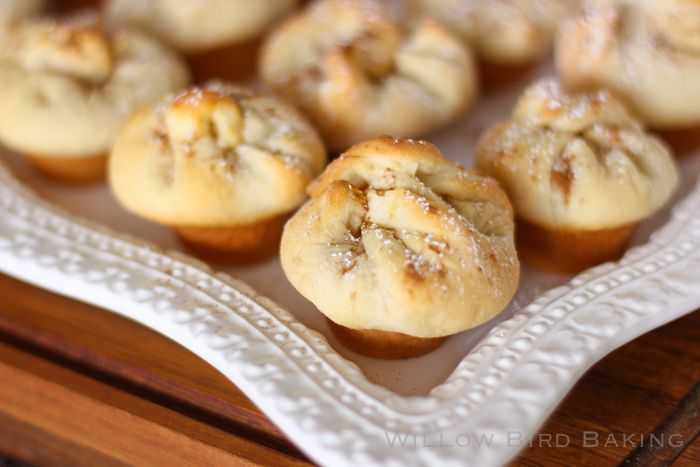
| Pumpkin Cheesecake Pillow Popovers Recipe by: Willow Bird Baking Yield: 39 pillows These little pumpkin cheesecake pillows are amazing served warm with vanilla bean ice cream and a drizzle of caramel. Add some toasted pecans for more delicious fall flavor. This recipe makes 39 pillows, but if you don't need that many, just half it. To half 1 egg, lightly beat it in a small bowl and discard about 1.5 tablespoons of it before adding it to the recipe. Ingredients: 4 cans crescent rolls 2 (8-ounce) package cream cheese, softened 5/8 cup sugar 1 egg 2 cup canned pumpkin 2 teaspoon vanilla extract 2 teaspoons ground cinnamon*, plus more for sprinkling 1/4 teaspoon ground allspice* 1/2 teaspoon nutmeg* 1/2 teaspoon ginger* powdered sugar for sprinkling caramel sauce and ice cream for serving *or substitute 2 teaspoons of pumpkin pie spice for these spices. Directions: Preheat oven to 375 degrees F. Spray two mini muffin tins with cooking spray. In a large mixing bowl, beat together the cream cheese and sugar until light and fluffy. Add egg, pumpkin, vanilla, cinnamon, ginger, nutmeg, and allspice, and beat to combine. Cover this and chill it while you prepare your dough. Unroll one can of crescent baking sheet dough onto a lightly floured surface and roll it out to around 9 x 12 inches. Cut it using a pizza cutter into 9 squares, roughly 3 x 4 inches each. Place the squares into wells of the mini muffin tins, skipping a well between each. Gently push the squares down into the well. Spoon a heaping spoonful of the pumpkin mixture into each well and pinch the corners of the dough together around it, twisting at the top to close. Bake for 10-14 minutes or until browned (let them get good and golden or they'll still be doughy in the middle.) Remove from the oven and top with powdered sugar and cinnamon. Let them cool in the pan for around 5 minutes before serving them in a bowl with heaping scoops of vanilla bean ice cream and caramel drizzle. |
|
Метки: recipe dessert |
Pumpkin Cheesecake Pillow Popovers |
layers_of_eli at Pumpkin Cheesecake Pillow Popovers
| Pumpkin Cheesecake Pillow Popovers Recipe by: Willow Bird Baking Yield: 39 pillows These little pumpkin cheesecake pillows are amazing served warm with vanilla bean ice cream and a drizzle of caramel. Add some toasted pecans for more delicious fall flavor. This recipe makes 39 pillows, but if you don't need that many, just half it. To half 1 egg, lightly beat it in a small bowl and discard about 1.5 tablespoons of it before adding it to the recipe. Ingredients: 4 cans crescent rolls 2 (8-ounce) package cream cheese, softened 5/8 cup sugar 1 egg 2 cup canned pumpkin 2 teaspoon vanilla extract 2 teaspoons ground cinnamon*, plus more for sprinkling 1/4 teaspoon ground allspice* 1/2 teaspoon nutmeg* 1/2 teaspoon ginger* powdered sugar for sprinkling caramel sauce and ice cream for serving *or substitute 2 teaspoons of pumpkin pie spice for these spices. Directions: Preheat oven to 375 degrees F. Spray two mini muffin tins with cooking spray. In a large mixing bowl, beat together the cream cheese and sugar until light and fluffy. Add egg, pumpkin, vanilla, cinnamon, ginger, nutmeg, and allspice, and beat to combine. Cover this and chill it while you prepare your dough. Unroll one can of crescent baking sheet dough onto a lightly floured surface and roll it out to around 9 x 12 inches. Cut it using a pizza cutter into 9 squares, roughly 3 x 4 inches each. Place the squares into wells of the mini muffin tins, skipping a well between each. Gently push the squares down into the well. Spoon a heaping spoonful of the pumpkin mixture into each well and pinch the corners of the dough together around it, twisting at the top to close. Bake for 10-14 minutes or until browned (let them get good and golden or they'll still be doughy in the middle.) Remove from the oven and top with powdered sugar and cinnamon. Let them cool in the pan for around 5 minutes before serving them in a bowl with heaping scoops of vanilla bean ice cream and caramel drizzle. |

|
Метки: recipe dessert |
Sausage & Corn Chile Con Queso Taco Ring |
layers_of_eli at Sausage & Corn Chile Con Queso Taco Ring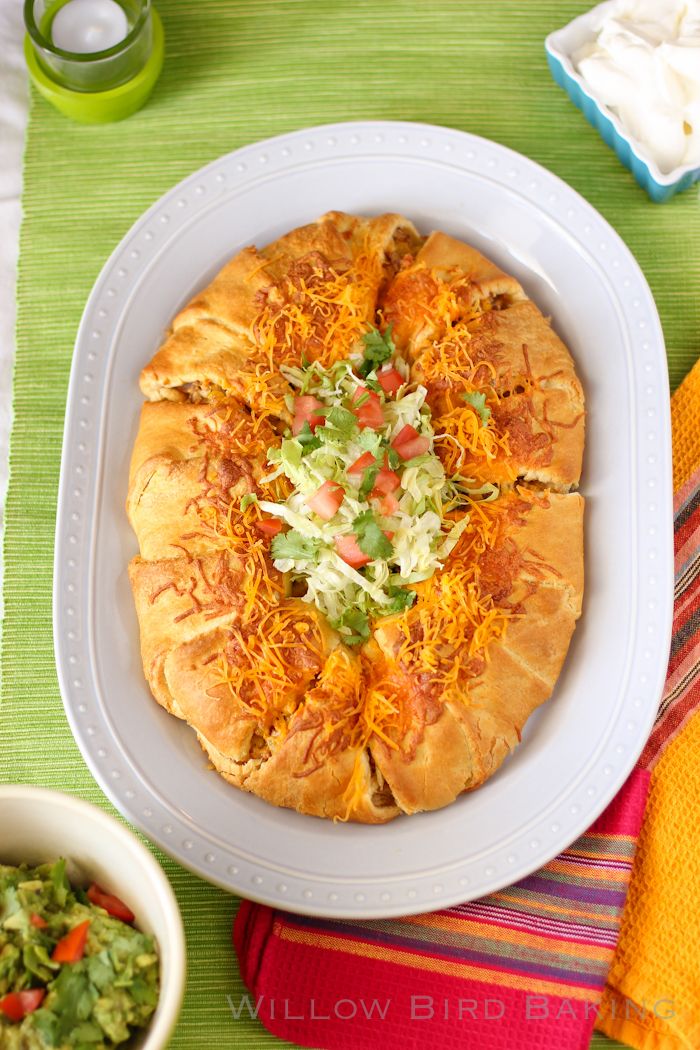
| Sausage & Corn Chile Con Queso Taco Ring Recipe by: Willow Bird Baking Yield: 5-6 portions Forget your usual tacos and even your usual taco rings: this taco ring is an explosion of hot sausage con queso with green chiles. It's gonna blow your mind! And it's so easy to make. Ingredients: 1 (8-ounce) package cream cheese 1/2 cup sharp cheddar cheese, plus more for topping 2 tablespoons salsa of your choice 1 tablespoon diced green chiles 1 pound hot sausage olive oil (if needed) 1 1/2 cups frozen corn kernels 1 tablespoon taco seasoning 2 cans Pillsbury Crescent Rolls Directions: Preheat oven to 375 degrees F and cover a round pizza pan with foil sprayed with cooking spray (or use a pizza stone or baking sheet). Place cream cheese, cheese, salsa, and chiles in a large bowl and set aside. In a skillet over medium-high heat, brown the sausage. Remove the meat to a paper-towel lined plate to drain, reserving the grease in the skillet. As soon as sausage has drained for a minute, pour it into the cream cheese bowl. Set this aside to allow the cheeses to melt. In the meantime, pour corn kernels into the skillet over medium heat (adding a little olive oil if there's not enough grease) and cook 5-6 minutes or until heated through. Stir in 2 teaspoons of taco seasoning towards the end of cooking. Pour the hot corn over the cream cheese and sausage mixture. Stir together until well combined (it'll take a bit, but it'll come together). Carefully unroll packages of crescent rolls, separating them into long triangles. Place triangles, points out, in a sun-like ring (allowing bases of the triangles to overlap). Press down on the overlapping bases to flatten the center of the ring to a consistent thickness. (If you'd like to see a video of these steps, I loved this one). Spoon sausage mixture all around the ring (you'll need to really pile it high) and then tuck the points up and over the mixture. Bake until golden brown (let it get really golden to avoid doughiness), around 15 minutes. During the last few minutes of cooking, top it with cheddar cheese. Serve with salsa, cilantro, sour cream, chips, and guacamole. |
|
Метки: recipe meal |
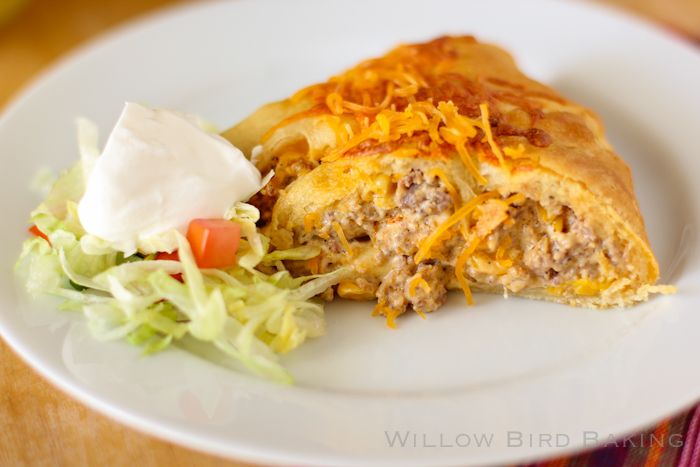
Sausage & Corn Chile Con Queso Taco Ring |
layers_of_eli at Sausage & Corn Chile Con Queso Taco Ring
| Sausage & Corn Chile Con Queso Taco Ring Recipe by: Willow Bird Baking Yield: 5-6 portions Forget your usual tacos and even your usual taco rings: this taco ring is an explosion of hot sausage con queso with green chiles. It's gonna blow your mind! And it's so easy to make. Ingredients: 1 (8-ounce) package cream cheese 1/2 cup sharp cheddar cheese, plus more for topping 2 tablespoons salsa of your choice 1 tablespoon diced green chiles 1 pound hot sausage olive oil (if needed) 1 1/2 cups frozen corn kernels 1 tablespoon taco seasoning 2 cans Pillsbury Crescent Rolls Directions: Preheat oven to 375 degrees F and cover a round pizza pan with foil sprayed with cooking spray (or use a pizza stone or baking sheet). Place cream cheese, cheese, salsa, and chiles in a large bowl and set aside. In a skillet over medium-high heat, brown the sausage. Remove the meat to a paper-towel lined plate to drain, reserving the grease in the skillet. As soon as sausage has drained for a minute, pour it into the cream cheese bowl. Set this aside to allow the cheeses to melt. In the meantime, pour corn kernels into the skillet over medium heat (adding a little olive oil if there's not enough grease) and cook 5-6 minutes or until heated through. Stir in 2 teaspoons of taco seasoning towards the end of cooking. Pour the hot corn over the cream cheese and sausage mixture. Stir together until well combined (it'll take a bit, but it'll come together). Carefully unroll packages of crescent rolls, separating them into long triangles. Place triangles, points out, in a sun-like ring (allowing bases of the triangles to overlap). Press down on the overlapping bases to flatten the center of the ring to a consistent thickness. (If you'd like to see a video of these steps, I loved this one). Spoon sausage mixture all around the ring (you'll need to really pile it high) and then tuck the points up and over the mixture. Bake until golden brown (let it get really golden to avoid doughiness), around 15 minutes. During the last few minutes of cooking, top it with cheddar cheese. Serve with salsa, cilantro, sour cream, chips, and guacamole. |

|
Метки: recipe meal |


