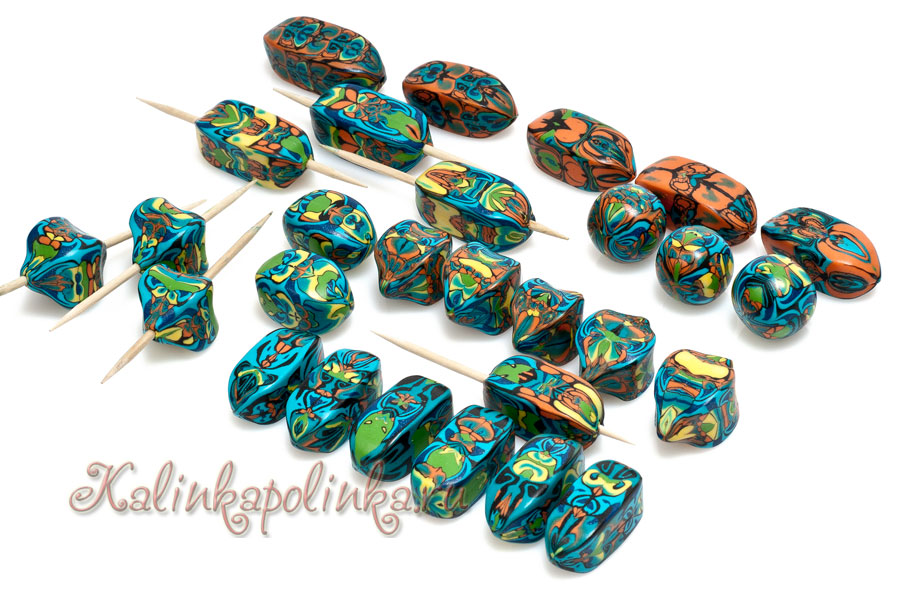
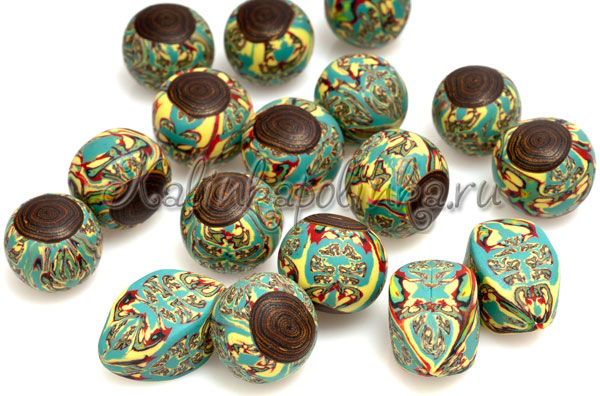
��������� ���������� ������ �� ������������ ��������. Natashas beads (������� ����) � ������ ��� �� ������� ����� |
������ �� ������������ ���������� Natashas beads �
������ ��� �� ������� �����- �� �� �������������� � Natasha Designs
��������� ���������� ������ �� ������������ ��������. Natashas beads (������� ����) - �� �� ��������������
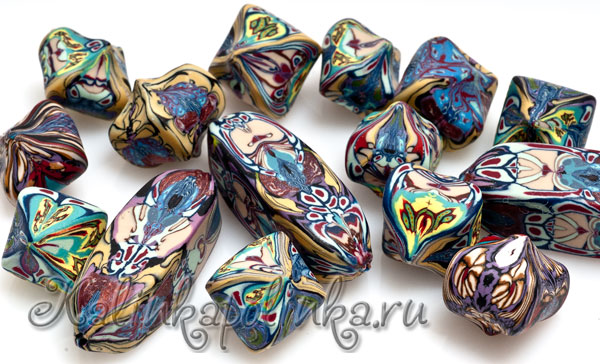
����, ��� ������ ��� ����� ������ ���, ���������� � ������������ �������� ������� (����� ������������ ��������� �������).
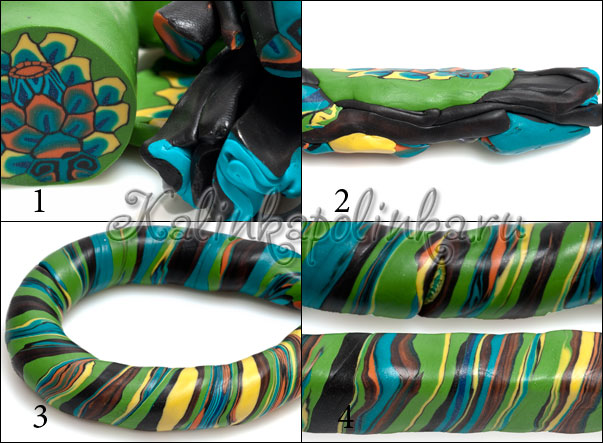
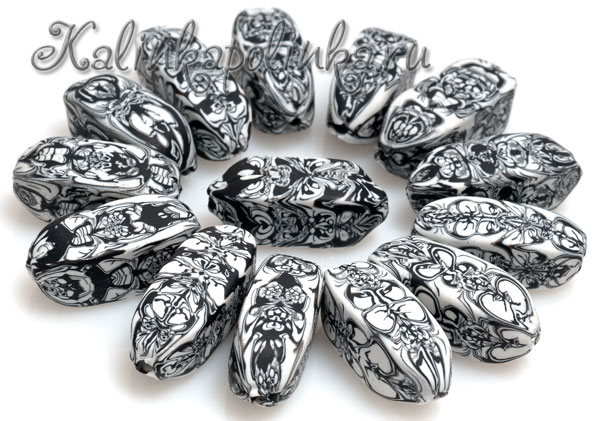
�� ���� � ��� ��� ������ ������� � �������-��������, ��� ��� ��� ������� �� ���� �������� � � ���� ������������ (����1).
��� ������� ��������� ������ � ��������. ��� ������ ����������� ����, ��� ������ ������� �������. ���� ���� ������� ������, �� ����� �������� ������ ��������� ����� ��� ��������������� (����2). ������ ��������, ��� ������ ����, ��� ������ ������, � �������� (����3). �������� ������ ���������� (����4).
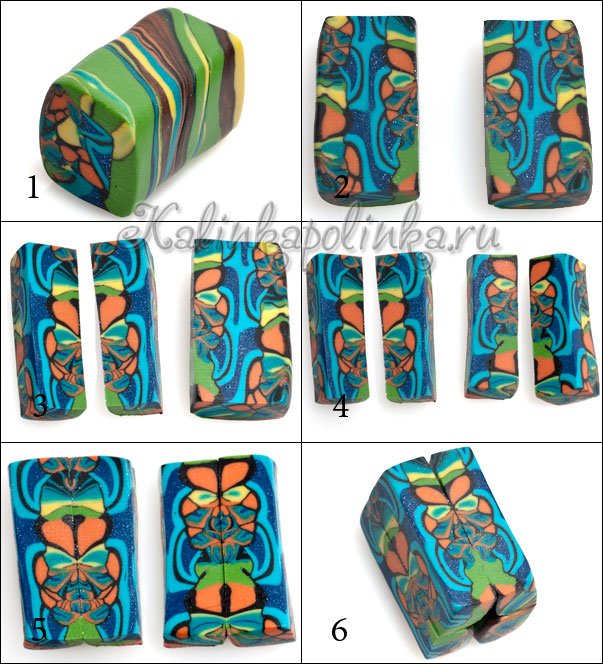
�������� ������� �� ������� �������� � ������� (����1). ��������� ��� �������, �� ��������������(����2).
������ ��������� ��������� ��� ��� ������� (����3) ��� ��������� ������ � ��� ��������� ����� ������������ ������ ����� (����4)� ���������, ���������� ������������ ���� (����5) ���������� ������������ ��������� ������� � ������, ��� ���� ���� �������, ������� ��� ������ �������� ������, �� ��� �� ��������� ������, ������, ����� �������������� ����� �� ���������� (����6). ������� �������, ��� ���������� �������, ������ ���� ����������� � ��� ���������.
���� ������� �������������� ����������� ����������, ���� ��� �������, � �� ���������� �������������� �������. � ������, ���� ��� ������� ������� ���������� ������� ������� � ������, �������� ������� ��� �������.
� ����� ������ ��������� ����������, ������ ����������� �����������, ����� ����� ��� � ����� ���������� ���������. �� ���� �����, ��� � ������ � ��� ��������� ���, � � ���� ��� ��������. ����� ����� ����� ��������� ������� ���������, ���� ��������� ����������� � ������ ������ �������.

�� ����� ���������� ������ ����� ������� ������� ����� �����, ����� ������ ���������� � �������� � �����, ����� ������ ����� �������� ��� ����� ������ � ���������. ��� � ���, �������� ������ ������������ �������� ��� ������������ ������ ����
��� ����������� ��� ��������� ��������� �����:
��� ������ �� �������� ������� �� ������ ��. ������ ������� ���� ������ �������
��� ������ �� �������� �����-����� ������� � �������
� ��� ������ ������� �� ����, ��� ����, ������������ ���������
http://www.kalinkapolinka.ru/publ/master_klassy/vo...aznocvetnykh_obrezkov/2-1-0-56
������ ��� �� ������� ����� � �������������� ��������

��� ��� ����������� ��� ������:
������ (�������������� � �� ������� ��������� � ����������), �������� ���� � �������� �����.
�� ��������� ������� ���� ���������� ������, ��������� ����� ���� ������. ����� ��������� ������ ���� ���������� ������, ����� ������� ����������� ��������� ������� �����. ��� �� ������ ������ ��� ������ ���������, �������, ����� � �������� ���� ��� ����������� �����, � �� ��������� ������. � �������� ����������� ���� ������ �������� ��������, ���� ����� ����� 10-15 ��, ������ ������.
����� ������ �������� �� �������, ������� � ���������� � ����� � ����������, ����� �� ������ ������. �������� ���� ������, ������ ������ ��� ������ ��������)
������ ���� � ��������, ������ ���� ���������, ������������ �������� � ������ �����, ��������� ����� ��� ������ � ������ ����� ����. �������� ���� �� �� �������� �������� ���������� ����� ����� �����, � ����� ���������� ��������. ����� ��� ������ ����� �������� � ������ ������ ����. ��� �������� ����� ������� ���� � ������, � �����.

��� ����� ���������� ����:

������ ����:
(��� ������� ������� � �������� ������������ ����� ��� �������������)

|
|
|
3. �� ������ ������ ������, �������� ��������� �������. ����� ����� ������� ��� ��� ��� �������� �������. |
|
4. ������ � ��������� �������� (�����������) ��� ��������� �� 3 �� 5 ���. �� ������ ��� ������� �� ������� �����, ���������� �� ������� ���� ������ |
5. ���������� ����� ���� ����� ����� � �������������, �.�. ������ ����� ���������������
|
6. �������� ���� ������������� ����� ����� |
|
7. �������� �����, ����� �������� 4 ������ ����� |
� �������� � �� ����� ������ �����. ��� � ������� ����� ����� �������, ��� � ���� ������! |
9. ����� ������1 � �������� �� ������������ �����, ������� ���� ��� �� ������� �����. |
|
10.������� ���������� �����! |
 11. Keep peeling, remember where the "X" is. 11. ������� ��� �����, �� �������, ��� �. |
 12. Lift the bottom up so that the "X" side is now on the bottom. 12. ��������� ���� ���� ���, ����� � ��� ������ �����. |
 13.Slide this back into it's original position, but you have turned it inside out and upside down! 13. ������� ��� ����� �� �������������� �����, �� �� ��� ��� ��������� ������ � ������ ����. |
 14. From the top you can see 3 sections with "X"'s haven't been moved yet, but our first one has been! 14. �� �����, ��� ������ 3 ����� � � ��� �� ������� �����, �� ������ ����� ��� �����������. |
 15. Now turn one quarter turn to the right and start peeling the next piece! 15. ������ ��������� ����������� ������ �� ������ ����� � ������ �� ������������ |
 16. Peel it down! 16. ��������� ���� |
 17. Slide it back into it's place. 17. �������� �� �� ���� �����. |
 18. We are actually half done with this, see two "X's" left. 18. �� ������� �������� ����, ����� �� � ����� |
 19. Another quarter turn, start peeling. 17. ������������� ���� ������ �����������, �������� ������������ |
20. ���������� ���������� ������� |
 21. Pull up the bottom and slide it into place. 20. �������������� ���� ���� � ������ �� ����� |
|
22. ��� ������� � �������� ����! |
 23. Quarter turn, Peel. 22. �������� ������������, ������������ |
 24. Peel, Lift 24. ������������, ��������� |
 25. Slide back in place 25. ������ �� ����� |
 26. Your basic moves are done! 26. ������� ����������� ������� |
|
|
|
 29. Start from the top of each side nad match up the pattern so that it is even on both sides. 29. ������� � ������� ����� ������ ������� ����������� ���, ����� ����� ��������� �� ����� �������� |
 30. Work your way down to the bottom of each side, being sure to hold on to all 4 pieces while your straightening up each seem. 30. ������� ����� �� ������ ����� ������ �������, ������� ��������� ��� 4 �����, �� ��� ��� ���� ��� 4 ������� �� ����� ����������. |
|
|
|
|
http://www.polymerclaycentral.com/poleigh/natasha.html
����� ��������� "��������":
����� 1 - ���������� ����� ��� ����������: �������� �������� � ������� ������ ������
����� 2 - ���������� ����� ��� ����������: ������� �������� ������ FIMO
...
����� 27 - ���������� �����: �������� �������� � �������� ����� - 2 ��
����� 28 - ���������� ����� ��� ����������:�������� �������� �� ���������� �����. ����������� ������ ������ � ������� �� ���������� �������
����� 29 - ��������� ���������� ������ �� ������������ ��������. Natashas beads (������� ����) � ������ ��� �� ������� �����
����� 30 - ������-����� �� ����� �� ���������� ����� - ������ � �������� "�������" � "�����"
����� 31 - ��������:��������� ����� �� ������� ������ ����������. ���� "����"� �������� ���� (�� �������)
...
����� 41 - ���������� �����: ���� ��� ���, ��� ��� ������� �������� ������. ��������� ���� �� Fimo ��� Premo. ��� ������� ������� ����
����� 42 - ����� ���������������� ����� ���� �� ����� ���������� ���������� ����� �� �� ������ ��������� (yefremova-shop)
����� 43 - ������� � ��������� ������ ��������� �������, ������� ���������� ������ (���������� � ��)
| �������: | ����, �����, ����������, �������, ��������/��������� �� ��������, ����, ������, ������� � �.� |
| �������������� | « ����. ������ — � �������� — ����. ������ » | ��������: [1] [�����] |


