Must-Have Tools For Any Kind Of Skilled Worker's Tool Kit |
Material Writer-Cain Reese
Are you a handyman on the hunt for the perfect tools to deal with any job? Look no further.
Whether you're taking care of a dripping faucet or constructing a bookshelf from square one, having the right collection of tools is essential.
From https://www.google.com/search?q=About+https:/busin...8894367430024?hl=en-US&tbm=ilp to power tools and customized tools, there's a large range of alternatives to consider. However where do you begin?
Well, that's what we will discover. So, order your toolbox and prepare to uncover the essential tools that every handyman requires.
|
Метки: Handyman Handyman Services Local Handyman Handyman Roof Repair Carpenter Handyman Commercial Handyman Services Family Handyman Handyman Business |
Essential Tools Every Handyman Demands In Their Arsenal |
Article By-Philipsen Anthony
Are you a handyman on the hunt for the perfect devices to take on any job? Look no more.
Whether you're taking care of a leaky faucet or constructing a shelf from scratch, having the appropriate toolbox of tools is vital.
From fundamental hand devices to power devices and specialized devices, there's a wide variety of alternatives to take into consideration. But where do you begin?
Well, that's what click to read to explore. So, grab your toolbox and get ready to find the must-have tools that every handyman needs.

|
Метки: Handyman Handyman Services Local Handyman Handyman Roof Repair Carpenter Handyman Commercial Handyman Services Family Handyman Handyman Business |
Staying Clear Of Usual Mistakes When Working With Handyman Providers |
Writer-Lee Casey
Did you know that a survey carried out last year located that virtually 40% of home owners have had a negative experience when working with handyman solutions? It's a shocking number that highlights the value of preventing typical mistakes when picking a handyman for your home improvement tasks.
But worry not, since in this conversation, we will certainly explore 3 vital mistakes to avoid: absence of research, failure to examine recommendations, and neglecting the importance of clear interaction.
By the end, you'll be outfitted with the understanding to make an educated decision and ensure an effective outcome for your following handyman hire.

|
Метки: Handyman Handyman Services Local Handyman Handyman Roof Repair Carpenter Handyman Commercial Handyman Services Family Handyman Handyman Business |
Discover The Must-Have Devices For Each Handyman! From Drills To Wrenches, Our Overview Has You Covered. Develop, Deal With, And Dominate Any Type Of Project With Self-Confidence |
Web Content Created By-Friis Rogers
Are you a handyman on the hunt for the excellent tools to take on any kind of task? Look no more.
Whether you're dealing with a leaky faucet or constructing a shelf from scratch, having the right toolbox of tools is essential.
From standard hand tools to power tools and specific tools, there's a vast array of alternatives to take into consideration. But where do you start?
Well, that's what we will explore. So, get your toolbox and prepare to discover the essential tools that every handyman requires.

|
Метки: Handyman Handyman Services Local Handyman Handyman Roof Repair Carpenter Handyman Commercial Handyman Services Family Handyman Handyman Business |
Preventing Typical Errors When Involving Handyman Providers |
Article Created By-Song Winkel
Did you recognize that a study carried out last year discovered that almost 40% of homeowners have had an unfavorable experience when employing handyman services? It's a staggering number that highlights the importance of avoiding usual mistakes when choosing a handyman for your home renovation jobs.
Yet anxiety not, since in this conversation, we will explore 3 key errors to prevent: absence of study, failing to inspect referrals, and ignoring the value of clear interaction.
By the end, you'll be geared up with the expertise to make an informed decision and make sure an effective outcome for your next handyman hire.
|
Метки: Handyman Handyman Services Local Handyman Handyman Roof Repair Carpenter Handyman Commercial Handyman Services Family Handyman Handyman Business |
Specialist Suggestions: What Every Home Owner Needs To Seek In A Specialist Handyman |
Created By-Birk Pierce
Did you know that over 70% of homeowners come across home maintenance problems that need the help of a professional handyman?
With so many choices offered, it can be frustrating to choose the right person for the task. Nevertheless, are afraid not! In this conversation, we will explore the essential high qualities that every house owner should look for when employing a professional handyman.
From their experience and expertise to their professionalism and dependability, there are important factors to think about.
By the end of this discussion, you will certainly have a clear understanding of what to seek in an expert handyman, ensuring that your home remains in qualified and trustworthy hands.

|
Метки: Handyman Handyman Services Local Handyman Handyman Roof Repair Carpenter Handyman Commercial Handyman Services Family Handyman Handyman Business |
Change Your Woodworking Tasks With Professional Finishing And Discoloring Strategies |
Authored By-Lund Camacho
Discolorations and surfaces contain solvents that evaporate, releasing harmful fumes. Gloves, eye protection and a respirator are necessary devices for taking care of these chemicals securely.
Dip your brush or dustcloth into the discolor, and scrub it into the timber, selecting the grain. Allow the tarnish sit for a couple of mins before wiping off any unwanted.
Preparation
Prior to you can discolor wood effectively, it is essential to effectively prepare the surface area. This consists of fining sand to smooth and level the wood, removing any kind of existing paint or coatings. Sanding also removes mill polish from new timber and loose timber fibers to help the discolor permeate and look its finest.
If the wood has any damages, openings or scratches, make use of a wood filler to address them before going on to discoloration. Also, make certain the weather condition is clear and dry prior to beginning. Moisture can interfere with discolor absorption and result in a flaky surface.
Discolorations are available in a wide range of colors and designs, so take the time to choose one that will certainly match your wood and fit your design. It's additionally a great idea to examine the color on a scrap item of wood or an unnoticeable location. https://www.woodworkingnetwork.com/news/woodworkin...ked-kitchen-remodeling-details will assist you prevent any type of shocks when the project is complete.
Tarnish
Tarnishing timber is all about bringing out the natural beauty of the grain while securing it from water. Bath Built Custom Furniture of discolor do this in different means, and there are some discolorations that will certainly keep the present appearance of your wood exterior siding and others that will entirely alter it (like paint would certainly).
You can use stains with a brush or cloth, yet we advise making use of a sponge tarnish brush. These brushes have a soft appearance that helps to spread out the discolor equally. You can likewise utilize a pump sprayer for larger projects. Just see to it to work in a well-ventilated location.
Prior to applying your discolor, lightly sand the surface of the timber to open up the pores and smooth away any type of rough spots. When the sanding is done, wipe down the wood with a clean fabric to remove any dirt. After a couple of hours, you can use your very first layer of tarnish. You'll need two or 3 coats to achieve a rich shade.
Seal
When you're ready to apply a sealant (we advise waiting 1 day so the stain can completely completely dry), it's best to make use of a tidy paintbrush to prevent air bubbles. Make certain to read the directions on the tag, and make sure you're in a warm area as most sealants require a particular temperature for maximum outcomes.
All woods take discolorations in different ways, so test the shade on a scrap piece of the actual task prior to using. You might likewise wish to try a various shade of discolor to compare the build-able protection and see how well it matches up with what you're looking for.
If you select to make use of an oil-based sealer like polyurethane or Tung Oil, start by mixing the combination extensively yet don't drink it. Then, dip a top notch brush into the finish and begin applying it to the whole surface, collaborating with the grain. You may need multiple coats to achieve the desired level of protection and gloss.
End up
If you want your wood job to last, it requires a durable finish. The most effective surface offers a combination of defense, appearance and convenience of workability. Finishes such as waxes, oils, shellacs, lacquers and varnishes supply varying levels of security and sturdiness. When picking a surface, keep in mind that no coating stands out in all of these high qualities: it is a trade-off.
Penetrating surfaces, such as linseed and tung oil, supply the highest level of defense because they penetrate deep right into the pores of the timber. These are the simplest to apply, as they can be applied and rubbed out prior to the tarnish dries.
For a water-based protective surface, use polyurethane. It is easier to deal with than many various other coatings because it is less unsafe, non-flammable and easy to remove from brushes and synthetic pads. It is important to comb in a well-ventilated area and use a foam brush. Constantly sand after the very first layer, making use of 280-grit sandpaper and vacuuming or tack rags to eliminate the dust.
Bringing Unique Woodworking Concepts To Life For Your Individual Room |
Team Writer-Maurer Yang
Crafting woodworking tasks is a rewarding and pleasing experience that can help you end up being a specialist in your craft. It needs precision cutting and joinery to make sure that the items fit together effortlessly.
Picture frames are a basic woodworking project that is usually profitable at craft fairs and online. Various other useful home items that market well consist of layer wall mounts and wooden kitchen tables.
Coat Hangers
You can turn coat wall mounts into a range of enjoyable craft projects. https://www.hawaiinewsnow.com/2022/05/23/consideri...ing-delays-product-scarcities/ are the most functional as a result of their flexible nature and capacity to flex in many different ways. Utilize them to make a special, distinctive image frame or to support plants in your garden.
You can additionally recycle them as a tie rack for your storage room or garage, or as a cute method to present your mail. If https://squareblogs.net/houston97kary/crafting-pra...furniture-a-woodworkers-manual do not wish to utilize them in your home, donate them to a second hand store or garments drive rather than tossing them away.
Jewelry Organizers
Jewelry organizers maintain ornaments arranged so they're not entangled, misplaced or accidentally threw. They come in many designs consisting of boxes, stands and trellis-like locket wall mounts that allow you see your jewelry at a look to prevent forgetting which jewelry match which pendants.
Boxes and drawers that are closed to safeguard your baubles are better for larger collections and great fashion jewelry, while open storage choices like jewelry trees and stands offer more display screen adaptability. Some can even double as traveling instances. Piling trays, over-the-door shelfs and Command hooks are also affordable options for storage space and company.
Couch Arm Table
When loosening up on the sofa, a couch arm table is the best way to keep your beverage, snacks and remote within reach. These tables are simple to make, and can be crafted from a selection of wood types and shades.
To craft your own, simply determine the dimension of your couch arm and utilize this formula to obtain the dimensions you'll require for both side pieces of timber:
Kitchen Table
The cooking area table is a symbol of togetherness and a room for family members routines. It likewise shows the special regular and daily routines of a functioning class home: ironing on washday, cooking in the daytime, and video game having fun at evenings and weekend breaks.
Include some storage to your kitchen area with a straightforward wood cabinet door flavor shelf. This easy-to-do project only needs a few days and some modest woodworking abilities.
This great woodworking job makes an excellent present for any solution participant in your life. Usage contrasting timbers with a mix of grains for a fashionable appearance that will certainly stand out in your armed forces close friend's living-room.
Garden Decoration
Woodworking tasks for the yard and backyard are a fantastic means to include aesthetic attract your home. Consider a wood home window planter to present your yard or plant for all to admire.
A birdhouse is an additional appealing and useful garden woodworking job that is simple sufficient for a beginner to craft. This set from danslelakehouse has a distinct layout that will stick out in any kind of backyard.
Another enjoyable woodworking concept for the yard is a DIY sign. A basic wooden indication can include personality and act as a functional design information to any type of backyard.
Rustic Wooden Signs
Rustic wood indicators make a great centerpiece for your home design. These very easy DIY tasks offer you the liberty to produce an item aligned with your individual design preferences and budget plan.
Utilizing a pattern and paint pens, map a layout or lettering onto the timber indicator. Alternatively, you can make use of a paint pen to draw a synopsis that you can complete with latex paint.
On the back of your sign, procedure 16" apart on both boards so you can hang them in wall surface studs once they are finished. Screw in brackets to finish the task.
Larger Home Decor Parts
Wood coasters add style to everyday drinking, a practical home accessory that can be very easy for starting woodworkers to craft. They are a preferred item for home design and can be individualized with engravings for gifting.
Image frameworks are another small woodworking job that sells well because of their capability and appearances. They can be made in a wide range of designs to match consumers' preferences, and they don't call for much woodworking ability to create.
Other practical timber tasks that sell well consist of wooden business card holders for an elegant and expert look and a basic wood clock. Rustic wooden utensil owners are another sensible cooking area item that can be made with unique layouts and supply a rustic and shoddy trendy style.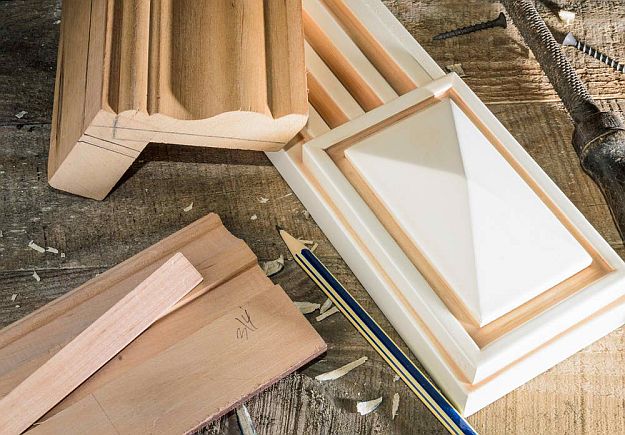
Tips For Establishing A Safe And Effective Woodworking Room At Home |
Posted By-Foster Payne
Clean your workshop frequently and organize your devices, products, and tools. Take into consideration utilizing a modular storage system with adjustable shelving to fit your needs and maximize area.
1. Keep It Tidy
Keeping your woodworking area tidy is a crucial step to efficient work. Clutter can create slides, stumbling and various other hazards. Roaming timber shavings can irritate the skin, while locating cords can be unsafe and even harmful.
Use a store vacuum cleaner or an air compressor with a dust nozzle to blow away sawdust and various other particles prior to they resolve. Make sure to use a respirator or mask to safeguard your lungs from great wood particulates, which can worsen allergic reactions, creating hissing and lack of breath.
Keep a supply system for materials to avoid overbuying and to save time looking for devices. Making use of wall-mounted shelfs and pegboards with identified storage space areas for your tools can help with this. Hanging a ceiling box for keeping clear containers of occasionally used devices can liberate flooring area and give you very easy accessibility to your products when needed.
2. Strategy Your Space
Whether you operate in a cavernous loft space or a spare room in the house or garage, and even in a shed out back, it's important to think through your store's format prior to getting started. Even if you eventually rearrange it a little bit, advancement preparation can make the difference in between an effective workshop and one where you invest a lot of your time irritated by the lack of space and the need to continuously shuffle tools around.
Begin by graphing the offered square footage, attracting scaled intermediaries of stationary tools, workbench and storage space remedies and explore different arrangements based upon a job triangular. You'll also wish to take into consideration existing barriers that can not be relocated, such as an entrance or cars and truck in the garage. Also https://blogfreely.net/berry641maida/every-woodwor...et-of-indispensable-devices-to where lumber and device storage will certainly go.
3. Keep It Organized
Organizing your shop isn't almost cleaning up the space. just click the following webpage 's about setting up a system that will certainly make it simple to keep an effective woodworking atmosphere.
As soon as your workshop is organized, it is essential to stick with a regular maintenance timetable. This might seem like a hassle, but it deserves the effort to have an effective office that will assist you function well and get jobs done right.
To maintain your workshop organized, utilize wall-mounted pegboards or device racks to store regularly utilized hand devices. Mounting drawer organizers and dividers can additionally help you arrange via your device collection, making it easy to find what you require when you're working. And don't forget to make use of above storage space: Ceiling-mounted racks can be an excellent means to keep lumber or devices that you don't make use of usually.
4. Obtain the Right Tools
Whether you're intending on woodworking as a hobby or career, having the right devices is essential. It can make all the difference in a job's outcome and your level of satisfaction.
Begin with https://squareblogs.net/ricardo04carolyne/crafting...furniture-a-woodworkers-manual , which ought to be customized to your elevation and functioning style. Ensure it can support the weight of any type of products you'll be utilizing.
Mark particular areas for storing lumber and sheet products based upon type and size, and execute an inventory system to help keep an eye on offered stock. This will certainly save you time and stress when searching for products and eliminate the possibility of overbuying.
Guarantee there suffices storage area for your power tools and products, including a locking door to prevent interested kids and pets from entering your workshop. Ideally, make your stationary power devices mobile by including wheels.
5. Keep It Safe
Woodshops been available in all sizes and shapes, from cavernous loft spaces to confined garages. However one thing they all have in common is that shop layout matters, a whole lot. Needing to shuffle tools around or hassle with moving devices in between jobs can swiftly make woodworking irritating and much less satisfying.
A home woodworking area needs to additionally be outfitted with the appropriate security tools, from dirt and fume filtering to hearing and eye security. And because a woodshop utilizes so much power, home owners ought to have a certified electrician ensure the home's electrical system can securely handle the workshop's electrical energy demands.
Ultimately, an excellent fire extinguisher is vital in any workshop. Woodworking creates lots of flammable material, from oily dustcloths to sawdust. The extinguisher ought to be in an easily available place so it's very easy to reach in case of a fire.
Authored By-McCollum Payne
Clean your workshop regularly and organize your tools, products, and tools. Think about using a modular storage space system with flexible shelving to fit your requirements and maximize space.
1. Keep It Tidy
Maintaining your woodworking room clean is a crucial action to effective job. Mess can trigger slips, stumbling and other hazards. Stray wood shavings can aggravate the skin, while locating cords can be unsafe and even lethal.
Make use of a shop vacuum cleaner or an air compressor with a dirt nozzle to surprise sawdust and other particles prior to they settle. See to it to put on a respirator or mask to shield your lungs from fine timber particulates, which can aggravate allergies, causing hissing and lack of breath.
Maintain a stock system for products to stop overbuying and to conserve time searching for tools. Utilizing wall-mounted shelfs and pegboards with identified storage areas for your devices can aid with this. Hanging a ceiling box for saving clear bins of rarely used devices can free up floor area and give you very easy accessibility to your products when required.
2. Plan Your Room
Whether you work in a cavernous loft space or an extra area in your house or garage, or perhaps in a shed out back, it is essential to think through your store's layout before beginning. Even if you eventually reposition it a bit, advancement preparation can make the difference in between a reliable workshop and one where you spend much of your time irritated by the lack of room and the requirement to regularly shuffle tools around.
Begin by graphing the available square video, attracting scaled intermediaries of stationary devices, workbench and storage services and try out various setups based on a work triangular. You'll likewise want to take into consideration existing barriers that can not be relocated, such as an entrance or vehicle in the garage. Also strategy where lumber and tool storage will certainly go.
3. Maintain It Organized
Organizing your shop isn't nearly cleaning up the area. It's about setting up a system that will make it simple to maintain an effective woodworking atmosphere.
As soon as your workshop is organized, it is necessary to stick with a normal upkeep timetable. This might seem like a problem, yet it's worth the effort to have an effective work area that will assist you function well and obtain tasks done right.
To keep your workshop organized, use wall-mounted pegboards or device racks to store often used hand devices. Setting up cabinet organizers and divider panels can also help you sort through your device collection, making it easy to find what you need when you're functioning. And do not neglect to make use of overhanging storage space: Ceiling-mounted shelfs can be a wonderful means to save lumber or devices that you don't use frequently.
4. Obtain the Right Devices
Whether you're planning on woodworking as a pastime or occupation, having the right devices is vital. visit this web-site can make all the distinction in a job's end result and your level of satisfaction.
Start with the workbench, which need to be tailored to your elevation and working design. Make sure it can sustain the weight of any type of products you'll be utilizing.
Designate certain areas for saving lumber and sheet products based on type and dimension, and implement a stock system to assist monitor available supply. This will conserve you time and stress when looking for materials and eliminate the possibility of overbuying.
Make certain there's enough storage space for your power devices and materials, including a locking door to prevent interested kids and pet dogs from getting inside your workshop. If possible, make your fixed power devices mobile by including wheels.
5. Keep It Safe
Woodshops come in all sizes and shapes, from spacious loft spaces to cramped garages. But one point they all have in common is that store layout matters, a great deal. Having to shuffle tools around or difficulty with moving equipment between jobs can rapidly make woodworking aggravating and much less pleasurable.
A home woodworking area needs to additionally be outfitted with the appropriate security tools, from dirt and fume filtration to hearing and eye security. And because a woodshop uses so much power, homeowners must have a certified electrician ensure the home's electrical system can safely handle the workshop's power requirements.
Lastly, go to this website is vital in any kind of workshop. Woodworking develops lots of combustible product, from oily dustcloths to sawdust. The extinguisher needs to remain in a readily available location so it's easy to reach in case of a fire.
Creating Unique Woodworking Tasks For Your Residence |
Short Article By-George Zacho
Crafting woodworking tasks is a satisfying and pleasing experience that can assist you end up being an expert in your craft. It calls for accuracy cutting and joinery to make sure that the items fit together effortlessly.
Picture frameworks are a basic woodworking project that is commonly rewarding at craft fairs and online. Various other practical home items that offer well include coat wall mounts and wood kitchen tables.
Coat Hangers
You can turn coat hangers into a range of fun craft tasks. Wire wall mounts are one of the most versatile because of their flexible nature and capability to flex in several ways. Utilize them to make a special, captivating picture frame or to sustain plants in your garden.
You can likewise recycle them as a tie shelf for your storage room or garage, or as a charming way to show your mail. If you do not want to use them in your home, contribute them to a thrift shop or clothes drive instead of tossing them away.
Fashion jewelry Coordinators
Fashion jewelry coordinators maintain ornaments organized so they're not tangled, lost or mistakenly threw. They can be found in many designs consisting of boxes, stands and trellis-like pendant wall mounts that let you view your precious jewelry at a glance to avoid neglecting which earrings match which necklaces.
Boxes and drawers that are closed to safeguard your baubles are much better for larger collections and great fashion jewelry, while open storage space choices like precious jewelry trees and stands deal even more display screen adaptability. Some can also double as travel situations. Stacking trays, over-the-door racks and Command hooks are also affordable alternatives for storage and company.
see this page
When relaxing on the couch, a sofa arm table is the best way to maintain your drink, treats and remote available. These tables are simple to make, and can be crafted from a variety of timber types and shades.
To craft your own, merely identify the dimension of your couch arm and utilize this formula to get the dimensions you'll require for both side items of timber:
Kitchen area Table
The kitchen table is a symbol of togetherness and an area for household routines. It also shows the distinct weekly and day-to-day routines of a functioning class home: ironing on washday, food preparation in the daytime, and game having fun at evenings and weekends.
Include some storage space to your kitchen with a simple timber cupboard door seasoning rack. This easy-to-do job only needs a couple of days and some moderate woodworking abilities.
This trendy woodworking project makes an excellent present for any type of service participant in your life. Use contrasting timbers with a mix of grains for a fashionable appearance that will certainly stick out in your military buddy's living room.
Yard Design
Woodworking projects for the yard and yard are an excellent way to include visual attract your home. Consider a wooden home window planter to show your yard or greenery for all to appreciate.
A birdhouse is another eye-catching and sensible yard woodworking task that is very easy sufficient for a newbie to craft. This set from danslelakehouse has a special style that will attract attention in any yard.
An additional enjoyable woodworking concept for the yard is a do it yourself indication. https://blogfreely.net/cindy49horace/crafting-smoo...p-by-step-overview-for-novices can add character and function as a functional design detail to any kind of yard.
Rustic Wood Indications
Rustic wood indicators make a terrific centerpiece for your home design. These easy do it yourself jobs give you the liberty to create a piece aligned with your personal design choices and spending plan.
Using a stencil and paint pens, map a design or lettering onto the timber indication. Alternatively, you can use a paint pen to draw an outline that you can fill in with latex paint.
On the back of your indication, procedure 16" apart on both boards so you can hang them in wall surface studs once they are completed. Screw in brackets to complete the task.
Larger Home Decor Parts
Wood coasters include design to everyday alcohol consumption, a functional home device that can be simple for starting woodworkers to craft. They are a prominent thing for home style and can be personalized with engravings for gifting.
Photo frameworks are one more small woodworking project that offers well as a result of their capability and aesthetics. They can be made in a wide variety of designs to fit customers' tastes, and they don't require much woodworking ability to create.
Other useful timber jobs that sell well include wooden business card holders for a chic and specialist appearance and a straightforward wood clock. Rustic wood tool holders are an additional functional kitchen product that can be made with unique designs and provide a rustic and shoddy posh design.
Bringing Distinct Woodworking Concepts To Life For Your Personal Space |
Content Writer-Anthony Zacho
Crafting woodworking jobs is a satisfying and rewarding experience that can aid you come to be a specialist in your craft. It needs precision cutting and joinery to make certain that the items mesh perfectly.
Picture frames are an easy woodworking project that is often lucrative at craft fairs and online. Other useful home products that sell well include layer hangers and wood kitchen tables.
Coat Hangers
You can turn coat wall mounts right into a selection of fun craft tasks. Cable hangers are the most flexible as a result of their pliable nature and ability to bend in many different ways. Utilize them to make an unique, distinctive photo frame or to sustain plants in your garden.
You can likewise reuse them as a tie shelf for your closet or garage, or as a cute means to display your mail. If you don't want to utilize them in your house, contribute them to a second hand shop or clothes drive rather than tossing them away.
Precious jewelry Coordinators
Precious jewelry organizers maintain trinkets arranged so they're not entangled, misplaced or mistakenly threw. They come in lots of styles including boxes, stands and trellis-like necklace hangers that let you watch your precious jewelry at a glance to stop neglecting which jewelry match which pendants.
Boxes and cabinets that are closed to safeguard your knickknacks are better for larger collections and great precious jewelry, while open storage space alternatives like precious jewelry trees and stands offer even more display screen versatility. Some can also function as travel cases. Stacking trays, over-the-door racks and Command hooks are also budget friendly options for storage and company.
Sofa Arm Table
When loosening up on the couch, a couch arm table is the perfect means to keep your beverage, snacks and remote accessible. These tables are simple to make, and can be crafted from a range of wood types and colors.
To craft your very own, merely determine the dimension of your sofa arm and utilize this formula to obtain the sizes you'll need for the two side items of wood:
Cooking area Table
The kitchen table is an icon of togetherness and an area for household routines. It likewise shows the special regular and everyday routines of a functioning class home: ironing on washday, cooking in the daytime, and video game having fun at evenings and weekend breaks.
Include some storage to your kitchen with a straightforward wood cabinet door seasoning shelf. This easy-to-do job just requires a few days and some moderate woodworking skills.
This awesome woodworking project makes an exceptional gift for any solution participant in your life. Use contrasting timbers with a mix of grains for a fashionable look that will stand apart in your military buddy's living room.
https://www.digitaljournal.com/pr/news/press-advan...pe-kitchen-remodeling-services
Woodworking jobs for the yard and yard are a great method to add curb appeal to your home. Consider a wood home window planter to display your garden or plant for all to admire.
A birdhouse is one more captivating and functional garden woodworking project that is simple enough for a beginner to craft. This from danslelakehouse has an unique layout that will stick out in any kind of yard.
One more fun woodworking idea for the garden is a DIY indicator. A straightforward wooden indicator can add character and act as a functional design detail to any kind of backyard.
Rustic Wood Indicators
Rustic wooden signs make a fantastic centerpiece for your home decor. Basement Wet Bar do it yourself tasks give you the liberty to create an item straightened with your individual style choices and budget plan.
Making use of a pattern and paint pens, trace a style or lettering onto the timber sign. Additionally, you can make use of a paint pen to attract a summary that you can fill out with latex paint.
On the back of your sign, step 16" apart on both boards so you can hang them in wall studs once they are completed. Screw in braces to complete the project.
Larger Home Style Pieces
Wood rollercoasters add style to everyday alcohol consumption, an useful home accessory that can be very easy for starting woodworkers to craft. They are a preferred thing for home design and can be individualized with inscriptions for gifting.
Photo frameworks are one more little woodworking job that markets well as a result of their performance and visual appeals. They can be made in a wide variety of styles to fit clients' preferences, and they don't require much woodworking skill to develop.
Various other practical timber projects that market well consist of wood calling card holders for a posh and professional look and a simple wooden clock. Rustic wood utensil holders are one more practical kitchen area thing that can be made with one-of-a-kind layouts and offer a rustic and shabby posh style.
The Ultimate Guide To Finishing And Staining Wood Like A Pro |
Developed By-Madden Terkelsen
Discolorations and coatings consist of solvents that evaporate, releasing poisonous fumes. Handwear covers, eye security and a respirator are vital tools for dealing with these chemicals securely.
Dip your brush or rag right into the tarnish, and massage it right into the wood, opting for the grain. Allow the tarnish sit for a few mins before rubbing out any extra.
Preparation
Prior to you can stain wood efficiently, it is necessary to correctly prepare the surface area. Custom Picnic Tables includes sanding to smooth and level the timber, eliminating any type of existing paint or finishes. Sanding additionally removes mill glaze from new timber and loose wood fibers to aid the stain pass through and look its ideal.
If Custom Design Table Runner has any damage, openings or scrapes, utilize a timber filler to resolve them before carrying on to staining. Additionally, ensure the weather condition is clear and completely dry before starting. Wetness can disrupt stain absorption and lead to a flaky coating.
Discolorations can be found in a wide range of colors and designs, so take the time to choose one that will certainly complement your wood and fit your style. It's likewise a good concept to evaluate the shade on a scrap piece of wood or an inconspicuous location. This will certainly help you stay clear of any type of surprises when the task is complete.
Tarnish
Tarnishing timber is all about highlighting the all-natural appeal of the grain while shielding it from water. Different kinds of stain do this in different ways, and there are some stains that will maintain the present look of your wood siding and others that will completely alter it (like paint would certainly).
You can apply discolorations with a brush or dustcloth, yet we advise making use of a sponge discolor brush. These brushes have a soft texture that aids to spread the stain uniformly. You can also utilize a pump sprayer for bigger tasks. Simply ensure to work in a well-ventilated location.
Before using your discolor, lightly sand the surface of the wood to open the pores and smooth away any type of rough spots. As soon as the sanding is done, wipe down the timber with a clean fabric to remove any dust. After a couple of hours, you can apply your initial layer of stain. You'll require 2 or 3 layers to achieve a rich color.
Seal
When you prepare to use a sealant (we suggest waiting 1 day so the tarnish can totally completely dry), it's ideal to make use of a tidy paintbrush to prevent air bubbles. Make certain to review the directions on the tag, and make certain you remain in a cozy space as the majority of sealers call for a certain temperature level for maximum results.
All woods take spots in different ways, so examine the shade on a scrap item of the real job prior to applying. You might also intend to attempt a different color of discolor to compare the build-able insurance coverage and see just how well it compares with what you're trying to find.
If you select to use an oil-based sealer like polyurethane or Tung Oil, start by stirring the mixture extensively but don't shake it. After that, dip a premium brush into the coating and begin using it to the entire surface, collaborating with the grain. You may require several coats to achieve the wanted level of security and gloss.
End up
If you want your timber task to last, it needs a sturdy finish. The most effective surface uses a combination of defense, look and convenience of workability. https://writeablog.net/spencer99belva/crafting-smo...by-step-overview-for-beginners as waxes, oils, shellacs, lacquers and varnishes provide varying levels of defense and resilience. When selecting a finish, remember that no coating succeeds at all of these top qualities: it is a trade-off.
Penetrating surfaces, such as linseed and tung oil, give the highest degree of protection due to the fact that they pass through deep into the pores of the timber. These are the simplest to use, as they can be used and rubbed out before the tarnish dries.
For a water-based protective surface, use polyurethane. It is less complicated to work with than a lot of various other finishes because it is less hazardous, non-flammable and very easy to remove from brushes and artificial pads. It is very important to brush in a well-ventilated area and utilize a foam brush. Always sand after the first layer, utilizing 280-grit sandpaper and vacuuming or tack dustcloths to remove the dust.
Change Your Woodworking Projects With Professional-Grade Finishing And Discoloration Techniques |
Authored By-Carrillo Terkelsen
Discolorations and coatings have solvents that vaporize, launching toxic fumes. Handwear covers, eye security and a respirator are essential devices for dealing with these chemicals securely.
Dip click over here now or rag right into the tarnish, and rub it right into the timber, choosing the grain. Allow the discolor sit for a few mins before rubbing out any extra.
https://www.elledecor.com/home-remodeling-renovati...0799496/my-contractor-ghosted/ to you can stain wood efficiently, it's important to effectively prepare the surface. This includes fining sand to smooth and level the timber, getting rid of any kind of existing paint or coatings. Sanding likewise eliminates mill glaze from new wood and loosened wood fibers to aid the stain penetrate and look its best.
If the wood has any kind of damages, holes or scrapes, utilize a timber filler to address them before carrying on to discoloration. Additionally, make certain the climate is clear and dry before beginning. Dampness can interfere with discolor absorption and lead to a half-cracked coating.
Discolorations can be found in a wide variety of shades and styles, so make the effort to select one that will certainly match your timber and fit your design. It's additionally a great idea to check the shade on a scrap piece of wood or a low-profile area. This will certainly assist you stay clear of any surprises when the task is full.
Discolor
Discoloring timber is all about highlighting the all-natural beauty of the grain while shielding it from water. Various sorts of stain do this in different ways, and there are some spots that will maintain the current look of your timber siding and others that will totally transform it (like paint would certainly).
You can use stains with a brush or rag, however we suggest utilizing a sponge stain brush. These brushes have a soft structure that aids to spread the discolor equally. You can likewise make use of a pump sprayer for bigger jobs. Simply make sure to work in a well-ventilated area.
Before using your tarnish, gently sand the surface area of the wood to open up the pores and smooth away any type of rough spots. Once the sanding is done, wipe down the wood with a tidy fabric to get rid of any dirt. After a couple of hours, you can use your initial coat of discolor. You'll require two or 3 layers to achieve a rich color.
Seal
When you're ready to use a sealer (we recommend waiting 24 hr so the tarnish can fully completely dry), it's finest to use a clean paintbrush to avoid air bubbles. Be sure to review the instructions on the label, and see to it you remain in a warm area as a lot of sealers need a certain temperature level for optimal results.
All woods take stains in a different way, so test the shade on a scrap item of the real job before applying. You may also want to attempt a various shade of tarnish to compare the build-able protection and see exactly how well it matches up with what you're seeking.
If you pick to make use of an oil-based sealant like polyurethane or Tung Oil, start by mixing the combination extensively yet don't tremble it. After that, dip a high-quality brush into the finish and begin using it to the whole surface area, dealing with the grain. You may need numerous layers to attain the desired level of protection and gloss.
End up
If you desire your wood task to last, it needs a sturdy surface. The best coating offers a mix of protection, look and simplicity of workability. Coatings such as waxes, oils, shellacs, lacquers and varnishes use varying degrees of security and resilience. When picking a coating, remember that no surface stands out at all of these top qualities: it is a trade-off.
Penetrating surfaces, such as linseed and tung oil, offer the highest level of security due to the fact that they permeate deep right into the pores of the wood. These are the simplest to apply, as they can be applied and rubbed out before the stain dries.
For a water-based protective surface, usage polyurethane. It is much easier to deal with than many various other coatings since it is less harmful, non-flammable and very easy to eliminate from brushes and artificial pads. It is essential to brush in a well-ventilated location and make use of a foam brush. Constantly sand after the initial layer, using 280-grit sandpaper and vacuuming or tack cloths to eliminate the dust.
Steering Clear Of Woodworking Errors: Suggestions For Novices |
Material Author-Medeiros Gilmore
Woodworking is a craft that calls for accuracy. Even the smallest blunder can ruin your task. Fortunately, you can stay clear of making these errors by complying with these tips from DIY professional Timisha Porcher.
Keep in mind to gauge accurately and double-check your measurements before cutting. Additionally, know the blade kerf so your cuts are precise.
Not Determining Accurately
When working with timber, even little mistakes can impact the quality of the final product. This is why it is important to take your time and ascertain your measurements prior to cutting any kind of wood. Simply put, "measure two times, cut once."
just click the up coming site 's likewise crucial to use the correct safety gear when dealing with woodworking devices. This consists of wearing a dirt mask to avoid inhaling the great sawdust bits that can be damaging to your health. It's likewise an excellent idea to use protective eyeglasses to avoid any injuries from sharp blades.
An additional error that beginner woodworkers typically make is stopping working to appropriately adjust the timber they're using. This can result in pieces that don't fit together appropriately or become misshapen in time. To avoid this, you should always allow your timber acclimate for a minimum of 24 hours before beginning to work with it. This will certainly make certain that the timber is at its ideal dampness degree. It will likewise enable it to expand and contract more evenly.
Not Accepting the All-natural Grain of the Wood
The all-natural grain of the timber is a crucial element that contributes to the looks and architectural honesty of a finished piece. https://www.washingtonpost.com/business/2021/04/01...an-help-you-find-reliable-one/ is necessary to focus on the instructions of the timber grain and deal with it instead of against it to make sure ideal results.
It is additionally crucial to be familiar with how the wood responds to modifications in temperature level and wetness. Incorrectly allowing for this activity can cause mismeasured pieces and eventually poor-fitting joints. This is why it is vital to always adjust the wood prior to utilizing it.
Lastly, it is essential to make the effort to very carefully choose the best tool for the task and recognize its objective. Avoiding these actions can diminish the quality of a project and potentially damage or wound the product. Likewise, it is important to keep blades sharp and appropriately preserved to guarantee secure, efficient usage. A dull blade slows you down and might cause injuries if you force it right into the material or other components.
Skipping the Finishing and Fining Sand Actions
Whether you're utilizing wood for trim, kitchen cabinetry or furniture, it will certainly need some type of ending up to look its finest. Many novice woodworkers avoid these steps, but the result isn't rather. Skipping a step can result in unequal surface areas and problems in the wood that will become extra obvious once a tarnish is applied.
Not correctly sanding the wood prior to applying a surface can additionally be an issue. Avoiding grits or fining sand also gently can leave rugged scratches that will certainly appear once the item is ended up and discolored. It is necessary to utilize the appropriate grit for each action and not skip a grit when transforming from one sort of sandpaper to one more.
Other errors woodworkers make include misreading dimensions and using a boring blade. A boring blade can lead to a harsh cut or misaligned item that will call for manual labor to fix, or may also be unusable. To prevent these issues, take your time and always determine precisely.
Using the Incorrect Device for the Job
Woodworking requires patience and interest to detail. Hurrying the procedure or using the incorrect tool for a task can bring about pricey blunders that influence the final product. Always put in the time to double-check measurements, utilize appropriate devices for accuracy cutting, and enable modifications in temperature level and moisture.
Misreading a dimension is discouraging, especially when you've already hung around milling matching dados or made joinery cuts. It's additionally essential to keep in mind that timber can broaden or acquire depending on its environment. This is why leaving area for development joints or including joinery methods that suit activity are so crucial.
Lastly, utilizing plain or incorrectly readjusted tools is dangerous and can trigger damage to the timber and your hands. Make sure all your tools are sharp and properly maintained, and wear safety tools consisting of shatterproof glass, ear plugs, and a dirt mask to stop injury. Keeping a tidy and well organized workspace will additionally improve performance and help reduce the opportunities of accidents.
The Ultimate Overview To Finishing And Discoloration Timber Like A Pro |
Uploaded By-Casey May
Stains and surfaces contain solvents that evaporate, launching hazardous fumes. Handwear covers, eye security and a respirator are essential tools for taking care of these chemicals safely.
Dip https://mgyb.co/s/mBGQS or rag into the tarnish, and massage it into the timber, going with the grain. Let https://www.dallasnews.com/abode/2023/06/08/renova...nd-a-contractor-you-can-trust/ sit for a few minutes prior to wiping off any extra.
Prep
Prior to you can stain wood efficiently, it is essential to effectively prepare the surface area. This includes fining sand to smooth and level the timber, getting rid of any type of existing paint or finishes. Sanding also removes mill polish from brand-new wood and loose timber fibers to assist the discolor penetrate and look its best.
If the timber has any damage, openings or scratches, make use of a timber filler to address them before carrying on to discoloration. Also, see to it the climate is clear and dry prior to starting. Wetness can interfere with discolor absorption and lead to a flaky coating.
Discolorations are available in a wide variety of shades and styles, so make the effort to pick one that will certainly complement your wood and fit your design. It's also an excellent concept to evaluate the shade on a scrap piece of timber or a low-profile location. This will assist you avoid any shocks when the task is complete.
Discolor
Tarnishing timber is all about highlighting the natural elegance of the grain while shielding it from water. Different sorts of tarnish do this in different means, and there are some discolorations that will maintain the present look of your wood siding and others that will completely transform it (like paint would certainly).
You can use discolorations with a brush or cloth, but we recommend utilizing a sponge discolor brush. These brushes have a soft structure that helps to spread out the stain uniformly. You can also use a pump sprayer for bigger tasks. Just see to it to operate in a well-ventilated location.
Prior to using your stain, gently sand the surface area of the timber to open the pores and smooth away any kind of rough spots. When the sanding is done, clean down the timber with a clean cloth to eliminate any dirt. After a few hours, you can use your initial layer of tarnish. You'll require two or 3 coats to attain a rich color.
Seal
When you prepare to apply a sealant (we recommend waiting 1 day so the tarnish can fully completely dry), it's ideal to utilize a tidy paintbrush to prevent air bubbles. Make sure to review the instructions on the tag, and make certain you remain in a warm space as many sealants require a certain temperature level for maximum outcomes.
All woods take stains in different ways, so examine the color on a scrap piece of the actual job prior to using. You might also wish to attempt a different color of tarnish to contrast the build-able protection and see just how well it matches up with what you're looking for.
If you pick to utilize an oil-based sealer like polyurethane or Tung Oil, begin by mixing the mixture completely but do not shake it. Then, dip a high-quality brush right into the finish and begin applying it to the whole surface area, working with the grain. You might need several coats to achieve the preferred degree of security and gloss.
Finish
If you want your wood job to last, it requires a resilient coating. The best surface supplies a combination of defense, appearance and simplicity of workability. Surfaces such as waxes, oils, shellacs, lacquers and varnishes provide varying levels of security and longevity. When choosing a coating, remember that no finish succeeds whatsoever of these top qualities: it is a trade-off.
Passing through finishes, such as linseed and tung oil, supply the highest degree of protection because they pass through deep right into the pores of the timber. These are the most convenient to apply, as they can be applied and wiped off prior to the discolor dries.
For a water-based protective surface, usage polyurethane. It is much easier to collaborate with than most various other finishes since it is less hazardous, non-flammable and simple to eliminate from brushes and synthetic pads. It is necessary to brush in a well-ventilated location and make use of a foam brush. Constantly sand after the very first layer, utilizing 280-grit sandpaper and vacuuming or tack dustcloths to get rid of the dirt.
Change Your Woodworking Jobs With Professional-Grade Finishing And Discoloration Techniques |
Web Content By-Lund Camacho
Spots and finishes include solvents that evaporate, launching poisonous fumes. Handwear covers, eye defense and a respirator are vital devices for handling these chemicals securely.
Dip Semi Custom Kitchen Cabinets or rag into the discolor, and rub it right into the timber, going with the grain. Let the stain sit for a few mins prior to wiping off any kind of unwanted.
Preparation
Prior to you can tarnish timber effectively, it is necessary to effectively prepare the surface. This includes sanding to smooth and level the wood, removing any kind of existing paint or coatings. Sanding additionally gets rid of mill glaze from new timber and loosened wood fibers to assist the stain penetrate and look its finest.
If the wood has any damage, openings or scratches, use a timber filler to resolve them before going on to staining. Also, ensure the weather condition is clear and completely dry before starting. Wetness can interfere with stain absorption and lead to a flaky finish.
Stains come in a wide variety of colors and styles, so make the effort to select one that will certainly match your wood and fit your style. It's likewise a great concept to check the color on a scrap piece of wood or an inconspicuous area. This will certainly aid you prevent any kind of surprises when the job is complete.
visit the next site
Tarnishing timber is everything about highlighting the natural beauty of the grain while securing it from water. Various kinds of tarnish do this in various methods, and there are some discolorations that will maintain the present appearance of your timber siding and others that will entirely change it (like paint would certainly).
You can use spots with a brush or rag, but we suggest making use of a sponge discolor brush. These brushes have a soft texture that assists to spread out the discolor evenly. You can additionally use a pump sprayer for larger tasks. Just see to it to operate in a well-ventilated location.
Before using your tarnish, lightly sand the surface area of the wood to open up the pores and smooth away any rough spots. Once the sanding is done, clean down the wood with a tidy towel to remove any dust. After a couple of hours, you can use your first layer of discolor. You'll require two or 3 coats to achieve an abundant color.
Seal
When you prepare to apply a sealer (we recommend waiting 1 day so the discolor can totally completely dry), it's finest to use a tidy paintbrush to avoid air bubbles. Make sure to check out the directions on the label, and see to it you're in a cozy space as most sealers require a certain temperature for maximum results.
All woods take spots in a different way, so evaluate the shade on a scrap piece of the real task prior to applying. You might likewise want to attempt a different shade of tarnish to contrast the build-able protection and see how well it pairs up with what you're searching for.
If you pick to utilize an oil-based sealer like polyurethane or Tung Oil, beginning by mixing the mix completely but don't tremble it. Then, dip a top notch brush right into the surface and start applying it to the whole surface, dealing with the grain. You may need several coats to attain the wanted level of defense and gloss.
Finish
If you desire your timber task to last, it needs a sturdy finish. The best coating supplies a combination of defense, appearance and ease of workability. Surfaces such as waxes, oils, shellacs, lacquers and varnishes offer varying degrees of protection and longevity. When picking a surface, keep in mind that no finish succeeds in all of these high qualities: it is a trade-off.
Permeating coatings, such as linseed and tung oil, provide the highest degree of security due to the fact that they pass through deep into the pores of the wood. These are the simplest to use, as they can be used and rubbed out prior to the stain dries.
For a water-based safety coating, usage polyurethane. It is much easier to collaborate with than the majority of other finishes because it is less dangerous, non-flammable and easy to eliminate from brushes and synthetic pads. It is essential to brush in a well-ventilated area and make use of a foam brush. Always sand after the initial layer, using 280-grit sandpaper and vacuuming or tack cloths to get rid of the dust.
Are You All Set To Find Expert Pointers For A Smooth Cooperation With Residence Painters That Will Make Your Paint Job A Trouble-Free Experience? |
Article Created By-Banks Parks
Have you ever wondered exactly how to make sure a seamless collaboration with home painters? Well, look no further. In this conversation, we will check out expert ideas that can assist you attain simply that.
From establishing clear assumptions to reliable interaction and managing timelines and spending plan, we will explore the methods that can make your partnership with home painters a smooth and effective one.
So, allow's dive in and discover exactly how you can make your painting project a stress-free experience.

Illuminating The Transformative Power Of Residence Painters, Uncover Exactly How They Can Transform Your Home Into An Awesome Masterpiece With Their Amazing Abilities |
Write-Up Written By-Ward Juel
So, you believe you can transform your home right into a beautiful work of art all on your own? Well, simply click for source of luck with that said. While it might feel like an easy job, residence paint is an art type that needs the abilities and competence of specialist painters.
However do not fret, this discussion is not concerning making you really feel insufficient. As a matter of fact, it's quite the opposite. By the time you finish this paragraph, you'll be itching to get that phone and call a house painter to function their magic on your area.
Believe me, you won't want to lose out on the unbelievable means they can transform your home.

Here Are Some Inquiries To Consider You Should Ask To Guarantee That You're Making The Right Decision: |
Post By-Jespersen Burgess
By asking these concerns, you can get a better sense of the painter's credentials, pricing, and strategy to the project. This will aid you make a notified decision and ensure that you more than happy with the result.
1. What is your experience and reputation in the market?
2. Can you give recommendations from previous clients?
3. What is your pricing structure, and what is included in the expense?
4. What sort of paint do you use, and what are the environmental effects?
5. Do you have the essential licenses and insurance coverage?
6. What is your policy on cleaning up and shielding our possessions throughout the painting process?
7. How much time will the task take, and what is the payment timetable?
8. What kind of communication can we anticipate throughout the task?
9. What are your policies on adjustment orders and unanticipated expenditures?
10. What sort of warranty or assurance do you use?
When it pertains to painting your residence, it resembles choosing the shades that will define your home's character and produce an enduring impression.
But before you dive into the world of paint swatches and brush strokes, there are a couple of essential inquiries you have to ask yourself. https://www.reviewjournal.com/entertainment/arts-c...ed-house-in-las-vegas-2712828/ will certainly not just assist you find the best home painters for the job however likewise ensure that your vision becomes a reality.
So, allow's start this trip together and unravel the mysteries of hiring the excellent residence painters.


