-Поиск по дневнику

Поиск сообщений в О_Дзюба

 -Подписка по e-mail


 -Сообщества

Участник сообществ (Всего в списке: 49) Материнство_с_умом УРОКИ_ФОТОШОПА Мы_и_Дети _вышивка_крестом_ Фото_и_фотошоп В_К_У_С_Н_Я_Т_И_Н_А Мамины_радости Учим_Английский Рецепты_домохозяек Стройные_и_красивые готовим_сами Наши_рецептики Вышивка_крестиком Фотошоп_и_творчество Вкусная_кухня_интернета О_детях Аудиокниги вязалочки Рукоделочки Всем_Вкусно Лучшие_рецепты_интернета УспешнаяДомохозяйка Кулинарная_книга Україна Я_мама Магия Рукодельница КлипАРТ Кисти_для_Фотошопа Рецепты До_и_после_фотошопа Вязание Мой_любимый_Малыш Best_Photoshoots FAQphotoshop Make_up Photoshop-art Photoshop_art Photoshop_Creation Photoshopia-ART Photoshopia World_of_the_Occult -HochuVseZnat- МОЙ_ЛИЧНЫЙ_ПОВАР Вяжем_вместе Моя_кулинарная_книга Вкусно_Быстро_Недорого Готовим_малышам Creative_Designs
Читатель сообществ (Всего в списке: 8) Наши_схемы Ссылочки_малятам Настоящая_женщина All-for-photoshop New_Photoshopinka Photoshopinka Релакс_и_вдохновение Школа_славянской_магии

 -Статистика

Статистика LiveInternet.ru: показано количество хитов и посетителей
Создан: 09.04.2009
Записей: 2744
Комментариев: 26
Написано: 2826


блузки

Среда, 12 Марта 2014 г. 22:48 + в цитатник
Цитата сообщения adelaidaivi блузки http://m-sewing.com/patterns-catalog/women

Home / Women / Tops / #5297 Chiffon draped top
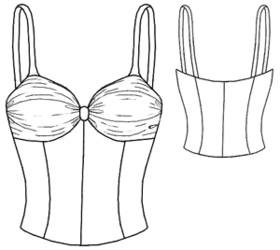
example - #5297 Chiffon draped top preview - #5297 Chiffon draped top

Difficulty: **

Recommended fabrics: soft draping silk

You will need: satin lining, separating zipper.

Attention! Fabric consumption varies depending on the size of garment. First of all, print out paper patterns and lay them out at the width of fabric/ knit you plan to use, to see how much fabric you will need.

When sewing the garment, pay attention to notches- they must coincide.

Cutting:

Fabric:

1. Front part center –2 details
2. Front part side - 2 details
3. Back part center - 1 detail
4. Back part side –2 details
5. Cup – 2 details
6. Draping detail of cups – 1 detail
7. Front facing – 1 detail
8. Back facing – 2 details
9. Strap – 2 details

Lining:

1. Front part center – 2 details
2. Front part side - 2 details
3. Back part center - 1 detail
4. Back part side –2 details
5. Cup – 2 details
6. Strap – 2 details

Recommendations on sewing sheer material. Do not draw contours via carbon paper on material, for they will be visible on the right side. The simplest way is to cut all details with equal allowances and sew edges on equal width.

Instructions:

1. Tack lining and fabric details and then sew them as usual (as fabric only).

2. Sew bust darts into cups.

3. Sew front part centers, front part princess seams.

4. Sew back part princess seams.

5. Sew right side of the top.

6. Tack lining and chiffon straps. Fold straps along the center and topstitch on 1 cm (3/8") width from the bend. Turn straps right side out, then press and sew to cups.

7. Make drapes into the detail to be draped. Make large machine stitches along both sides of front part center line and along side edges. Do not gather details on the string.

8. Tack draping detail to upper edge of front part, with draping detail edge opened between marks.

9. Sew cups to front parts.

10. Turn draping detail upward and gather it on lower strings to front center line up to 4 cm (1-5/8") height and along side edges up to cups side edges. Fold the stripe along the center and make a stitch 1 cm below the bend. Turn the stripe put and fold with it draping detail along front center lines. Sew stripe ends on the wrong side. Tack the detail. To avoid hanging drapes, you can invisibly sew them to cups by hand.

11. Press front/back part left sides into the wrong side and sew the zipper.

12. Sew front and back facing together and oversew facings outer edges.

13. Overstitch upper edge of the garment with facings. Turn the facings and topstitch seam allowance on 0.1 mm (very close) from the edge.

14. Turn the facing wrong side out and topstitch it to the zipper.

15. Fit the straps and sew their back ends under back upper edge.

16. Press the hem into wrong side and topstitch.


Free sewing patterns (PDF) available for download

Please review Our Sizing Charts

Size S   Size M   Size L   Fabrics Selection »  Sewing Supplies »


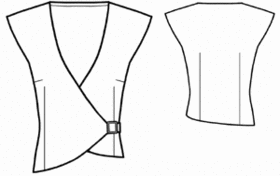
Home / Women / Tops / #5443 Wrapped top

example - #5443 Wrapped top preview - #5443 Wrapped top

Difficulty: *

You will need: sheer natural fabric.

Attention! Fabric consumption varies depending on the size of garment. First of all, print out paper patterns and lay them out at the width of fabric/ knit you plan to use, to see how much fabric you will need.

When sewing the garment, pay attention to notches- they must coincide.

Cutting :

Fabric:

1. Back part - 1 detail
2. Left front part - 1 detail
3. Right front part - 1 detail
4. Long waistband - 1 detail
5. Short waistband - 1 detai

Instructions:

1. Sew front/back darts. Press darts.

2. Sew shoulder seams, serge them. Press shoulder seams backwards.

3. Serge front/back neckline edges, sleeve hems. Turn front/back ready allowances under and topstitch them at 0.5 cm (3/16") from edge. Turn one-piece sleeve's hem ready allowances and topstitch at 0.5 cm from edge.

4. Serge side seams. Side seams leaving a slit into left side seam; press side seams apart. Serge the hem, then turn under and topstitch.

5. Fold the waistband along the center and overstitch along both edges. Turn waistband right side out and press it. Edgestitch waistband edge. Sew the waistband to left front part. Serge joining seam and topstitch it.

6. Serge side edge of short waistband. Apply the waistband to right front part and overstitch by three edges. Turn the waistband right side out and press it. Edgestitch waistband edge.

You can trim waistband end with buckle.


Free sewing patterns (PDF) available for download

Please review Our Sizing Charts

Size S   Size M   Size L   Size XL   Fabrics Selection »  Sewing Supplies »


Home / Women / Others / #5440 Denim corset

example - #5440 Denim corset preview - #5440 Denim corset

Difficulty: **

You will need: denim, a cord, fusing.

Attention! Fabric consumption varies depending on the size of garment. First of all, print out paper patterns and lay them out at the width of fabric/ knit you plan to use, to see how much fabric you will need.

When sewing the garment, pay attention to notches- they must coincide.

Cutting :

Fabric:

1. Center front part - 2 details
2. Placket - 2 details
3. Side front part - 2 details
4. Center back part - 2 details
5. Side back part - 2 details

Fusing: placket.

Instructions:

1. Apply the fusing to wrong side of placket.

2. Sew front and back princess seams. Press allowances towards the center front or center back. Topstitch princess seams at 0.5 cm (3/16").

3. Sew back middle seam, and serge it. Press back middle seam towards right back part. Make decorative seam at 0.5 cm (3/16") from joining seams.

4. Sew shoulder and side seams, then serge them. Press side/shoulder seams backwards. Topstitching at 0.5 (3/16”) cm from joining seams.

5. Serge front/back neckline edge, front part edge and garment hem edge. Topstitch ready edges on the garment at 0.5 cm from edge.

6. Press placket outer edge at 1 cm (3/8"). Fold the placket along the center, right side together, and press. Overstitch upper/lower corners of placket. Cut extra fabric at corners, and turn the placket right side out. Press the placket. Sew placket raw edge to middle edge of center front part.

7. Cut a stripe of fabric for button loops of 3 cm (1-1/8") width. Fold the stripe along the center and make a stitch at 0.5 cm from bend, overstitching one end. Turn the stripe right side out and press. Cut loops of 6 cm (2-3/8") length.

8. Tack loops to placket pressed edge. Topstitch the placket on center front part. Remove tacking. Turn loops towards center front part and topstitch them on the placket.


Free sewing patterns (PDF) available for download

Please review Our Sizing Charts

Size S   Size M   Size L   Size XL   Fabrics Selection »  Sewing Supplies »


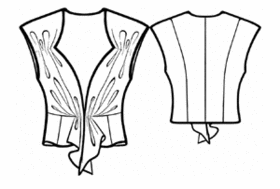
Home / Women / Blouses / #5600 Blouse With Drapes

example - #5600 Blouse With Drapes preview - #5600 Blouse With Drapes

Difficulty: *

Recommended fabrics: lightweight fabrics of natural or artificial fibers.

You will need: shell fabric, lining, 1 button.

Attention! Fabric consumption varies depending on the size of garment. First of all, print out paper patterns and lay them out at the width of fabric/ knit you plan to use, to see how much fabric you will need.

When sewing the garment, pay attention to notches- they must coincide.

Cutting:

Shell Fabric:

1. Center Back– 2 pieces
2. Side Back – 2 pieces
3. Center Bottom Front – 2 pieces
4. Side Bottom Front – 2 pieces
5. Top Front – 2 pieces

Lining:

1. Center Back– 2 pieces
2. Side Back – 2 pieces
3. Center Bottom Front – 2 pieces
4. Side Bottom Front – 2 pieces
5. Top Front – 2 pieces

Instructions:

1. Sew Center Bottom Front to Side Bottom Front. Serge seam allowances and press them towards center front.

2. Sew Top Front to Center and Bottom Fronts. Clip allowances, serge and press upwards.

3. Sew princess seams of Back. Serge seam allowances; press them towards center back. Sew center back seam. Serge seam allowances; press them to one side.

4. Sew side seams. Serge the seams, press towards center back.

5. Sew pieces of lining similar to shell. Leave shoulder seams unsewn.

6. Line up shell and lining face-to-face, pin together at raw edges. Sew lining to shell at armholes, back neckline and top front. Clip allowances of neckline, armhole, mark a notch at Top Front as marked in pattern. Turn the garment to the face side, press.

7. Insert raw shoulder edges of Front between shoulder edges of Back. Turn under raw edges of Back, baste all the layers together, stitch shoulder seam.

8. Cut a stripe of shell fabric for loop 3 cm (1-3/16”) wide. Fold the loop lengthwise in half, stitch at 0,5 cm (3/16”) from the fold, as well at across one short end. Turn out and press the stripe. Cut a loop of needed length, baste it to the right Front.

9. Line up shell and lining face-to-face, pin and stitch all the way from horizontal seam of Top Front to the princess seam at Back. Clip allowances, turn the blouse out through the opening at Back (between two princess seams). Turn inside and press bottom allowances of Center Back. Edgestitch lining to shell at the opening at bottom of Center Back.

10. Make gathers at Top Front; you might want to use a decorative tape. Sew button for closure at waist, at the wrong side of left Front.


Free sewing patterns (PDF) available for download

Please review Our Sizing Charts

Size S   Size M   Size L   Size XL   Fabrics Selection »  Sewing Supplies »


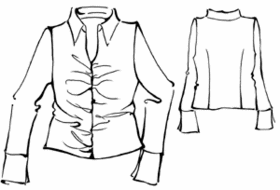
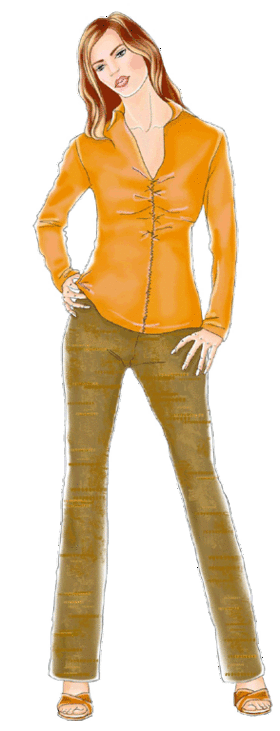
Home / Women / Blouses / #5298 Gathered front blouse

example - #5298 Gathered front blouse preview - #5298 Gathered front blouse

Difficulty: *

Recommended fabrics: soft cotton or combined fabric.

You will need: fusible interfacing.

Attention! Fabric consumption varies depending on the size of garment. First of all, print out paper patterns and lay them out at the width of fabric/ knit you plan to use, to see how much fabric you will need.

When sewing the garment, pay attention to notches- they must coincide.

Cutting:

Fabric:

1. Front part - 2 details
2. Back part - 1 detail
3. Front facing - 2 details
4. Sleeve - 2 details
5. Cuff - 2 details
6. Collar – 2 details
7. Stand-up collar – 2 details

Fusible interfacing: front facing, outer collar, cuff, stand-up collar.

Instructions:

1. Strengthen the front facing, outer collar, cuffs and outer stand-up collar with fusible interfacing.

2. Sew waist darts into back part.

3. Oversew inner edge of the front facing. Overstitch the front part with front facings up to the notch, then turn faint bands into wrong side and press.

4. Make gathering along the front part center seam and sew.

5. Sew shoulder seams.

6. Sew side seams.

7. Overstitch inner collar with outer one. Turn the collar right side out.

8. Sew stand-ups, with collar between them.

9. Sew inner stand-up (with the collar) to the neckline, fold the outer stand-up open edge under and topstitch along the inner stand-up joining seam. Make decorative topstitch along the collar. Topstitch the edge. Sew front facings on shoulder seams with stitch of 1 cm (3/8") width.

10. Sew sleeve seams.

11. Sew sleeves into arm hole, fitting along caps.

12. Fold cuffs right sides together. Sew short ends into ring. Make a notch into allowance (near split), with slit in the seam center. Fold cuffs right sides together, stitch edges.

13. Sew cuffs to the sleeve hem and oversew cuff upper edge with the sleeve.

14. Topstitch the cuff-on-sleeve joining seam and make decorative seam along cuff bottom and slit sides.

15. Press the hem into wrong side and topstitch.


Free sewing patterns (PDF) available for download

Please review Our Sizing Charts

Size S   Size M   Size L   Fabrics Selection »  Sewing Supplies »

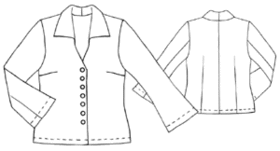
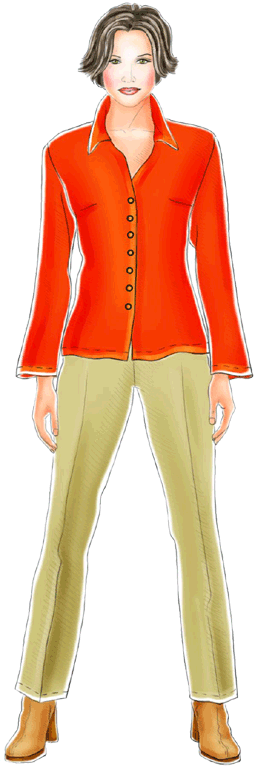
Home / Women / Blouses / #5167 Orange blouse

example - #5167 Orange blouse preview - #5167 Orange blouse

Difficulty: **

Recommendations: lightweight linen, cotton, silk or rayon fabrics and knits.

You will need: Lightweight linen fabric; fusible interfacing; 7 buttons.

Attention! Fabric consumption varies depending on the size of garment. First of all, print out paper patterns and lay them out at the width of fabric/ knit you plan to use, to see how much fabric you will need.

When sewing the garment, pay attention to notches- they must coincide.

Cutting:

Main Fabric:

1. Front one-piece-cut with Lower Collar – 2 pieces
2. Back -2 pieces
3. Front Facing, one-piece cut with Upper Collar – 2 piece
4. Front Sleeve – 2 pieces
5. Back Sleeve – 2 pieces

Fusible Interfacing: Front Facing one-piece cut with Upper Collar.

Instructions:

1. Reinforce with fusible interfacing the following pieces: Front Facing one-piece cut with Upper Collar.

2. Sew darts of Front and Back, sew center back seam.

3. Sew shoulder seams, clip allowances in the corners of collar.

4. Place Fronts face-to-face, stitch at raw edge of collar.

5. Sew Collar into neckline between corners.

6. Sew center back seam of Collar/Front Facings. Serge inside edge of each Front Facing up to the shoulder seam. Place Front Facings onto Front face-to-face, stitch together at center front.

7. Cut seam allowance in the corner of each Front Facing. Turn out the collar, turn Front Facings to the wrong side. Baste and press the edges. Turn under raw edge of Upper Collar and topstitch right into the seam of attaching the Lower Collar. Hand-sew Front Facings to Fronts at shoulder seams.

8. Sew side seams.

9. Sew Front and Back Sleeve pieces together (both front and elbow seam of each sleeve).

10. Sew sleeves into armholes, slightly gathering at sleeve head.

11. Turn under hem allowances of sleeves and blouse, topstitch.

12. Make buttonholes into the right front; sew buttons at the left front.


Free sewing patterns (PDF) available for download

Please review Our Sizing Charts

Size S   Size M   Size L   Size XL   Fabrics Selection »  Sewing Supplies »

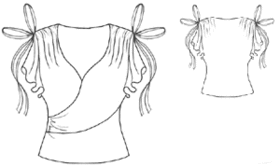
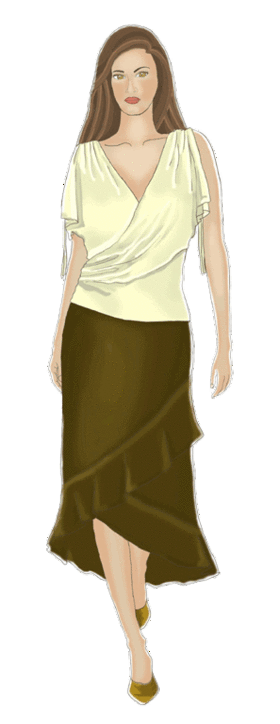
Home / Women / Tops / #5301 Draped top

example - #5301 Draped top preview - #5301 Draped top

Difficulty: *

Recommended fabrics: mixed knitted fabric.

Attention! Fabric consumption varies depending on the size of garment. First of all, print out paper patterns and lay them out at the width of fabric/ knit you plan to use, to see how much fabric you will need.

When sewing the garment, pay attention to notches- they must coincide.

Cutting:

Fabric:

1. Left front part - 1 detail
2. Right front part – 1 detail
3. Left drape – 1 detail
4. Right drape – 1 detail
5. Back part - 1 detail

Our advice: To make the fabric along stitched seams stretch, sew details with narrow zigzag or with special stretchable stitches. To make the hem stretch, oversew hem allowance with special oversew stitches (overlock), and then sew it using double needle. This is also attachable to other edges that should stay elastic.
These recommendations are not for industry.

Instructions:

1. Oversew outer edges of drapes, then fold under and topstitch.

2. Gather fabric on shoulder edges of drapes.

3. Overstitch left front part neckline with drape.

4. Overstitch right front part with drape coinciding left front part with notches.

5. Oversew front/back parts arm hole allowances, then fold under and topstitch.

6. Oversew back neckline allowance, then fold under and topstitch.

7. Sew shoulder seams.

8. Oversew drape shoulder allowances, then fold under and topstitch.

9. Make pleats into drape side edge. Sew side seams.

10. Oversew garment hem, then fold under and topstitch.

11. Tuck tie ends. Fold ties along the center and stitch on 0.7 cm (1/4") from the fold center. Turn tie into right side, then press. Sew ends. Sew ties to shoulder seams.


Free sewing patterns (PDF) available for download

Please review Our Sizing Charts

Size S   Size M   Size L   Size XL   Fabrics Selection »  Sewing Supplies »

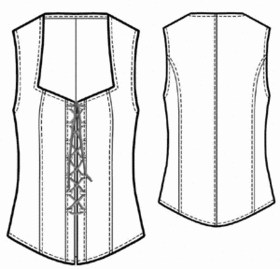
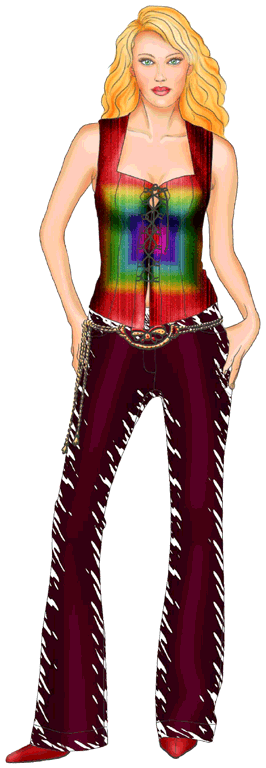
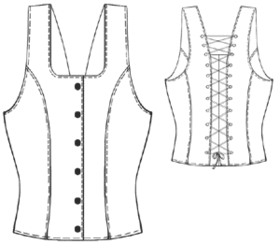
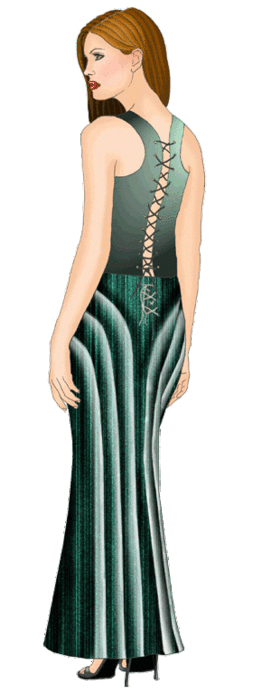
Home / Women / Others / #5359 Corset

example - #5359 Corset preview - #5359 Corset

Difficulty: **

You will need: denim, fusing, cotton lining, 6 buttons, a cord and 22 eyelets.

Attention! Fabric consumption varies depending on the size of garment. First of all, print out paper patterns and lay them out at the width of fabric/ knit you plan to use, to see how much fabric you will need.

When sewing the garment, pay attention to notches- they must coincide.

Cutting :

Fabric:

1. Center back part - 2 details
2. Side front part - 2 details
3. Center front part - 4 details
4. Side front part - 2 details

Lining:

1. Center back part - 2 details
2. Side back part - 2 details
3. Side front part - 2 details

Fusing: center front part.

Instructions:

1. Apply the fusing to wrong side of center front part.

2. Sew front and back princess seams and press them apart.

3. Sew side seams and press them apart.

4. Sew shoulder seams and press them apart.

5. Lay reinforced front central part on center front part, right sides together. Overstitch front facings and front neckline with front central part, stopping 5 cm (2") before shoulder edges.

6. Sew lining details. Press the lining.

7. Apply the lining to the garment right sides together, then sew to inner edges of front central part. Sew shoulder edges of lining and center front part shoulder edges. Overstitch back neckline and raw part of front neckline. Leave slits of 10 cm (4") length into lower part of armholes, and overstitch armhole upper parts. Cut seam allowances close to stitch. Pull front parts into right side through shoulder slits and turn the garment right side out through one of open side seams. Serge lower parts of armholes.

8. Press the hem to wrong side and sew by hand. Sew center front part to hem.

9. Make buttonholes into right front part, sew buttons on left one.

10. Male eyelets into center back part and pull the cord.


Free sewing patterns (PDF) available for download

Please review Our Sizing Charts

Size S   Size M   Size L   Size XL   Fabrics Selection »  Sewing Supplies »

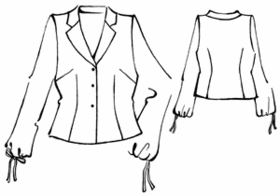
Home / Women / Blouses / #5305 Blouse with drawstring cuffs

example - #5305 Blouse with drawstring cuffs preview - #5305 Blouse with drawstring cuffs

Difficulty: **

Matrial: soft silk and viscose.

You will need: fusible interfacing; 3 buttons.

Attention! Fabric consumption varies depending on the size of garment. First of all, print out paper patterns and lay them out at the width of fabric/ knit you plan to use, to see how much fabric you will need.

When sewing the garment, pay attention to notches- they must coincide.

Cutting:

Fabric:

1. Front part - 2 details
2. Back part - 1 detail
3. Front facing - 2 details
4. Sleeve - 2 details
5. Collar - 2 details
6. Lapels – 2 details

Cut 2 fabric ties of 3 cm (1-3/16") width.

?usible interfacing: front facing, outer collar, lapel.

Instructions:

1. Strengthen the front facing, outer collar and the lapel with fusible interfacing.

2. Sew bust darts into front part and waist vertical ones into front/back parts.

3. Sew shoulder seams.

4. Sew side seams.

5. Sew inner lapel to inner collar.

6. Sew upper lapel to outer collar.

7. Overstitch inner collar and lapel with outer collar and lapel, then turn into right side and press.

8. Tack inner edge of front facings.

9. Overstitch right front part with front facing, inserting the lapel and collar. Make a notch into outer collar and bend it. Sew inner collar to back neckline, make one more notch into outer collar and overstitch left front part with front facing.

10. Turn front facings into wrong side. Oversew and press edges. Fold the outer collar open edge under and topstitch along the inner collar joining seam. Sew front facing into shoulder seams with 1 cm (3/8") width stitch.

11. Sew sleeve seams.

12. Press sleeve hem into wrong side and topstitch along drawstring marking.

13. Tuck tie ends. Fold ties along the center and stitch on 0.7 cm (1/4") from the fold center. Turn tie into right side, then press. Sew ends. Pull ties into drawstring loop.

14. Sew sleeves into armholes, fitting along caps.

15. Oversew garment hem, then fold under and topstitch along the edge.

16. Work button holes into right part. Sew buttons to left one.


Free sewing patterns (PDF) available for download

Please review Our Sizing Charts

Size S   Size M   Size L   Size XL   Fabrics Selection »  Sewing Supplies »

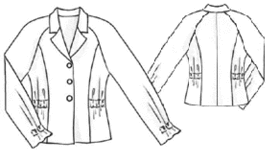
Home / Women / Blouses / #5154 Blouse with a Raglan Sleeve

example - #5154 Blouse with a Raglan Sleeve preview - #5154 Blouse with a Raglan Sleeve

Difficulty: **

You will need: Silk or other fabric for a blouse; fusible interfacing; 3 buttons; elastic 1/4” wide and about 50 cm (20”) long.

Attention! Fabric consumption varies depending on the size of garment. First of all, print out paper patterns and lay them out at the width of fabric/ knit you plan to use, to see how much fabric you will need.

When sewing the garment, pay attention to notches- they must coincide.

Cutting:

Silk:

1. Center Front- 2 pieces
2. Side Front - 2 pieces
3. Center Back - 2 pieces
4. Side Back - 2 pieces
5. Front Sleeve - 2 pieces
6. Back Sleeve – 2 pieces
7. Front Facing – 2 pieces
8. Collar – 2 pieces with folds
9. Facing for Elastic – 1 piece
10. Facing for Elastic at Sleeves - 2 pieces
11. Back Neck Facing – 1 piece with Fold

Fusible Interfacing: using hot iron, fuse interfacing to Front Facing, upper Collar piece, Back Neck Facing.

Instructions:

1. Cut elastic into 4 pieces: 2 pieces 10 cm (4") each – for sleeves and 2 pieces 15 cm (5-7/8") each for blouse sides.

2.Stitch center back seam and vertical seams of Back.

3. Stitch vertical seams of Fronts.

4. Sew Front Sleeves to Fronts, Back Sleeves to Back. Press seams.

5. Take each Facing for Elastic at Sleeve, fold under allowances and press. Place Fronts onto Back, face-to-face, and sew upper sleeve seam. At the wrong side of Sleeve, place Facing for Elastic, baste and topstitch along the long sides. Insert elastic into the tunnel, stitch to close the tunnel at one short side, picking up the elastic. Pull another end of elastic to get the right length and stitch the tunnel the same way.

6. Sew lower sleeve seams and side seam in one go. Press.

7. Prepare Facings for Elastic for blouse sides as you did in pt.5. Sew Facings to sides of blouse according to markings. Insert elastics and stitch tunnels at both sides as you did in pt.5.

8. Assemble the collar: place Collar pieces face-to-face, stitch along the outer edge, clip seam allowances, turn out and press. Take both raw edges of Collar together and baste the Collar into blouse neckline. Sew Back Neck Facing to Front Facings. Place Back Neck Facing/ Front Facings to blouse face-to-face, stitch along center front, lapels and neckline, attaching the collar at the same time.

9. Turn Front Facings/Back Neck Facing to the inside, baste along the seam and press. Hand-sew the Back Neck Facing to allowances of shoulder seams.

10. Serge bottom hem and sleeve hems. Turn under hem allowances and hand-sew to blouse bottom/ sleeve bottoms.

11. Make buttonholes into right Front, sew buttons to the left Front.


Free sewing patterns (PDF) available for download

Please review Our Sizing Charts

Size S   Size M   Size L   Size XL   Fabrics Selection »  Sewing Supplies »

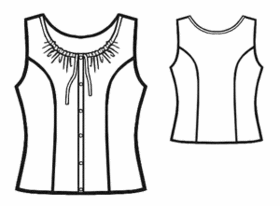
Home / Women / Blouses / #5125 Blouse

example - #5125 Blouse

Difficulty: **

You will need: crepe, elastic braid, 5 buttons.

Attention! Fabric consumption varies depending on the size of garment. First of all, print out paper patterns and lay them out at the width of fabric/ knit you plan to use, to see how much fabric you will need.

When sewing the garment, pay attention to notches- they must coincide.

Cutting :

Fabric:

1. Center back part - 1 detail
2. Side back part - 2 details
3. Center front part - 2 details
4. Side front part - 2 details
5. Edge placket - 2 details
6. Neckline edging - 1 detail
7. Armhole edging - 2 pieces (3 cm (1-3/16") wide and about 50 cm (20") long -refer to your pattern for armhole length)
8. Tie - 2 details (2.5 cm (1") wide and 25 cm (10") long)

Instructions:

1. Sew front princess seam and back princess seam. Press seam allowances towards the center.

2. Sew shoulder seams, press allowances apart.

3. Overstitch armholes with edging. Sew edging ends together. Turn the edging to garment wrong side. Turn edging allowance in and topstitch along edge.

4. Overstitch neckline edge with edging, right sides together. Turn edging to garment wrong side. Turn edging allowance in and topstitch along edge. Cut elastic brain into two pieces and pull into neckline coulisse. Fix braid ends. Stitch ties neatly, to 0.5 cm (3/16"), and turn right side out.

5. Process placket upper corner, folding it along center wrong side out and overstitching along upper edge. Turn the placket right side out, press long edge allowances into. Insert tie end and front facing into placket and tack. Topstitch the placket at 0.2 cm (1/16"). Sew blouse side seams, press seam allowance apart.

6. Fold hem allowance under and topstitch at 0.7 cm (1/4").

7. Make 5 buttonholes into right placket and sew buttons on left one.


Free sewing patterns (PDF) available for download

Please review Our Sizing Charts

Size S   Size M   Size L   Size XL   Fabrics Selection »  Sewing Supplies »


Рубрики:  Шитье


Добавить комментарий:
Текст комментария: смайлики

Проверка орфографии: (найти ошибки)

Прикрепить картинку:

 Переводить URL в ссылку
 Подписаться на комментарии
 Подписать картинку