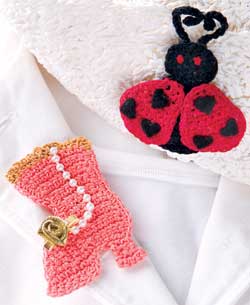
These whimsical pins will lighten up your wardrobe as they lighten your mood!
Finished Sizes
Ladybug: 3 inches tall
Victorian Boot: 3 1/4 inches tall
Skill level
Easy
Materials
Size 10 crochet cotton:
12 yds peach
10 yds red
7 yds black
1 yd gold metallic
Size 5/1.90mm steel crochet hook or size needed to obtain gauge
1 1/4-inch pin backs: 2
4-inch square black felt
Stitch markers
Scrap of fiberfill
Red fabric paint
Craft glue
Hot-glue gun
Wax paper
Fabric stiffener
4mm pre-strung pearl beads: 11
12mm gold ribbon rosette with gold leaves: 1
Gauge
8 sc = 1 inch
Pattern Notes
Weave in loose ends as work progresses.
Do not join rounds unless otherwise stated.
Mark first stitch of each round with stitch marker.
LADYBUG
Body
Rnd 1: With black, ch 5, 2 sc in 2nd ch from hook, sc in each of next 2 chs, 4 sc in last ch, working on opposite side of foundation ch, sc in each of next 2 chs, 2 sc in next ch. (12 sc)
Rnd 2: Sc in each sc around.
Rnd 3: Rep rnd 2.
Rnd 4: Sc in next sc, 2 sc in next sc, sc in each of next 3 sc, 2 sc in next sc, sc in next sc, 2 sc in next sc, sc in each of next 3 sc, 2 sc in last sc. (16 sc)
Rnd 5: 2 sc in each sc around. (32 sc)
Rnd 6: 2 hdc in first sc, hdc in each of next 3 sc, 2 hdc in next sc, sc in each of next 11 sc, 2 hdc in next sc, hdc in each of next 3 sc, 2 hdc in next sc, sc in each of next 11 sc, sl st to join in top of first hdc, fasten off. (36 sts)
Head
Rnd 1: With black, ch 2, 6 sc in 2nd ch from hook. (6 sc)
Rnd 2: 2 sc in each sc around. (12 sc)
Rnd 3: [Sc in next sc, 2 sc in next sc] around, sl st in next sc, leaving a 6-inch length for sewing, fasten off. (18 sc)
Sew Head to end of Body across 6 sts.
Antenna
Make 2.
With 2 strands black, ch 13, leaving a 2-inch length, fasten off. Sew Antenna to center front underside of rnd 3 of Head far enough apart so that when stiffened they can form a heart shape.
Wing
Make 2.
Row 1: With red, ch 3, sc in 2nd ch from hook, sc in next ch, turn. (2 sc)
Rows 2–8: Ch 1, 2 sc in first sc, sc in each rem sc across, turn. (9 sc)
Rows 9–11: Ch 1, sc in each sc across, turn.
Row 12: Ch 1, sc dec (see Stitch Guide) in next 2 sc, sc in each sc across to last 2 sc, turn. (7 sc)
Row 13: Rep row 12, do not turn. (5 sc)
Rnd 14: Ch 1, evenly sp sc in each st around outer edge, sl st to join in beg sc, fasten off.
Finishing
Following manufacturer’s directions, stiffen all pieces. Crumple piece of wax paper into a small ball and place underneath Body and each Wing to give rounded dome shape. Using photo as a guide, shape top of Antennas into heart shape, touching at center.
Dry completely.
Cut 6 small hearts from black felt, glue 3 to each Wing.
Position Head and Body on black felt, trace around outer edge, cut out piece of felt, place fiberfill between Body and felt and glue felt to bottom of Body and Head.
Glue Wings to Body with hot-glue gun.
With red fabric paint, paint red eyes on Head.
To strengthen Antenna, making sure glue does not show on front; place a small bead of glue just where Antenna touch at center back of heart.
Vertically center pin back on back of Ladybug and attach with hot-glue gun.
VICTORIAN BOOT
Toe
Row 1 (RS): With peach, ch 2, sc in 2nd ch from hook, turn. (1 sc)
Row 2: Ch 1, 2 sc in first sc, turn.(2 sc)
Row 3: Ch 1, 2 sc in first sc, sc in next sc, turn.(3 sc)
Row 4: Ch 1, 2 sc in first sc, sc in each rem sc across, turn. (4 sc)
Row 5: Ch 1, sc in each of next 3 sc, 2 sc in next sc, turn. (5 sc)
Row 6: Rep row 4. (6 sc)
Row 7: Ch 1, sc in each sc across, turn.
Row 8: Ch 1, 3 sc in first sc, sc in each rem sc across, turn. (8 sc)
Row 9 (RS): Rep row 7, fasten off.
Shaft
Row 1: With peach, ch 8, sc in 2nd ch from hook, sc in each rem ch across, turn.(7 sc)
Row 2: Ch 1, sc in each sc across, turn.
Rows 3–11: Rep row 2.
Row 12: Ch 1, 2 sc in first sc, sc in each sc across to last sc, 2 sc in last sc, turn.(9 sc)
Row 13: Rep row 12. (11 sc)
Rows 14–16: Rep row 2.
Row 17: Rep row 12, fasten off. (13 sc)
Row 18: Attach gold metallic with sl st in first sc, ch 1, sc in same sc as beg ch-1, [ch 3, sc in next sc] across, fasten off. (12 ch-3 sps)
Sew RS of row 9 of Toe piece to side of Shaft with Toe pointing to left and bottom edges even. With Toe still pointing left, attach peach with sc in side of row 17 of Shaft, sc around outside edge of Boot working 2 sc in very tip of Toe, ending on opposite side of row 17, fasten off.
Heel
Row 1: With top of Shaft facing and Toe pointing to the left, attach peach with sc in first st of Shaft bottom, sc in each of next 3 sts, turn. (4 sc)
Row 2: Ch 1, [sc dec (see Stitch Guide) in next 2 sc] twice, turn. (2 sc)
Row 3: Ch 1, 2 sc in first sc, 2 sc in next sc, turn. (4 sc)
Row 4: Ch 1, 2 sc in first sc, sc in each of next 2 sc, 2 sc in last sc, fasten off. (6 sc)
Sole
Row 1: With Toe facing, attach peach with sc at very tip of Toe, sc in next 5 sc, turn. (6 sc)
Row 2: Ch 1, sc in each sc across, turn.
Row 3: Rep row 2, do not turn.
Row 4: Sc in side edge of row 3, sc in each side edge of rows 2 and 1, sl st in next st on bottom of Boot, fasten off.
Finishing
Following manufacturer’s directions, stiffen Boot, shape and place on wax paper to dry.
Using photo as a guide, position pearl beads from row 17 to instep of Boot, glue in place with craft glue. Glue ribbon rosette to instep with hot-glue gun. Vertically center pin back on back of Boot and attach with hot-glue gun.