Цитата сообщения Nadin72
МК платья для куклы в Викторианском стиле
МК платья для куклы в Викторианском стиле
Making a Victorian Ball-Gown for an Iplehouse JID
In this tutorial I'll share all the steps in designing and creating two Victorian ball-gowns for a small-chest Iplehouse JID. I did share most of the steps in my blog over a period of several weeks in the summer of 2012, but thought it would be more helpful to combine everything into one thread. There are no patterns, but I'm hoping just seeing some of my techniques might be helpful.
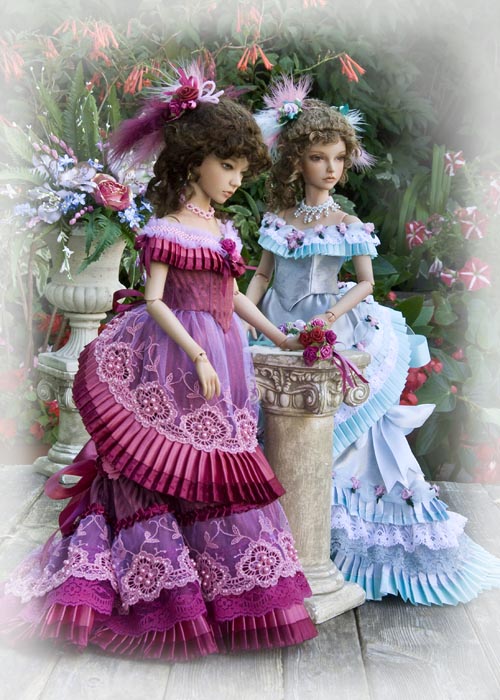
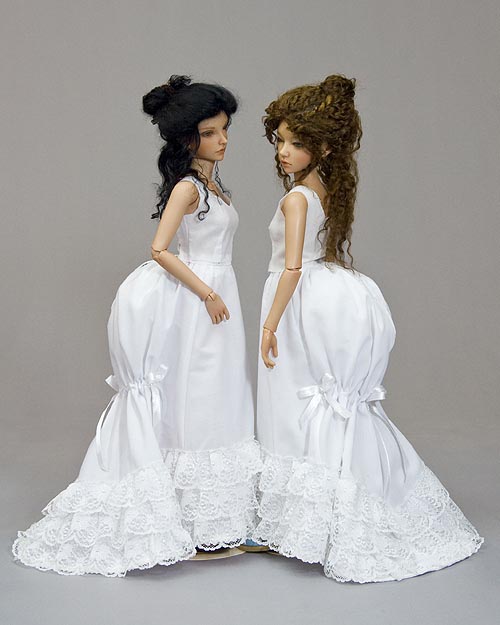
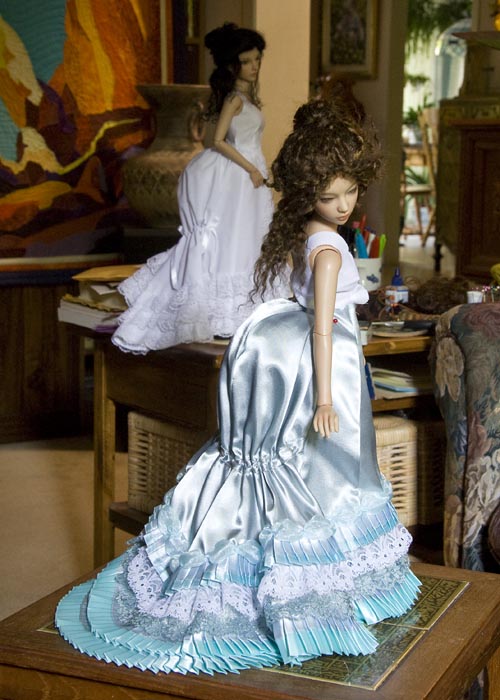
Here's Asa and Isar modelling the final dresses...
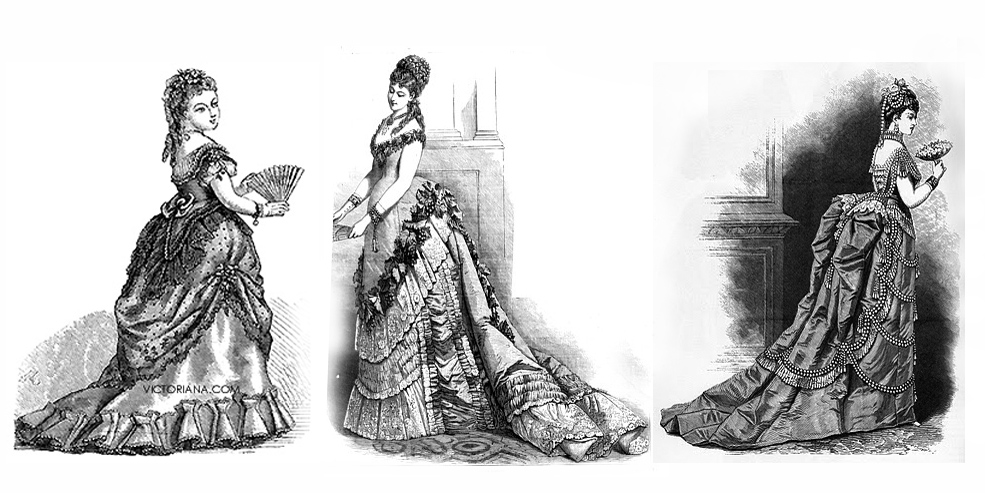
First the Research...
I looked through my costuming books looking for the perfect Victorian ball gown to make in MSD size for an Iplehouse JID, but I think I'm going to have to make up my own using some of the features I like best from many different gowns. One of the most challenging things when making an outfit for such a small doll is the scale of the fabrics - ie. the thickness. I'm obviously stuck using regular fabrics intended for human-size clothes, which is fine as long as I stay away from making puffs and ruffles, as they will be too stiff and stick out too much and ruin the look. Unless I can find very fine fabrics. But there's not really a lot of choice in the few fabric stores left these days. Pleats are lovely though, especially when made from wide ribbon.
Many people mistakenly think "Victorian" is any dress with a long skirt, but true Victorian has a very specific look - a small tight bodice, and a very elaborate series of long flowing skirts and draperies with a bustle in the back. There are actually three different Victorian bustle styles, but I'm going for the first, more feminine, one. These are all from that particular period. It's interesting that all the fashion illustrations from the period rarely show the front of the bodice, as it's the skirt decorations - especially at the back - that always seems to be the main feature.
First Step - the underwear...
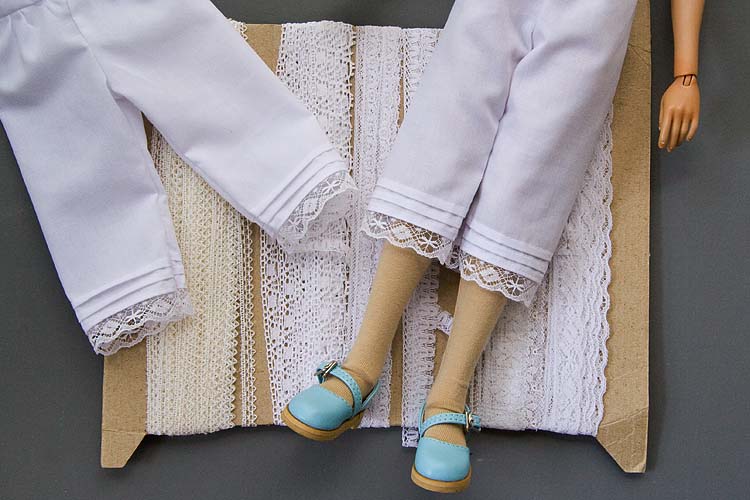
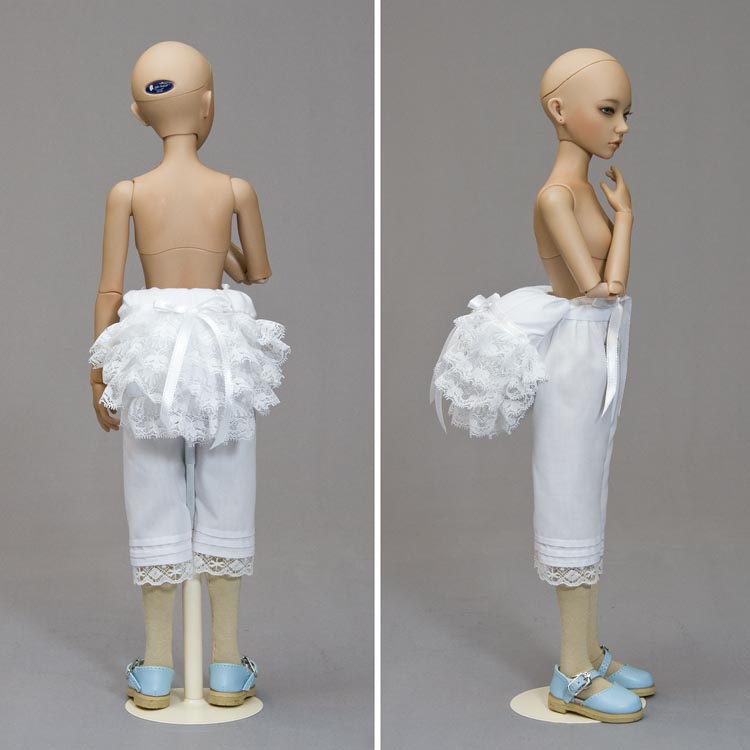
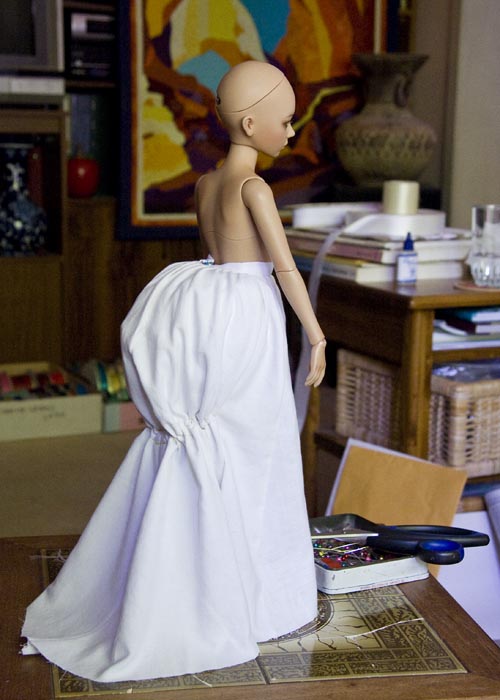
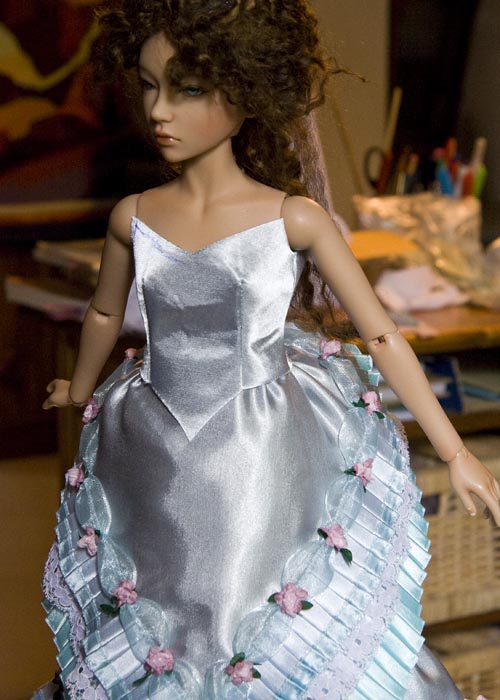
I always start with the under things. My Iplehouse JID Asa will be the model for the ball gowns. She has a rather "chunky" waist compared to authentic Victorian styles, so I'm going to have to make sure there's no extra bulk at her waistline to make her look even thicker, because unlike a real person, a corset wouldn't make her slimmer, just bulkier. Her pantaloons and slips will sit just below her waist for that very reason, each one getting a little higher until the final overskirt ends up at just the right level.
Asa has on her shoes so I know what length to make the skirts - the colour is not indicative of the dress colour at this point. They aren't going to show anyways, but I need them to help me make the skirt the right length. Next step is designing a bustle and slip.
Now the bustle...
Asa now has a lacy bustle to hold out her skirts. The bustle is embellished with rows of lace ruffles and is stuffed to help hold it's shape. It ties on with ribbons, but I have to see if that's good enough, as the bustle sits a bit high in the back right now - it looks the right height, but there's at least three layers of skirts still coming on top of it. It may need hooks so it can be hooked lower onto her pantaloons. I have to wait and see how high her slip and skirts come.
Next, a "Test" Slip....
I found some old envelopes with patterns I'd designed for Victorian gowns for my early dolls years ago, and with just a little modification (making shorter) the skirt seems a perfect fit. I made up a test slip with a draw-string in the back, to check the fit, and am now ready to cut the patterns out of good fabric, and go find some nice lace for ruffles along the bottoms.
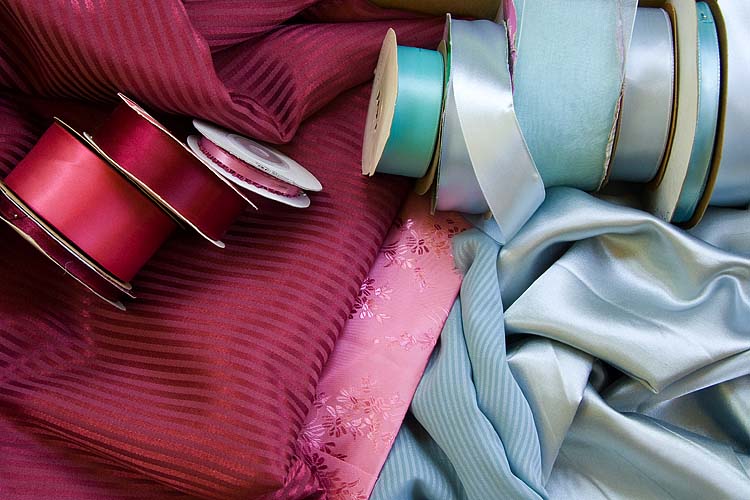
I've also managed to narrow down the fabric choices to two colour combinations - a pale silver turquoise/gray, which will most likely be embellished with white lace and pink roses, and an old rose with wine, and maybe pink. I'm not sure what colours of lace that one will get - I have to go see what I have in my supply closet. *The colours in the photo are not necessarily true to life, especially the aqua as it's notoriously difficult to photograph properly.
Two ladies in their underwear...
I thought I'd use Isar as the photography model for the second Victorian gown. She has a larger bust than Asa, who the gowns are being made to fit, but for photo purposes she should still work. I pulled out some test bodices for the two of them to wear temporarily so they could maintain their modesty, and tied up two wigs in something to suggest softly upswept hairdos. I think I may seriously need to make some proper Victorian-styled wigs just for the final photo sessions.
Well, here they are in their underwear. I am asked why I bother putting so much effort into the under-clothes when they aren't even going to show. Well, because it's part of the costume, and without the proper under-pinnings the actual costume would not hang correctly. Plus, I don't like to cut corners - do it right, or not at all!
the Minty Gray Gown
- first the underskirt....
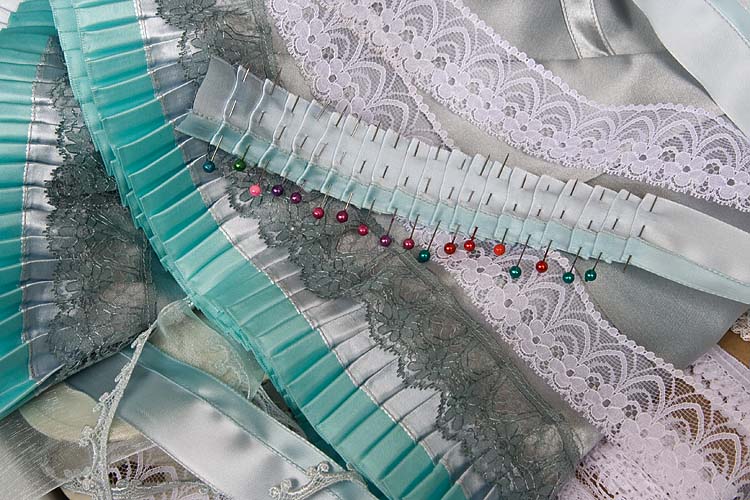
I'm building up the embellishment layers on the bottom of the first under-skirt. It's like decorating an elaborate, old-fashioned, wedding cake, but with laces and ribbons, adding layer upon layer to achieve the final effect.
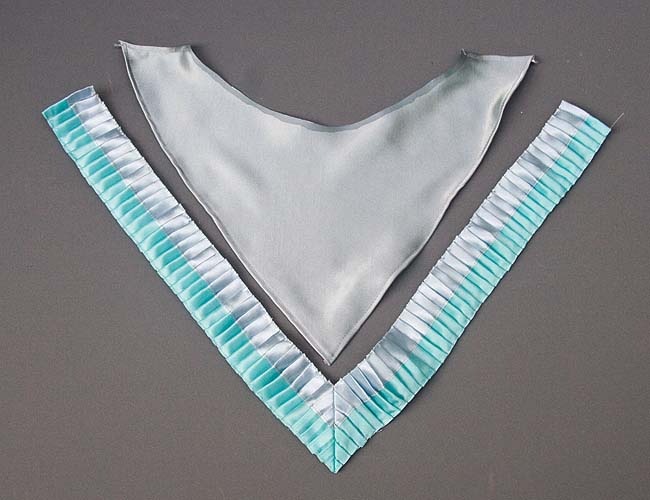
I couldn't find any appropriate colour ribbons the right width, so have sewn mint ribbons onto the edge of the gray ribbon. Then I have to pin every pleat by hand, then hand-sew the top edge. I can't press the pleats with the pins in them or the pins will leave unsightly marks, so the bottom edge needs to be basted as well. It takes several hours per pleated row.
I'm thinking maybe pink roses as an accent, but I have to wait and see when I'm further along.
All the rows of trim have been sewn onto the minty-gray underskirt now. There's still a lot of embellishment needing to be done by hand, but it has to wait until the over-skirt and bodice are done, so I can see the entire outfit and decide on the colour of the final details.
This photo, taken by natural light in my work-space, is a lot closer to the actual colours of the skirt, than the photo of the trims I took outside yesterday. For some reason, the turquoise ribbon and gray lace looked a lot darker than they really are, and the lovely aqua/blue sheen of the gray satin was all washed out. Maybe it was the hot, humid, pre-thunderstorm lighting, but turquoise is notoriously difficult to photograph properly.
the Over Skirt
Today I'm working on the overskirt. I've decided against making it "drape" as it would look too much out of scale on such a small gown. So it will be flat with many of the same trims as the main skirt - although not all of them as there isn't enough room. It was a bit challenging making the pleated trim come to a neat point down at the front, but I think it's looking good. Now to press it and sew it onto the over-skirt edge. Then make the next two rows.
PS. When working with the gray satin, I always use Fray Check around all the cut out edges. Satin is notoriously difficult to handle - it frays terribly, and the fabric shifts and moves - so the Fray Check keeps the edges neat, and stiff.
Embellishing the Over Skirt
Had to go to two stores looking for more sheer aqua ribbon, but could only find some half the width, so that's what I'm going to have to use for the final layer of puffs on the over-skirt. I'm saving the last piece of wide sheer aqua ribbon for the upper bodice.
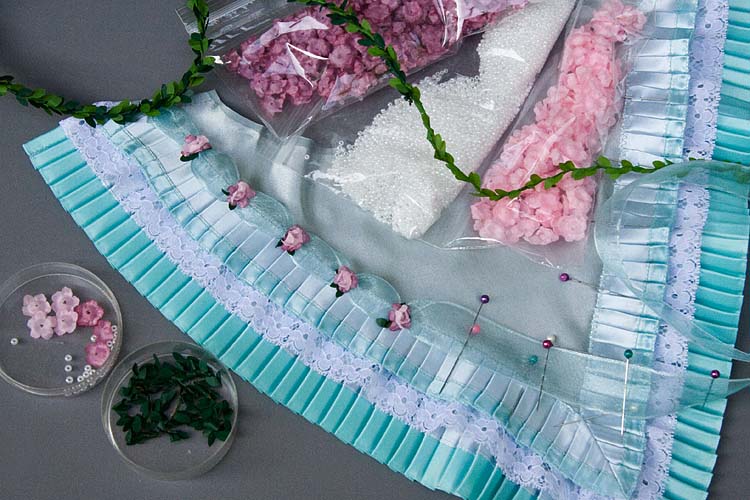
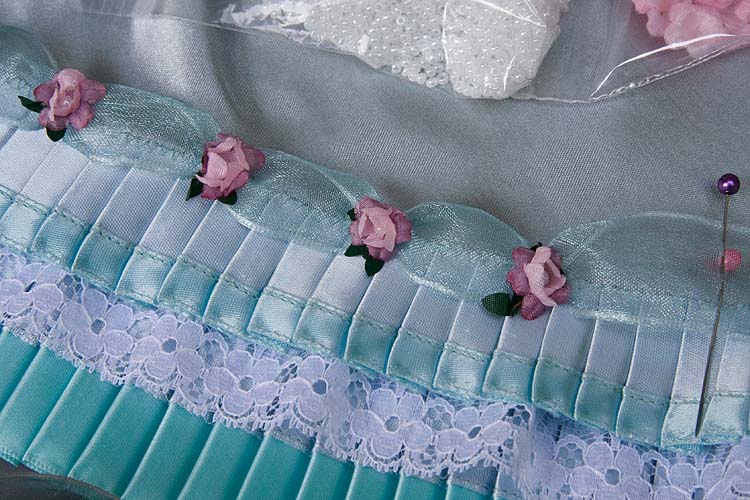
I also pulled out all my boxes of tiny flowers to see which colour looked nicest with the mint and gray. I looked at blues, darker aquas, various pinks, and those ribbon roses everyone else uses. But in the end I decided to go with making up my own flowers out of pink and dusty rose fabric flower bits.
I'm sewing a faux pearl into the center of each flower, and backing each one with a tiny bit of greenery. I have to sew the tiny flowers between all the puffs around the bottom of the over-skirt as well.
I was going to sew the two skirts together onto one waistband, but now I'm thinking each skirt will have it's own waistband. It will make the outfit easier to store.
the Test Bodice
Both skirts are now almost completely finished - they just need the final ribbons and bows embellishments at the back. I decided to make the two skirts separate, each with their own waistband - that way they would be easier to store.
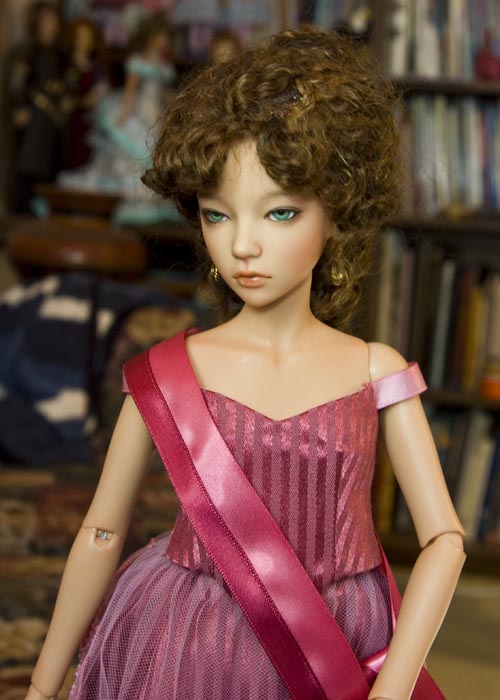
I was having a hard time deciding whether or not to have a pink satin sash at the waist, as it would make a big difference as to the actual bodice pattern, but in the end decided to go with the more formal-looking point in the front. I designed a bodice pattern, and for the "test bodice" used the actual dress fabric, supported with iron-on interfacing. The armholes needed enlarging and the neckline needed to be lower, but the nice thing about a test-bodice is that I can draw the changes right onto it, and then adjust the pattern.
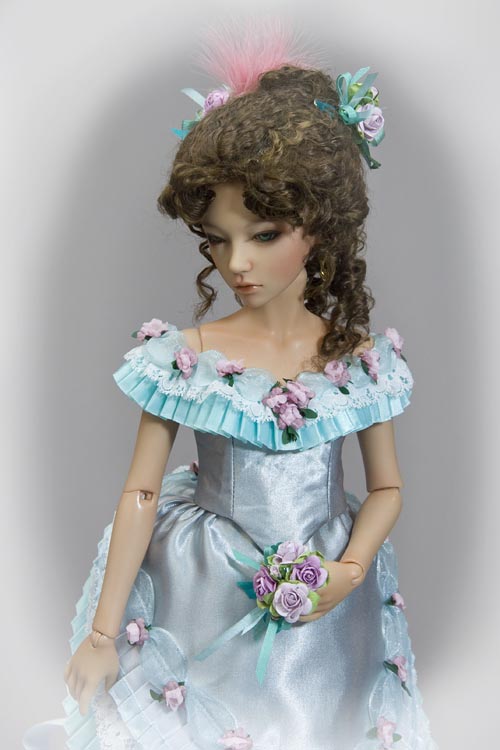
Now to make the proper bodice, and then figure out the trim for the neckline. The dress will have "off-the-shoulder sleeves" which won't actually be "sleeves", just a ribbon strip onto which the trims will be sewn. The challenge will be in keeping the neckline embellishment from getting too wide.
Finished
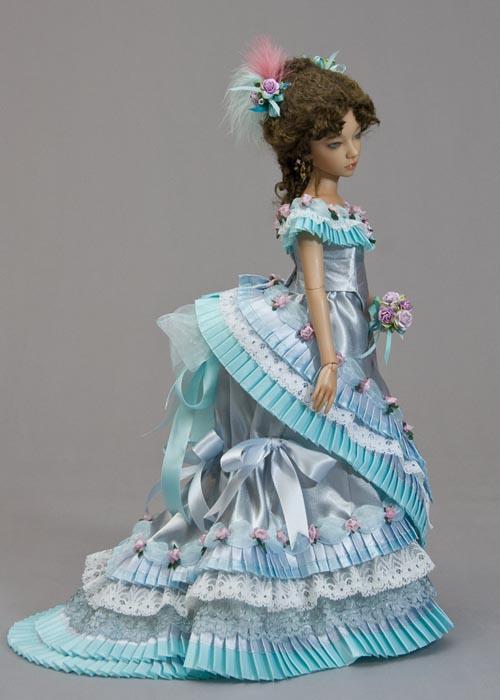
I'm finished the minty-gray gown. I had to re-baste the pleats on the front overskirt as they were flaring out too much.
I'm very pleased with the overal look.
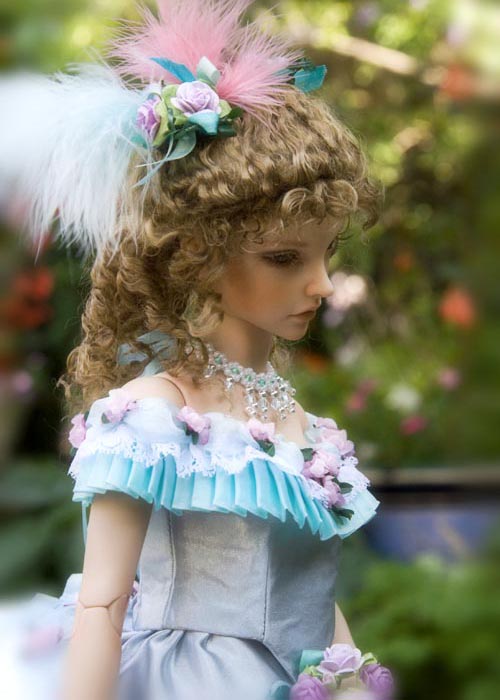
I wet and set Asa's wig into tiny curlers to tame her upswept hairdo so it's more suitable for going to a ball.
It's now much neater and period-appropriate.
Thought I'd post a photo of Isar in the minty-gray ensemble. I made her a light brown upswept wig, and made a necklace to fill the empty neckline. Isar has the large bust, which is a little bigger than Asa's small bust, so the bodice won't do up properly - but it's okay for a few photos.
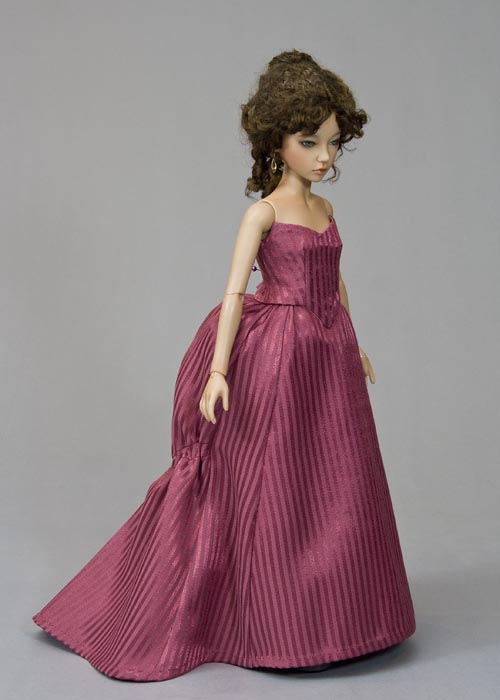
the Wine Red Gown
The main under-skirt and the bodice of the dusty wine Victorian gown have now been sewn. This fabric is a lot harder to work with. It slips and slides all over the place, and it frays a lot. Plus it has to be pressed with a damp cloth.
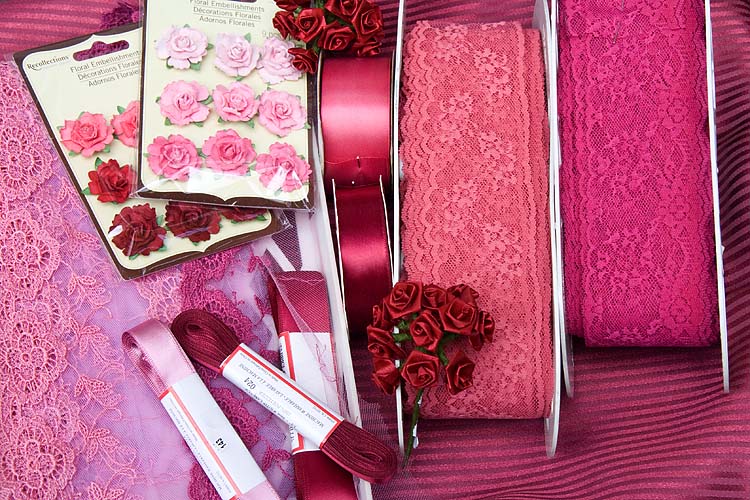
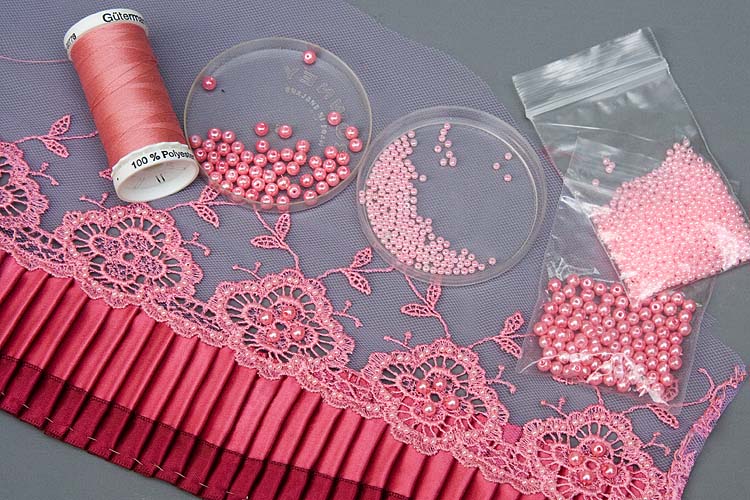
Now it's time to start embellishing. I've pulled out several different laces and ribbons. I don't know at this point which ones will get used and which ones won't - I know which ones I'd like to use, but it all depends on if the colour and motifs work. First I'll make a row of pleated ribbon for the bottom edge, and then I can decide on laces.
This gown will be very different from the minty-gray one. For this dusty wine one I'm planning two over-skirts - one which is a train, and the second, a pouffy over-skirt. This gown will have far less flowers - bigger ones. I bought some lovely mulberry paper roses at Michael's that I'm hoping will work.
The first gown came together right away, but the dusty wine one is proving a struggle. It's not as simple as just remaking the first gown in different colours, as it's impossible to get similar sized trims, so I had to come up with a totally different embellishment plan. After considerable thinking, draping, pinning, looking, changing things around, thinking some more, I finally decided on a direction to go. I had drawn up a pattern for a separate train, and even made one out of test fabric. But the trims are all too wide to embellish the edges of a train, so I've dropped that idea. This gown is going to be "lacier". Here is where I'm at so far......
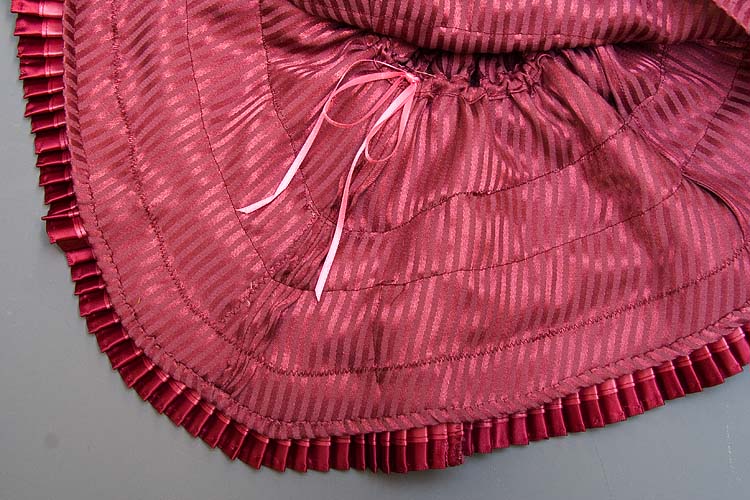
Inside view of the main skirt....because curious minds wanted to see.....
I've decided that the overskirt will be just sheer lace with a pleated edge. Problem is it looked
too plain for my taste, so I decided to "fancy it up" and bead the lace.
Of course that means I also have to go back and bead all that lace around the under-skirt too. That's going to be a BIG job! I wish I'd know I was going to do this before I sewed that lace onto the skirt - it would have been so much easier to bead then.
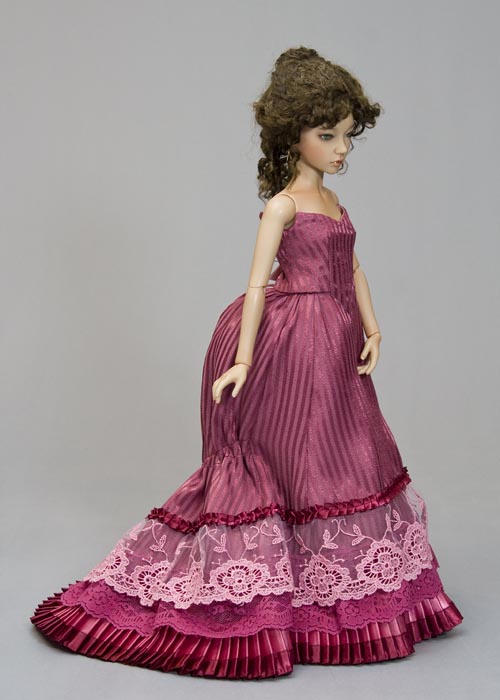
The beading was a big job, although it didn't take quite as long as I thought it might. It looks amazing - much nicer in real than in the photo. The beading adds a definite element of elegance, as does the sheer netting of the over-skirt.
I've sewn on the pleated wine ribbon around the neckline - it's not as dark in real life, especially not the bodice fabric. Now to finish off the neckline. I can't use the same pink lace at the neckline because it's way too large a scale, so will make a gathered ruche of the old rose tulle, and add decorative beading. Also, maybe a flower in the center front. Then I have to finish the back with ribbons and possibly some larger flowers below the bustle. Unlike the minty-gray gown where I knew what I was doing from the start, this gown has a mind of it's own, and the biggest challenge is trying to figure out what it wants.
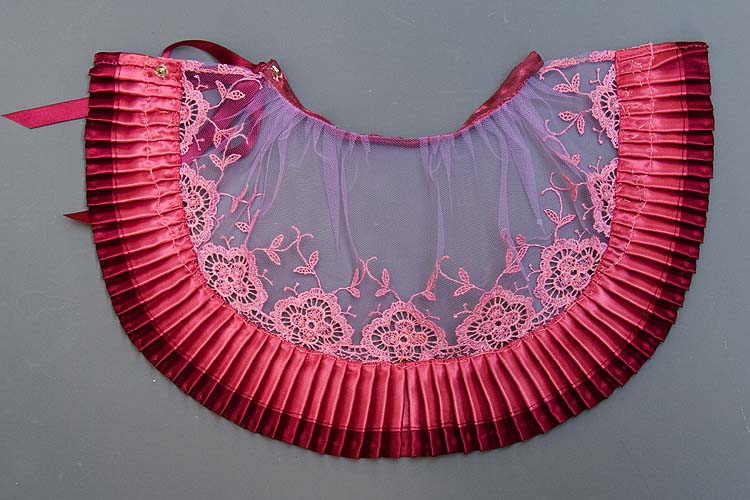
Back view of the over-skirt.....
Back to Square One...
I was halfway through sewing on the ruched tulle last night, when I decided it just wasn't working. There was something missing. I had the pale dusty rose tulle, and the dark wine pleated ribbon, but there was no medium pink to tie into the pleating on the skirt. I would have liked to have used the medium pink ribbon with a narrower wine red on the edge, but I only had the medium pink in one very wide width. Maybe I could figure out a way to make the medium pink ribbon narrower. So, off came the ruching, and off came the pleated wine ribbon.
So, this morning I drew a pen line 7/8" from the edge of the entire wide pink ribbon, cut the ribbon down, Fray Checked the edge. After it had dried I zig-zagged the Fray Checked edge, and sewed a narrow wine red ribbon over it. So now I'm right back where I started yesterday morning, but this time it should hopefully work out better.
Like I said - this dress has a mind of it's own, and sometimes it doesn't tell me what it wants until after I've done something wrong.
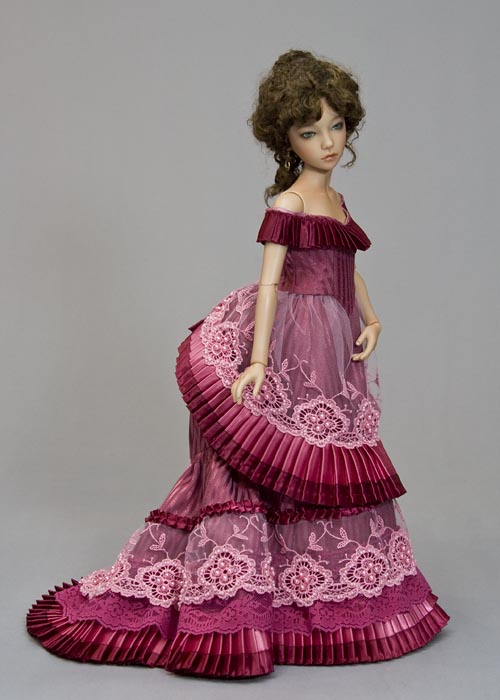
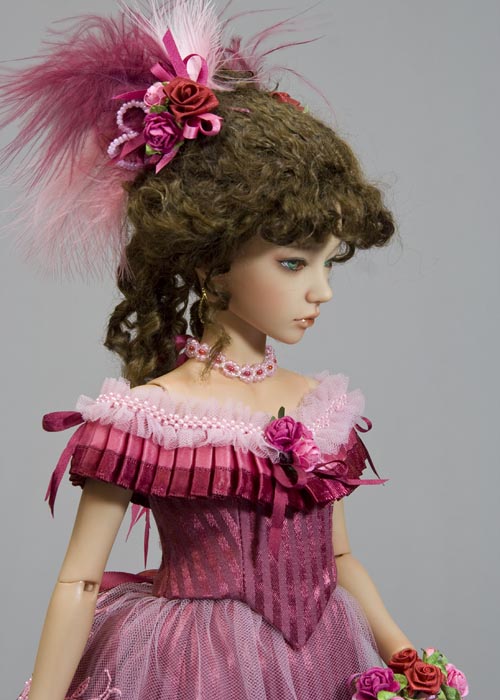
Another Victorian Ballgown Done!
Yesterday I reworked and finished the bodice. It looks so much better now. I also made a small choker necklace that ties in back with silk ribbons. All the ornaments in her hair are separate so they can be inserted to create whatever look I want.
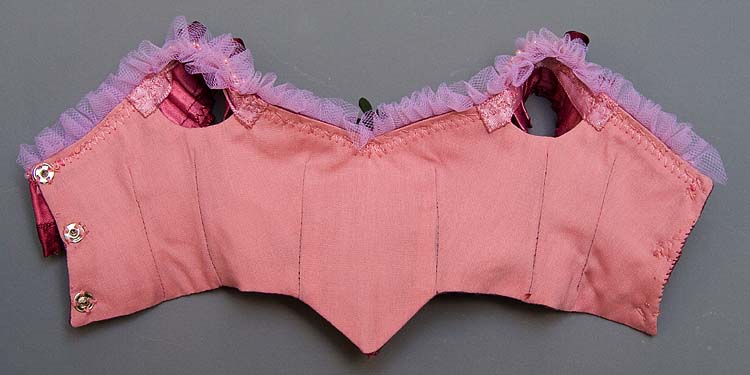
Inside view of the finished bodice...
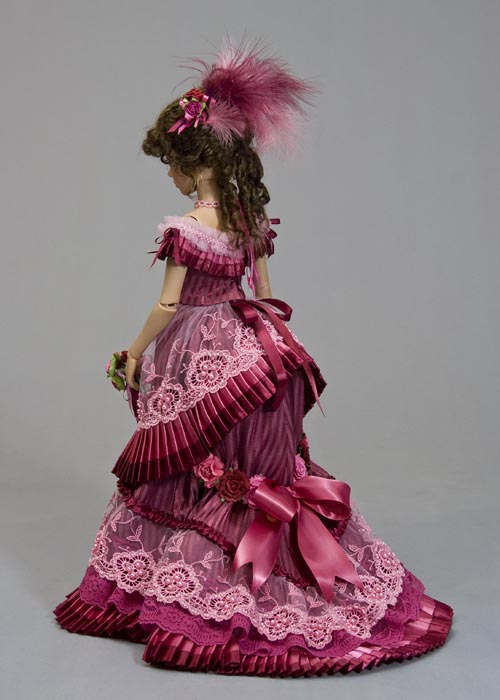
I also added the final embellishments - bows and flowers - to the back of the skirts.
I'm very pleased with how this dress turned out. Of course it helps that red and pink are my favourite colours.
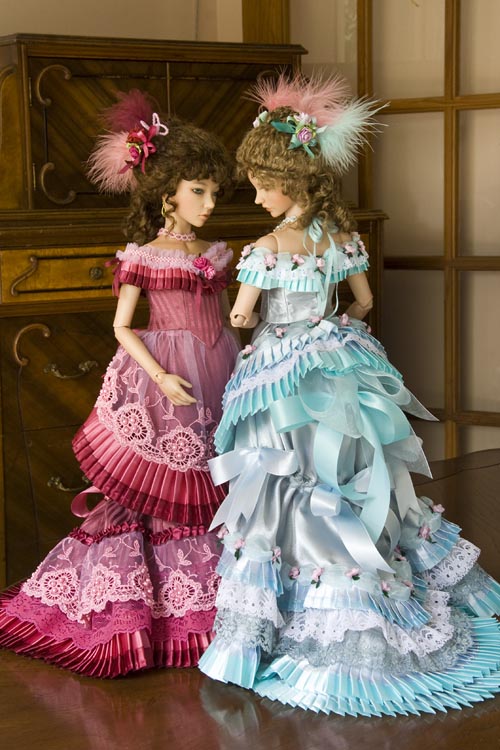
It looks amazing on Asa. Now to take some more photos....including some of both my Victorian girls together.
*To see all the photos of the two ladies together, just click on the photo above.
Источник